
Information of use to motorhome owners who perform their own diesel chassis maintenance, as well as those who take their vehicle to a service center.
By Mark Quasius, F333630
December 2018
Diesel-powered motorhomes and the chassis on which they are built have become increasingly sophisticated, making it harder for backyard mechanics to perform the required service and maintenance. Yet, many basic tasks remain the same. Often, they boil down to lubrication.
What follows is intended to help owners who perform basic service on their motorhome, as well as those who have the work done at a service center. For owners in the latter category, it’s important to have a good understanding of the work that is required, because areas that are ignored or forgotten eventually will result in costly repairs. Do-it-yourselfers, on the other hand, will reap substantial savings by avoiding labor charges, not to mention the satisfaction of performing the work themselves.
First, a few caveats. Only those with the proper tools and the appropriate level of experience and expertise should do service work on an RV; otherwise, the job is best left to professionals. It’s also important to remember that service recommendations vary by chassis manufacturer; there’s no one-size-fits-all.
Getting Started On Diesel Chassis Maintenance
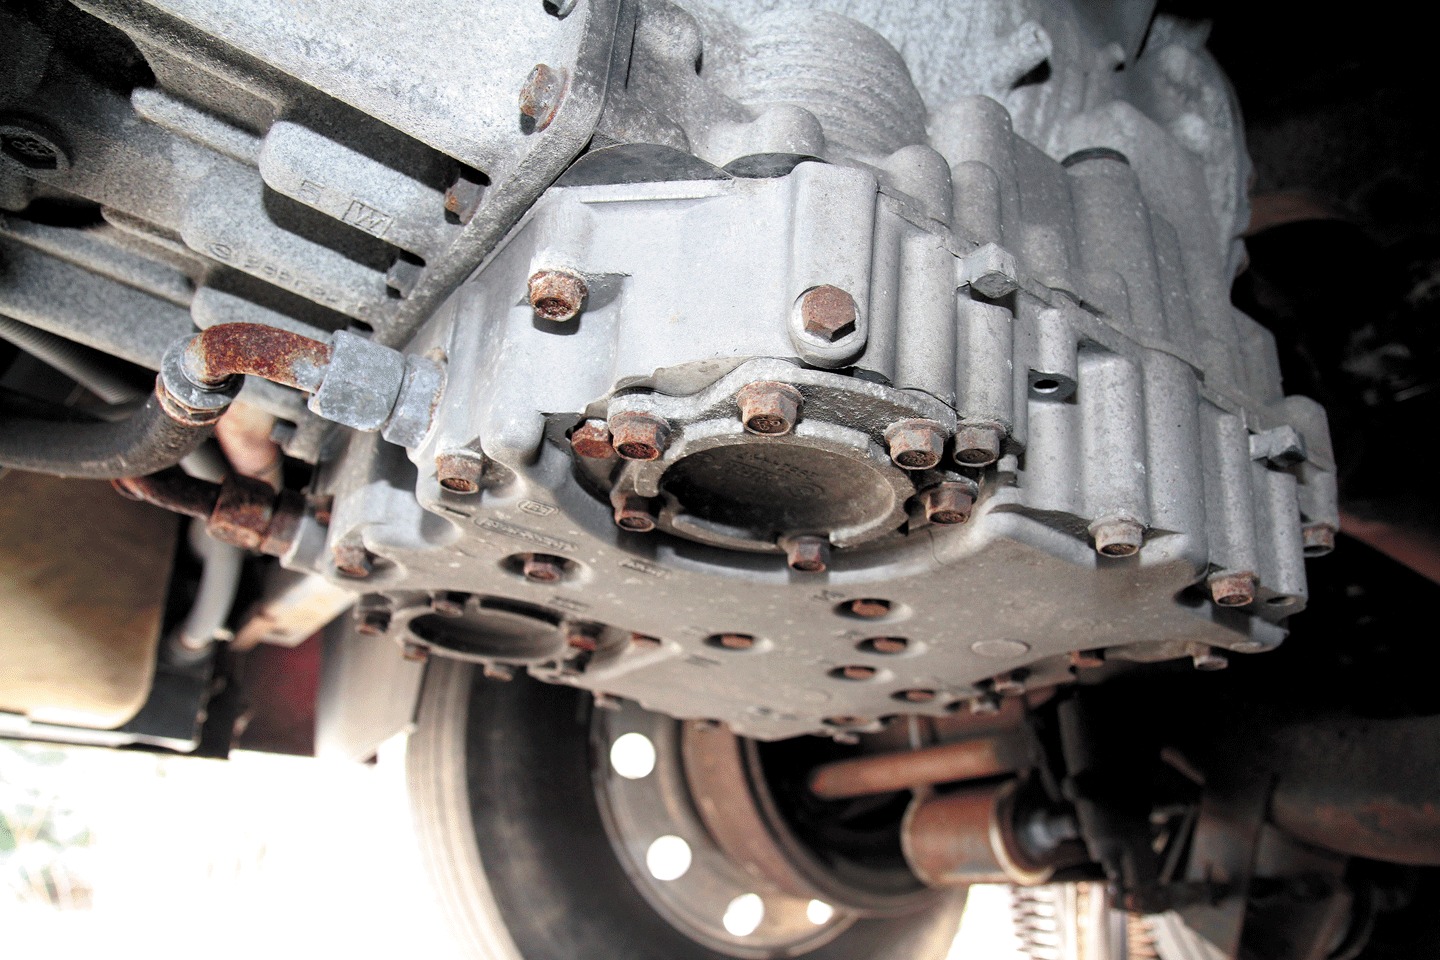
On this Allison 3000 Series transmission, the transmission filters are behind two access plates in the transmission’s oil pan.
Those who perform their own service on a diesel motorhome may have to upgrade their tool kits, but when factoring in labor cost savings, you’ll still be ahead. Larger oil filter wrenches and traditional wrenches may be needed. The oil drain pan you use for your car won’t be big enough either, so you may want some 5-gallon buckets with screw-on lids for hauling the old oil to a recycling center. Also, be sure you have a set of heavy-duty jack stands that will support the motorhome. When you are underneath it, do not trust the leveling jacks.
Begin by collecting information about your motorhome’s chassis. The chassis manufacturer’s owners manual or service manual will include information about maintenance needs and intervals. Typical service intervals are based on time or mileage, whichever comes first. Additional information can be obtained through online searches for service tips, filter part numbers, etc. In addition, most motorhome brands have online forums where you can ask questions and obtain information from other owners. When in doubt, call the manufacturer.
You’ll also need a place to do the work. If you travel for extended periods, this can be a problem, because many campgrounds do not allow service work to be done on an RV that is parked in a campsite. Unless you have a garage big enough for a motorhome, you’ll probably need to choose a nice day to do the work in your driveway. Spread a plastic tarp under the engine to catch oil spills.
Engine Oil
An engine will function better and last longer if its oil is changed according to the recommended service schedule. First, run the engine to warm it. This heats the oil so that it flows better; even more important, contaminants in the crankcase are held in suspension so they exit with the draining oil rather than settle in the bottom of the oil pan.
Before you begin, verify how much oil is required and make sure you have the proper size drain pan or bucket to hold the old oil. Adding a Fumoto engine oil drain valve will help. The quarter-turn valve replaces the drain plug and allows you to stop the oil flow midway through the process so you can change buckets without making a mess. My previous Cummins 400 ISL engine held 28 quarts of oil, so I used two 5-gallon buckets with screw-on gasketed lids. When one bucket was close to full, I shut off the valve, swapped buckets, and reopened the valve to finish the drain. My current 600-horsepower ISX engine holds 50 quarts, so I got a few more buckets.
Of course, every oil change should be accompanied by an oil filter change. Diesel engine oil filters are larger in diameter and must be removed with an appropriately sized filter wrench, which can be purchased at auto parts stores or online retailers. Most manufacturers — Caterpillar is an exception — recommend prefilling the filter so that you’ll have oil pressure immediately upon startup. (Cummins Filtration shows this in pictographs right on its filters.) Wipe a little oil onto the filter gasket to prevent it from binding when you tighten the filter. Filters should be tightened only by hand.
Finally, add the amount of oil called for by the factory specifications. Run the engine for a while to check for leaks, especially at the filter. Shut off the engine, allow the oil to settle into the pan for a few minutes (so the oil level won’t falsely appear to be low), and check the oil level via the dipstick. If you have added the correct amount of oil but the dipstick shows otherwise, you may need to have it checked for accuracy. Overfilling can cause the oil to foam and create problems with the crankcase breather system.
Fuel Systems
Diesel engine fuel systems are complex and have extremely tight tolerances. Any water in the fuel — or, in particular, small bits of dirt — can damage the injection pump or fuel injectors, so paying attention to the fuel filters is paramount.
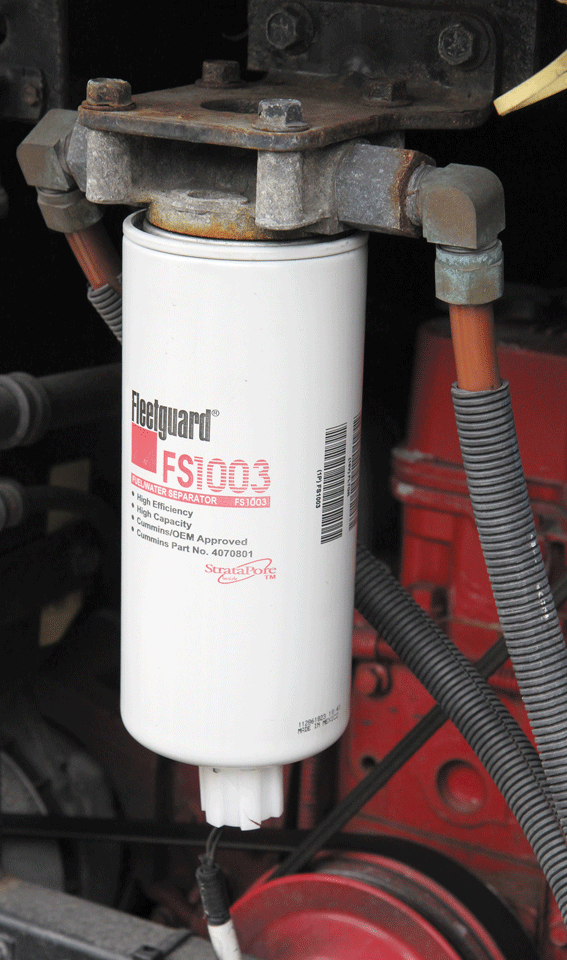
The primary fuel filter element may contain a water-in-fuel sensor, which must be disconnected before removal.
Most diesel engines utilize two stages of fuel filtration. The primary fuel filter performs initial filtration and also serves as a water separator. Many of these filters have sediment bowls or at least a drain petcock on the bottom, as well as a water sensor that communicates with the coach electronics to display a warning on the cockpit’s instrument panel. The petcock can be opened to drain moisture from the filter. Water settles to the bottom, but be sure the engine is stopped and has been allowed to rest for a couple of minutes before draining moisture from the fuel.
The secondary filter removes smaller particles than the primary filter. This is the last line of defense for the injection pump.
Diesel systems require a continuous fuel supply, so if you run the system dry, it will become air locked and you’ll have to bleed the air out of the system. The same holds true when you change fuel filters, so you have two options. One is to prefill the fuel filters with fresh diesel fuel before installing them. If you do this, make sure you are using clean containers; any dirt that enters the filter can be harmful if it gets into the injection pump. The second option is to prime the system to bleed out the air. Check the owners manual for the correct procedure. Some engines require operation of a manual primer pump; others, such as Cummins, allow activation of the electric fuel lift pump by turning the key on and off for 30-second intervals a number of times to purge air from the system.
Some owners prefer to prefill the primary filter only, because the secondary filter traps particles that enter the system, and then they use the primer pump to bleed the air from the secondary system. I prefer to do one filter at a time, running the engine in between to minimize the chance of getting a major air lock. For the exact procedure to bleed the fuel system on your engine, refer to the owners manual.
Air Filters
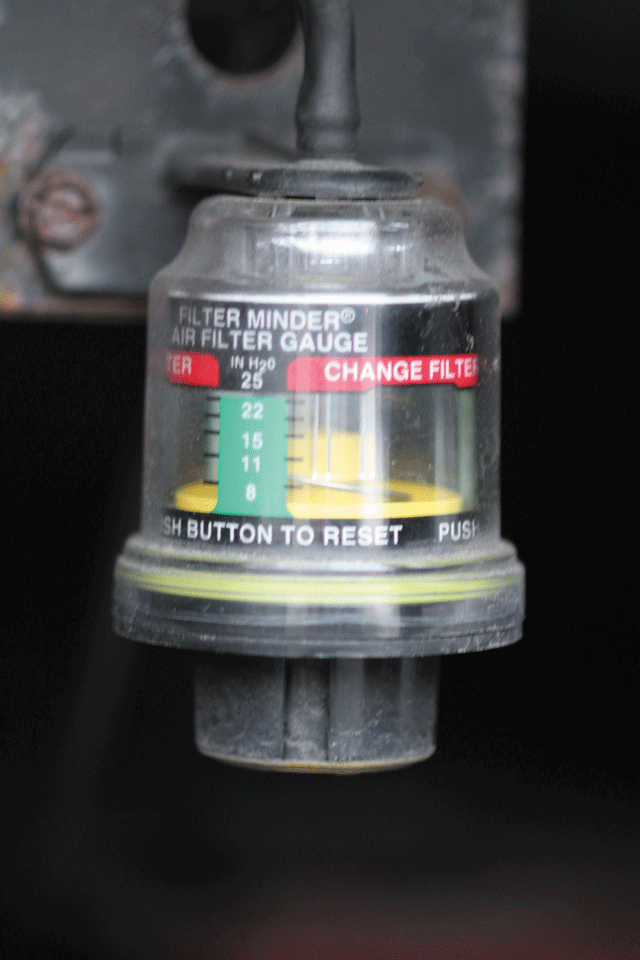
Engines need air as well as fuel in order to operate. Cummins literature states that just one tablespoon of dirt can ruin an engine, so obviously air filtration is important. Air filters eventually wear out from age or from becoming saturated with dirt, restricting airflow. If the engine control module (ECM) determines there’s not enough air entering the engine, it reduces the fuel flow accordingly to provide for the proper air-to-fuel ratio. That reduces the power output, so there’s a point when a dirty filter must be replaced.
Most air-intake systems are equipped with a filter-restriction indicator, which shows the inches of vacuum created by the air filter. Most filters are designed to be replaced when 15 inches of vacuum are present. This is measured from the baseline of a fresh filter, so if a fresh filter has 6 inches of vacuum, it should be replaced when the indicator reaches 21 inches of vacuum.
When replacing the filter for the first time, run the engine at high rpm and turbo boost for a while and then observe the indicator to get a baseline reading. Make a note of it so you know your motorhome’s limit. While you’re at it, check the intake piping for loose clamps, cracks, or other defects. The inlet piping after the turbocharger is under pressure; any leaks will reduce engine performance.
The second criteria is age. If paper elements become damp or old, they can fail and allow particles to pass through and damage the engine. Most filters should be replaced every three years, regardless of how plugged up they are, to ensure that the filter material won’t fail.
Cooling Systems
Cooling systems remove heat from the engine via coolant flow and airflow. Radiators must have clean cores to allow the flow of coolant. Also, the radiator and the charge air cooler (CAC) must be clean externally. When radiator fins plug up, coolant cannot transfer heat to the air, and the engine overheats. Rear radiators, because of their location, can be more prone to gunking up than side radiators. Road dirt and oil fumes tend to congregate in the radiator fins.
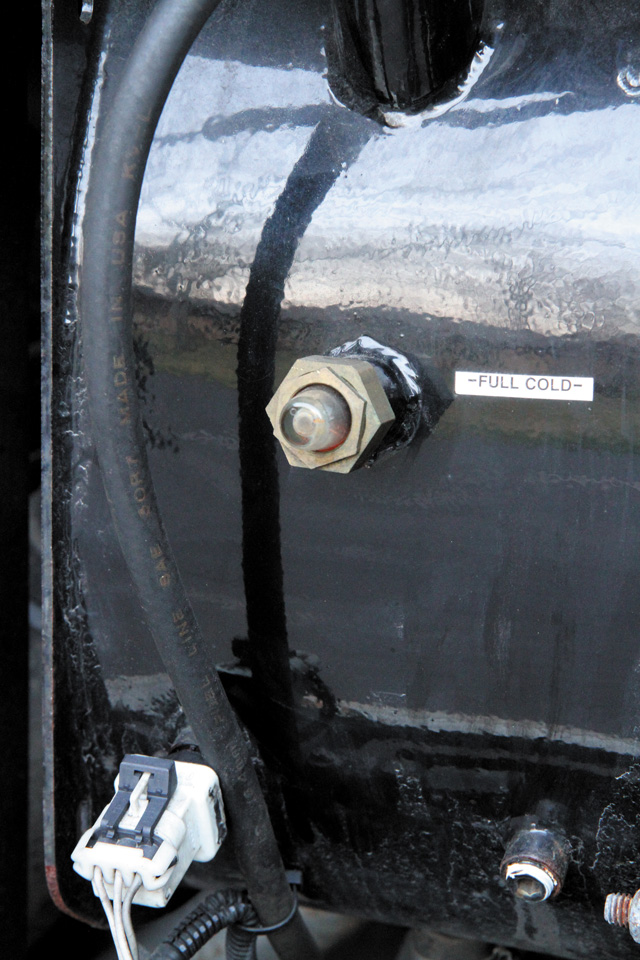
To check the coolant level, use the sight glass in the coolant surge tank.
When cleaning the radiator and CAC, be sure to use a product that is safe for aluminum, such as Extreme Simple Green.
Unfortunately, the cleaning must be done on the inside surface of the radiator. If it’s a rear radiator, you’ll have to reach that area through the bedroom floor’s engine access cover.
The coolant must be replaced according to its specified schedule. If it’s a heavy-duty coolant precharged with supplemental coolant additives (SCAs), use test strips to determine whether the proper level of protection is present or whether contaminants exist. If you are using the newer organic acid technology (OAT) coolant, there’s no need to worry about SCAs.
Finally, belts and hoses should be checked. Belts may need to be adjusted. Most belts have automatic tensioners, which should be inspected when the belts are changed. On some engines, a separate belt for the water pump is on a manual adjuster, not an automatic one. It’s especially important to look at the inside of belts for signs of cracking. Inspect hoses, which get hard and crack over time, and consider replacing them after five to six years, ideally when you change the coolant. You might want to consider replacing the thermostat at this time as well. Also look for loose hose clamps. Even constant-tension clamps can loosen over time, so a quick twist with a nut driver will prevent future problems.
Transmissions
Transmission fluid lubricates and cools the transmission, and it transfers power through the torque converter. Refer to your service schedule to determine when the transmission fluid and filters should be changed. For Allison 3000 Series and 4000 Series transmissions, Allison filter kits come with filters, gaskets, and instructions; all you need is an inch-pound torque wrench and metric sockets.
Allison provides two schedules. One is for standard Dexron automatic transmission fluid (ATF), while the other is for synthetic ATF meeting Allison’s TES 295 specifications, such as Allison’s TranSynd fluid. Fluids and filters meeting TES 295 qualify for extended service intervals, so using TranSynd offers significant benefits. When changing transmission fluid, be sure to wipe any deposits from the magnetic drain plug before reinstalling it.
Brakes
Air drum brakes typically are equipped with automatic slack adjusters that maintain the correct adjustment on the brake shoes. However, if they fail to self-adjust, you may need to adjust them manually. Do this by parking the motorhome on a level surface, chocking the wheels, and releasing the brakes. Then set each slack adjuster so that there is one inch of free play when you pull on it.
For a motorhome with hydraulic brakes, the procedures aren’t that much different from those associated with any small vehicle. Motorhome brakes, however, are subject to fade after heavy use, because of the weight of the vehicle. Brake fluid is hygroscopic, which means it absorbs water. When the brakes become hot, water in the system can turn to steam and create a spongy brake pedal. The result can be a catastrophic loss of braking ability. Motorhome brake fluid should be bled and changed every three years to ensure that it is clean and free of water or contaminants.
Disc brakes with sliding calipers tend to freeze up over time, especially on a vehicle that isn’t driven that often. Inspect them and lubricate the slides to ensure that the calipers slide freely and do not bind. Sticky calipers can drag, cause damage to brake rotors, and affect stopping ability. The calipers must be cleaned and lubricated with brake caliper lubricant, available at most auto parts stores.
Drum air brakes utilize an “S” cam to expand the shoes against the drum. These brakes also must be cleaned and lubricated regularly. If they stick, usually you hear a thump when applying the service brakes or the park brake. If this is allowed to continue, the shoes can eventually freeze up in the applied position, making it impossible to release the brakes.
Air System
A motorhome with air brakes or air-ride suspension is equipped with an air supply system. It consists of an engine-driven air compressor, various air tanks, an air dryer, and numerous valves and hoses. The brake diaphragms are made of rubber, and the valves have rubber seals in them, so it’s important to provide clean air with no oil in it so as to prevent swelling of the rubber components. The air also needs to be dry, because moisture can freeze up brake lines and components in winter, rendering the brakes inoperable. An air compressor tends to add a bit of oil to the air during normal operation, and any moisture in the incoming air also will pass through the system. When mixed with the oil fumes, this forms a slimy mess that can damage the rubber products in a motorhome’s air system.
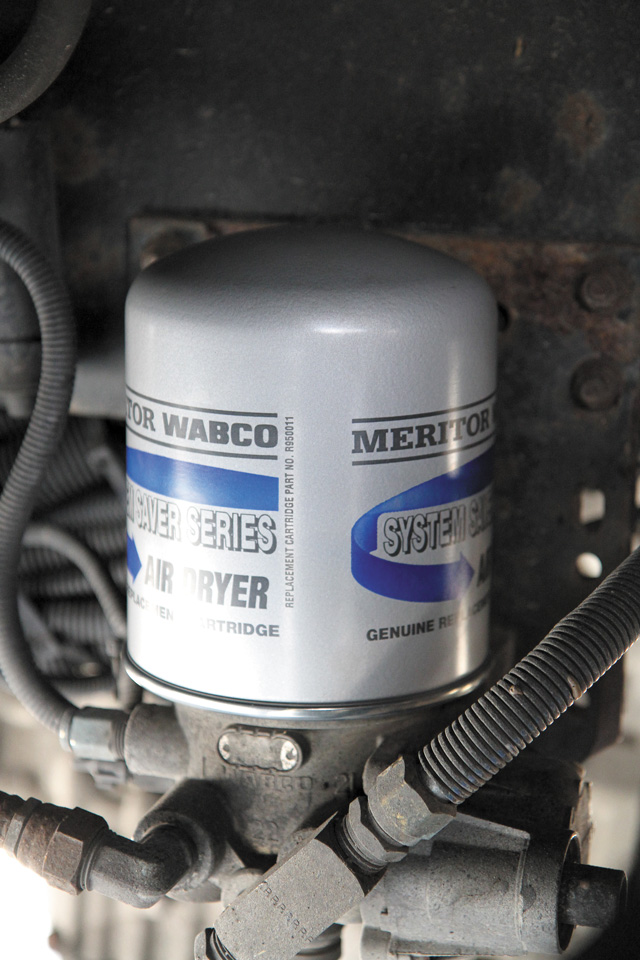
The air dryer’s filter, or desiccant cartridge, is designed to last three years, on average.
To combat this, in most motorhomes an air dryer is installed directly after the air compressor. The dryer removes moisture and oil from the air, ejecting it through the dryer’s drain port. A coalescing filter element removes oil or moisture that has made it that far and passes the dry air to the air tanks, where it is made available to the brakes and suspension components. The air dryer’s filter, or desiccant cartridge, is designed to last three years, but that’s just an estimate based on average use. Its life will vary depending on how much air and moisture pass through. The filter will have to be replaced sooner if the RV is operated frequently in warm, humid areas, as opposed to one running in dry desert conditions.
Once the air dryer’s desiccant cartridge is no longer capable of filtering out moisture, that moisture goes to the air tanks. Thus, it’s important to drain those tanks regularly. When you pull the drain lanyards, normally you hear the air blast out but you don’t see much more than a slight mist exiting the valve. But when a fair amount of moisture spits out, it indicates that the desiccant cartridge has failed and it’s time to service the air dryer. It’s not hard to do, but you need a large strap wrench to unscrew the filter. Before removing the filter, drain the tanks to bleed the system. Performing regular air tank drains might feel like a useless task, so think of it as testing the tanks for moisture, which is important to do.
Suspension And Driveline
A motorhome’s front-end suspension and driveshaft have a number of fittings that regularly require fresh grease, as does a drum brake system. The fittings can be hard to find, so check the owners manual for their exact locations. Use a quality grease, preferably with a moly additive. Pump it in until you see the old grease exit, and then wipe off any excess with a rag or paper towel. This ensures that water and contaminants have been flushed out of the cavity.
Solid front axles have kingpins where the steering knuckles are attached. Check the recommendations of the axle manufacturer; some manufacturers say to grease the kingpin bushings with the wheels on the ground, while others recommend jacking up the axle to remove the weight from the wheel. Driveshaft universal joints on larger motorhomes may have two grease zerks per joint; you can grease just one, but I recommend greasing both. If you have access to only one fitting, be sure to pump grease until it exits each of the four caps, then wipe off the excess.
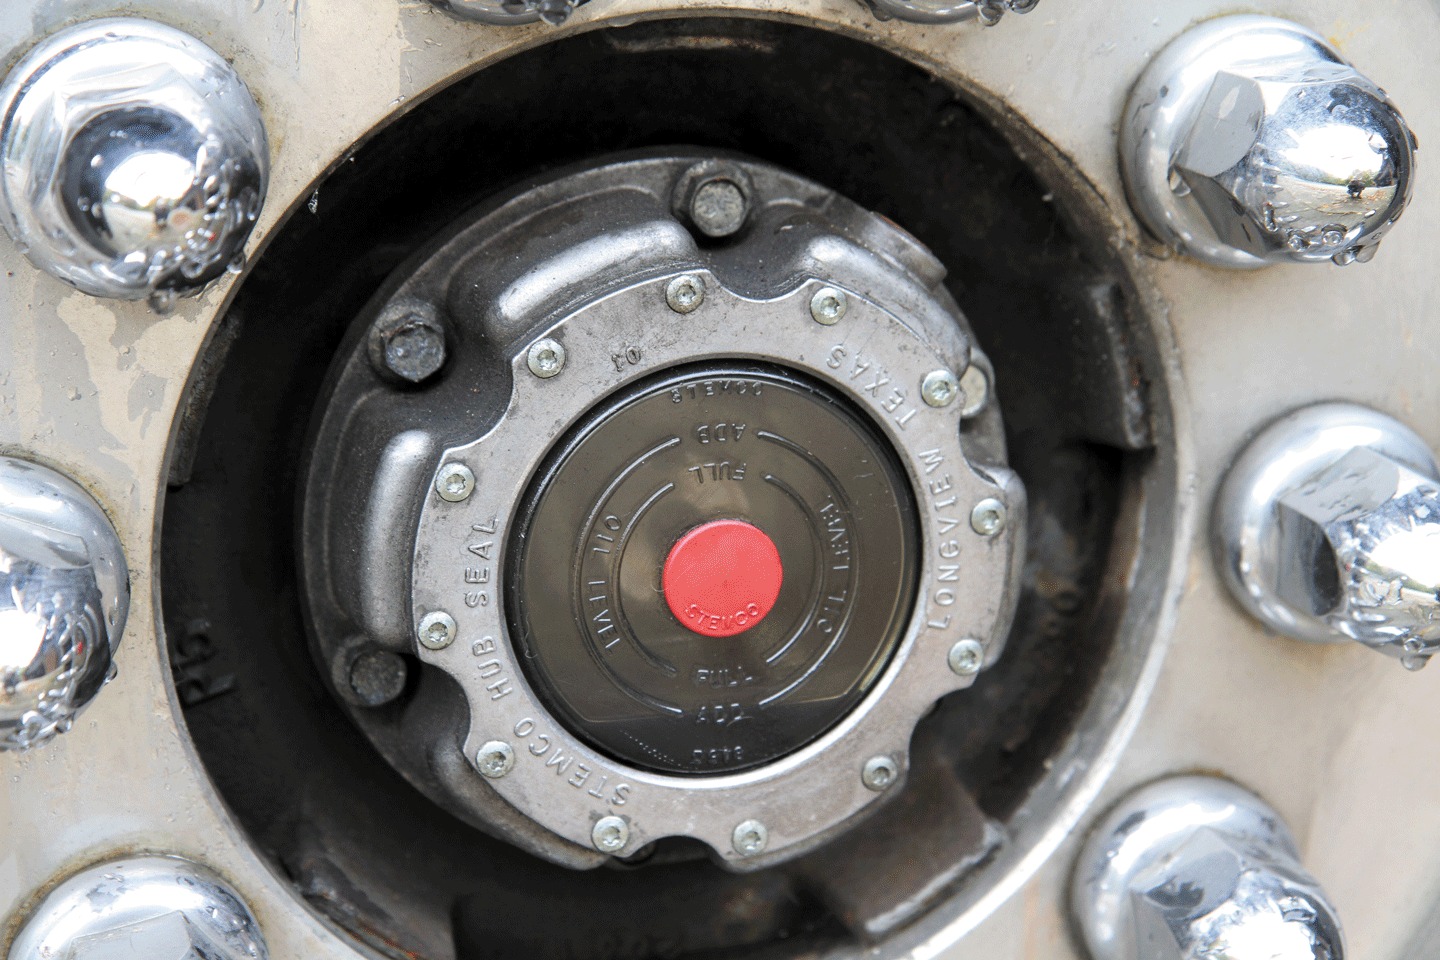
The clear plastic lens of a Stemco hub cover allows inspection of the wheel bearings’ gear lube level.
Many diesel pushers have oil bath wheel bearings on the front axle as well as the tag axle, if so equipped. Gear lube flows easier than grease and does a better job of lubricating those bearings. The gear lube level is inspected via a Stemco hub cap, which has a clear plastic lens with molded rings that mark the full and add levels. A rubber plug in the center can be removed to facilitate adding more gear lube. The level should remain constant; if it drops, it’s likely a leak exists somewhere. Check the rear of the tire and wheel rim. If the wheel seal has been leaking, you should see evidence of splatter on the backside of the tire. Have the seal replaced and the bearings inspected. If the leak is on the outside of the tire, the gasket on the Stemco hub seal may need to be replaced. Sometimes, though, it’s just a matter of tightening loose screws that hold the ring over the sight glass.
When it’s time to change the gear lube, the old lube must be removed from the wheel hub cavity. Removing the drain plug and rotating the wheel to the bottom won’t get all of the old lube out of the hub. It’s best to remove the hub cap and suck out the old gear lube from the cavity, then replace the gasket and reinstall the hub cover. I use a sealant such as Permatex Ultra Black on the gasket to prevent future leaks. If not all of the gear lube can be removed, I would perform the service more often to compensate for the partial lubricant changes.
Tires
Before hitting the road each day, check the tire pressures and quickly inspect for defects. When servicing the RV, carefully inspect the tires for sidewall cracking or anomalies in the tread, such as rivering or scalloping, as well as tread depth. If such problems appear, it’s probably time to have the RV’s alignment checked. The sun’s ultraviolet rays will damage tires over time, so tire covers will help extend their life. A good tire pressure monitoring system is a wise investment.
For a detailed discussion of how to determine the correct air pressure for your RV tires, see “Maximizing RV Tire Life” (April 2017, page 50).
Batteries
Unlike flooded house batteries, most chassis batteries are sealed, so there’s no need to check electrolyte levels or add water. But the connections can corrode, so you should inspect them, clean the dirty connections, and apply a battery terminal sealant.
If you take time to properly maintain your diesel-powered motorhome, you’ll save money and be rewarded further with peace of mind during your travels.