
How one RVer outfitted Jeep’s new pickup truck for four-wheels-down towing.
By Mark Quasius, F333630
June 2020
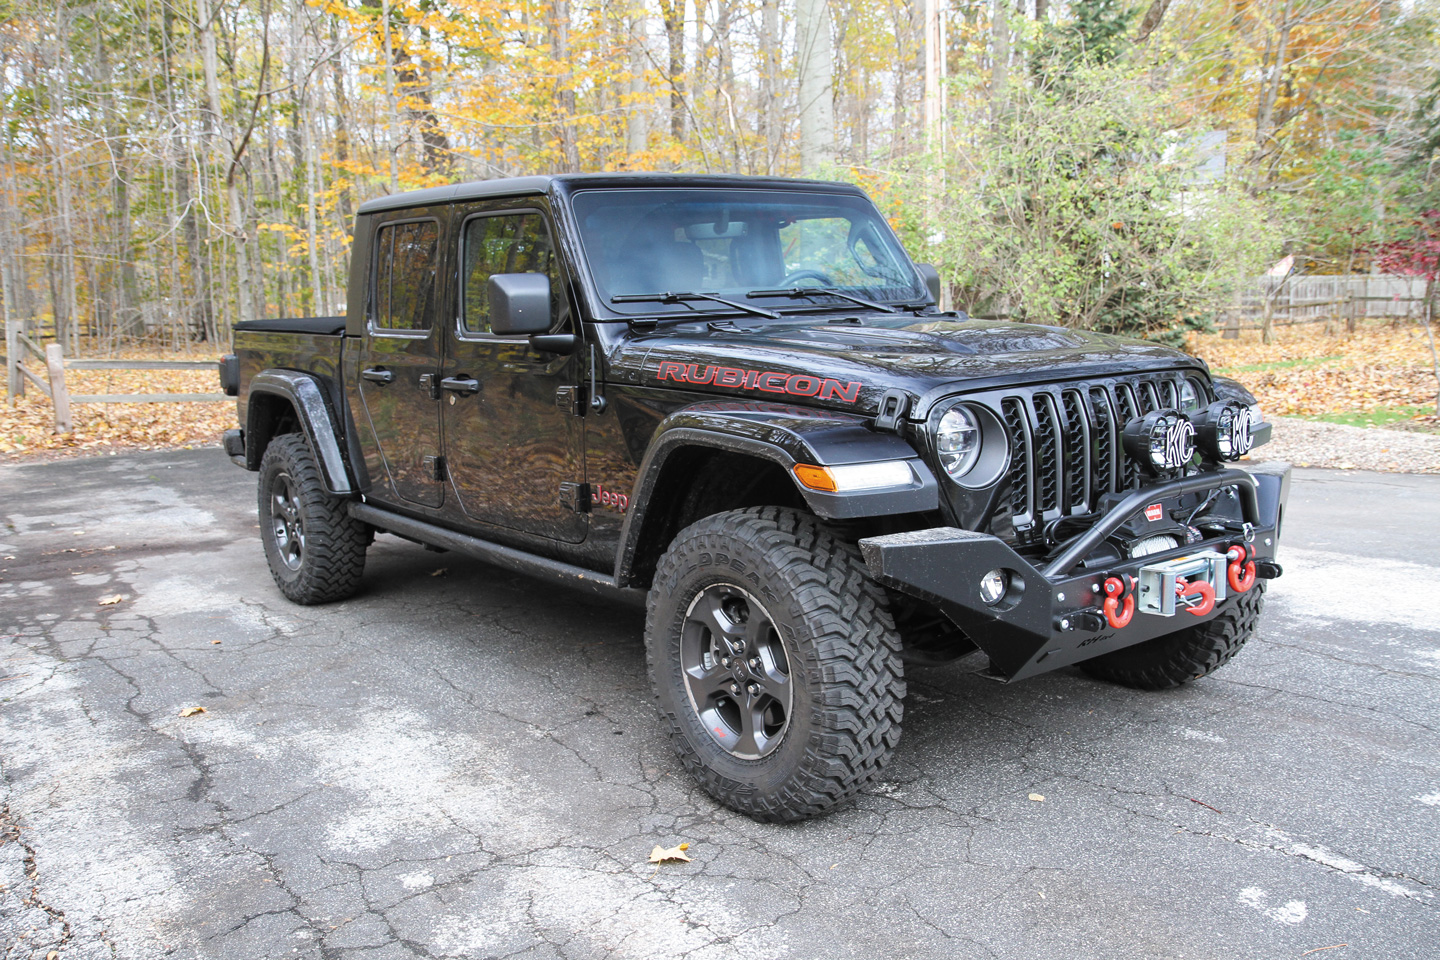
Look around at almost any RV campground where motorhomes are parked, and you’ll likely conclude that the Jeep Wrangler is a popular towed vehicle. No longer just the rough-and-tumble, go-anywhere Jeep that helped propel our soldiers to victory in World War II, today’s Wrangler offers comfort, style, and utility as well as legendary off-road prowess. “Jeepers” have been clamoring for a pickup truck version of the Wrangler for years, and Jeep has responded with the 2020 Gladiator.

The factory-installed plastic bumper was not suitable for heavy off-road driving.
The curb weight for the Gladiator base model is 4,650 pounds, making it the heaviest flat-towable Jeep. (The 2020 Grand Cherokee weighs in at 4,625 pounds, while the four-door Wrangler is 4,167 pounds.) The Gladiator has a slightly longer wheelbase than the four-door Wrangler and a completely redesigned five-link rear suspension.
But from the front seats forward, everything is 90 percent the same as the Wrangler, and the vehicles look virtually identical when viewed from the front. The result is a midsized pickup truck with a 5-foot bed and all the comforts and off-road capabilities of the latest Wranglers. One notable change is a towing capacity of 7,650 pounds, a substantial increase over Wrangler’s 3,500-pound rating.
Towing Considerations

The factory-installed bumper was removed to make way for a Rock Hard 4×4 steel bumper.
Like the Wrangler, the Gladiator is an excellent choice for flat towing behind a motorhome. I’ve been flat towing Wranglers for years, and although I had two that were set up for towing, I needed a midsize pickup for occasional hauling tasks. When the Gladiator was announced, I quickly ordered one. Once it arrived, I set it up for flat towing.
It should be noted that the latest Wrangler is the JL series, which replaced the JK series late in the 2018 model year. For flat towing purposes, the equipment I added to my Gladiator would be identical to the equipment for a Wrangler JL. Therefore, generally speaking, the information in this article applies to both a Gladiator and a Wrangler JL. I’ll point out any differences as I proceed.
Towing Connections
Typically, a vehicle that will be flat towed requires a baseplate, which connects the vehicle to a motorhome-mounted tow bar. Baseplates are available from the major tow bar manufacturers, such as Blue Ox, Demco, and Roadmaster.
The steel bumper was machined to accept the original fog lamps.
However, if you do any serious off-roading, baseplates can get in the way. They are mounted fairly low beneath the front bumper, and they can sustain damage from rocks. I encountered that situation with a 2004 TJ series Jeep.
So, when I upgraded to the 2012 Wrangler JK, I selected a steel bumper with optional tow bar brackets from Rock Hard 4×4. The brackets mount to the bumper and allow me to connect my Blue Ox tow bar directly to the bumper. The Rock Hard bumper provides excellent protection for off-road travel; in fact, when I couldn’t avoid hitting a deer while driving one of my JK Wranglers, no vehicle damage resulted.
Fog lamps were removed from the original bumper and installed on the steel bumper.
I connected the tow bar’s safety cables to the D-ring shackles on the bumper, and I added a lighting socket and auxiliary braking connection. This system worked well on my Wranglers, so when the Gladiator arrived, I ordered a new Rock Hard 4×4 bumper and tow tabs that are designed for the Wrangler JL or Gladiator.
Lighting Considerations
Flat towing requires that the towed vehicle have a lighting system that can be linked to the motorhome’s trailer lighting connection. Various methods can be used to accomplish this, and each has its pros and cons. In some cases, the taillight housing is large enough to add an extra set of bulbs that can be controlled by the motorhome’s lighting system. But modern taillight housings typically don’t have room for additional bulbs and sockets.
Another option is to utilize diodes to separate the motorhome lighting from the towed vehicle’s lighting circuits. The diodes prevent backfeeding into the vehicle’s onboard circuits during towing. But when the vehicle is not being towed, the vehicle’s lighting signals can pass through the diodes to the lights.
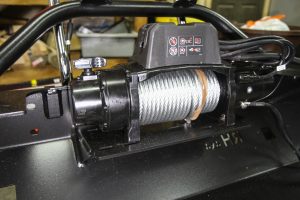
Once a hydraulic jack lifted the steel bumper into position, a Warn Industries winch was mounted to the bumper.
In many cases, however, diodes can cause a problem. An example: You slow a motorhome to make a left turn. The motorhome’s left turn signal is flashing and the right side is lit solid as you apply the brakes. If the towed vehicle has an auxiliary braking system that activates the brake pedal, the pedal sends brake-light signals to both brake lights, as it is designed to do. But, most turn signals share the same bulb filament with the brake lights, so the steady brake-light signal overrides the flashing left turn signal from the motorhome. The result: The towed vehicle’s two brake lights remain on, and other drivers are unaware that you are preparing to turn left. Note that this will not pose a problem if the auxiliary braking system is a type that does not activate the towed vehicle’s brake pedal, or if the vehicle has separate red brake lights and amber turn signals, but such conditions are not that common.
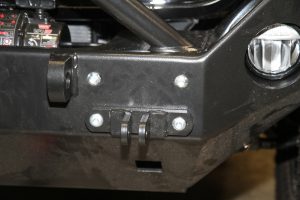
Tow bar brackets allow the tow bar to connect directly to the Rock Hard bumper.
A better solution is to completely isolate the RV lighting from the towed vehicle’s lighting circuits so that they cannot interfere with each other. This can be done with a four-pole double-throw switch that allows you to select between the vehicle’s lighting source and the motorhome’s connection. Kits are available from suppliers such as Cool Tech LLC, or you can make your own. Either method requires cutting into the existing lighting circuits to intercept the signals to the rear lights. You also must find a handy location in the driver’s area to mount the switch. One drawback: You have to remember to flip the switch every time you connect or disconnect from the motorhome. If you forget, you’ll be driving without rear lights on the towed vehicle, which is dangerous.
In the case of Jeep, there is a better alternative: the Mopar Tow Vehicle Wiring Harness. Two such parts are available. Mopar part 82211156AB fits Wrangler JK; Mopar part 82215382AB fits Wrangler JL. The harness plugs into the existing factory wiring connectors; no cutting or splicing is required. It uses solid-state relays that automatically switch between the two lighting sources so no manual switching is required. You plug the lighting cord from the motorhome into the socket on the towed vehicle. The Jeep lights automatically disconnect from the Jeep circuits and are connected to the motorhome lighting. When you disconnect from the motorhome, the lighting automatically reverts to the Jeep circuits. It does this by sensing the 12-volt battery power on the motorhome’s lighting connector to trigger the relays to make the switch.
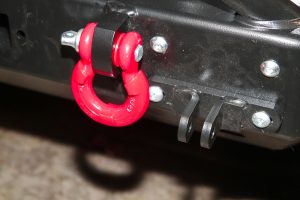
D-ring shackles serve as safety cable connection points and as a means to extract a stuck vehicle.
Unfortunately, Mopar has not yet made a lighting kit for the Gladiator. But the Gladiator and Wrangler JL use the same lighting, so I bought the Wrangler JL kit and lengthened it a bit to accommodate the Gladiator’s longer wheelbase.
Supplemental Braking
Many motorhome, chassis, and automobile manufacturers recommend that supplemental brakes be used on a towed vehicle. There are a number of options.
Portable units are available that rest on the vehicle’s floor and operate the brake pedal by sensing G-forces when the vehicle is stopping. I had such a system years ago, but I didn’t like having to set it up and calibrate it every time. Also, I had to remove it and find a place to store it when I disconnected the towed vehicle from the coach.
Holes were drilled in the bumper for the lighting socket and the supplemental braking system’s air hose connection.
Dedicated systems eliminate those hassles. And, our coach has air brakes, so I wanted a proportional system that operates the towed vehicle’s brakes in conjunction with the motorhome’s brake pedal. Examples of such systems include Demco’s Air Force One and M&G Engineering’s Original Brake System.
I used M&G’s system on three vehicles with excellent results, and I wanted to use it again. But the original M&G system mounts between the brake master cylinder and the power brake’s vacuum booster. That worked fine in our JK series Wranglers, because there was enough room to move the master cylinder forward to allow insertion of the M&G module. But that’s not possible in the JL series and the Gladiator, because the antilock braking system motor is mounted too close to the brake master cylinder.
Now, however, M&G offers its 2.0 Brake System, which eliminates the mounting problem. A pneumatic cylinder pulls on the brake pedal with a steel cable to apply the brakes. This is similar to the Air Force One system, but the AF-1 mounts the air cylinder on the brake pedal and anchors the steel cable to the firewall behind the pedal. The M&G 2.0 system positions the slender air cylinder in the engine compartment and runs the sleeved stainless-steel cable through the firewall to a bracket on the brake pedal. Both systems work well, but I chose the M&G 2.0 system, which has a smaller pedal-mounted bracket.
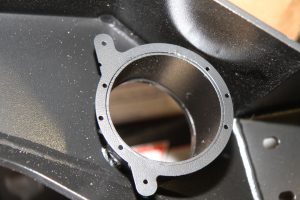
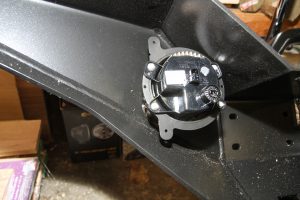
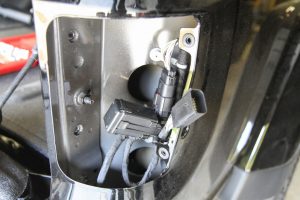
The installed socket assembly and air hose connection.
Assembly Time
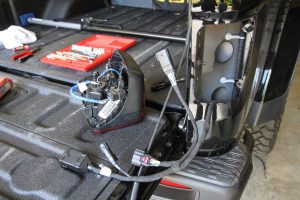
I removed the Gladiator’s original plastic front bumper, and then I removed its fog lights. I plan on doing a bit of off-roading, so I added a Warn Industries winch to the Rock Hard steel bumper. Then I reinstalled the fog lights on the new bumper, which was precision-engineered to accept them.
I didn’t have any help, so I lifted the bumper and winch assembly into position using a hydraulic jack. Then I mounted the Blue Ox tow bar brackets and bolted everything into place. I reconnected the fog light wires and ran the winch cables from the winch to the Gladiator’s battery. Next, I drilled holes for the six-way lighting socket and the air hose connection for the M&G supplemental braking system. I also mounted a breakaway switch to the bumper to apply the vehicle’s brakes should it ever become disconnected from the motorhome while towing. Then I added a pair of D-ring shackles to the bumper to serve as safety cable connection points as well as retrieval devices should I get stuck someplace where I probably shouldn’t have gone in the first place.
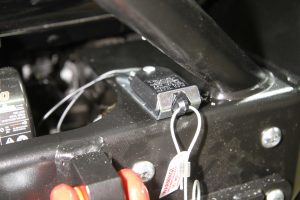
A breakaway switch was installed on the front bumper.
Next, I connected the wiring harness. First, I laid it out alongside the vehicle and calculated that I needed another couple of feet to allow for the Gladiator’s additional length. (Note: If you are installing it on a Wrangler, this is unnecessary, because the harness is cut to the exact length needed.) I cut the harness in the middle and spliced in some new wires to extend it. The splices were made with heat-shrink crimp connectors and then covered with loom to prevent future failures or corrosion.
The Mopar harness, which was designed for use with the factory plastic bumper, has a connector that mounts to that bumper. I cut off the end of the harness where the connector is, and I ran the wires into a six-wire die-cast socket that I mounted in the new bumper. That allowed me to use my existing coiled umbilical cord from Blue Ox. I plugged the connectors at the rear of the harness into the Gladiator’s taillight wiring, and I connected the Gladiator to the motorhome. I then tested the lights, and everything worked as expected. When I plugged in the lighting umbilical, the motorhome controlled the Gladiator’s rear lights. When a turn signal was activated, it remained flashing when the motorhome’s brakes were applied. When I unplugged the lighting cord, the Jeep automatically resumed command of the lighting.
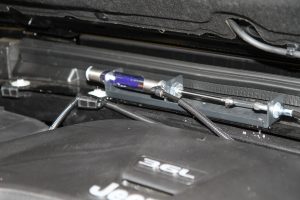
The air cylinder of the M&G 2.0 Brake System was mounted at the top of the firewall, just below the windshield wipers.
Next, using M&G’s easy-to-follow instructions, I installed the supplemental braking system. First, I mounted the compact air cylinder and the breakaway kit in the Gladiator’s engine compartment. I then installed the bracket onto the brake-pedal arm and drilled a hole through the firewall to accept the cable. I fastened the cable housing into place on the firewall, and I connected the cable to the bracket on the brake-pedal arm. I then ran the air line from the cylinder to the breakaway valve and on to the quick-disconnect coupler plug on the front bumper. I ran electrical wires from the breakaway valve to the Gladiator’s battery and to the breakaway switch on the front bumper.
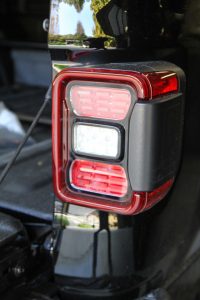
The taillight housings have room for the LEDs and blind-spot detection sensors.
Most supplemental braking systems require that the brake’s vacuum booster be kept charged with vacuum while towing. M&G offers an optional vacuum pump to accomplish this, but I did not need it. That’s because the majority of Fiat Chrysler vehicles (Chrysler, Dodge, Ram, and Jeep) already have a 12-volt electric vacuum pump that provides vacuum to the brake booster when the vehicle is being driven. M&G advised me that I needed only to connect the 12-volt hot wire from the motorhome and tap into the feed wire to the vacuum pump to allow it to operate as needed when towing.
This brought up a concern. If I wanted to utilize the motorhome’s 12-volt charge line to keep the Jeep’s battery charged while driving, I would have to connect the Jeep’s battery to that line. But connecting the Jeep’s vacuum pump to that line provides 12-volt power to the vacuum pump when the vehicle is not in use. That could potentially cause a drain on the battery over time.
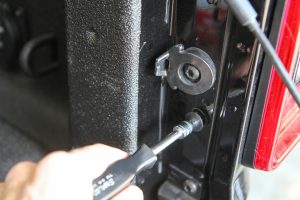
Screws that secure the taillights are removed.
I really didn’t need a charge line, because nothing was being powered by the Jeep’s battery during towing. But I wanted to run a charge line anyway, so that left me with two choices. I could install a diode in the charge line to prevent backfeeding from the Jeep battery to my vacuum pump tap connection; or, I could install a charge regulator and connect my vacuum pump tap to a point between the regulator and front bumper connection. I decided to purchase and install an RVi Towed Battery Charger. It contains a diode to prevent backfeeding, limits excessive current flow, and provides LED status monitors. That completed my system.
Nylon cable ties secure the wiring harness in place.
Final Observations
This setup allows me to tow the Gladiator in the same manner as the Wrangler. The heavy-duty Rock Hard bumper setup with tow tabs gives me the ability to travel off road without fear of damage to my towing equipment, yet I can drive on the highway with ease. It’s a simple plug-and-play solution. No special procedures are required when preparing to flat tow. I connect the tow bar to the bumper’s tabs,
A close-up of the wiring harness.
snap the safety-cable hooks onto the D-ring shackles, plug in the lighting cord and the supplemental braking system air hose, connect the breakaway switch safety cable, and shift the transfer case into neutral. I don’t even need the ignition key to tow, because the steering wheel does not lock. All in all, it’s a simple solution that allows me to connector disconnect in less than 2 minutes. When we eventually trade in our 2012 Wrangler for a Wrangler JL, I’ll set it up the same
way.
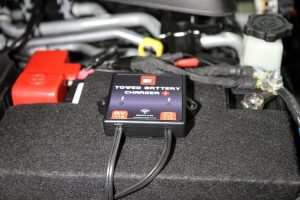
The RVi Towed Battery Charger was mounted to the top of the battery cover.
More Info
Cool Tech LLC
www.cooltechllc.com
Jeep
(877) 426-5337
www.jeep.com
Mopar
(800) 399-2668
www.mopar.com/en-us.html
M&G Engineering
(800) 817-7698
www.m-gengineering.com
Rock Hard 4×4
(844) 762-5427
www.rockhard4x4.com
RVi
(800) 815-2159
www.rvibrake.com
Warn Industries
(800) 543-9276
www.warn.com