

Procedures and tips for basic RV charging system troubleshooting, and advice as to when to seek the assistance of a service technician.
By Steve Froese, F276276
April 2022
Last month I introduced battery isolation solenoids and provided a high-level overview on how they work. This month I will discuss simple troubleshooting of an RV charging system. I would rate the troubleshooting procedures outlined below as a three out of five in difficulty level. They require basic electrical knowledge and a high degree of comfort with taking electrical measurements using a multimeter.

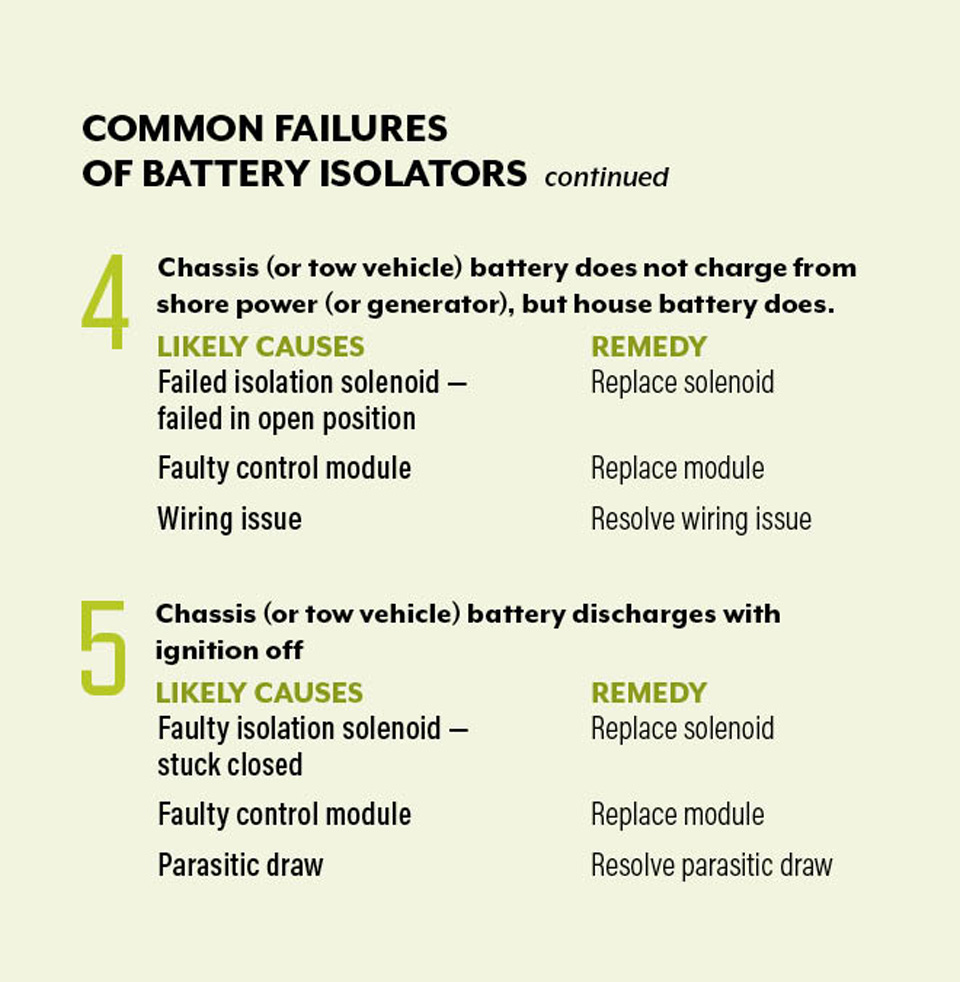 The chart outlines the most common failures and causes. If the issue you face is not listed here, seek professional assistance with troubleshooting.
Fortunately, many of the failure modes listed are easy to troubleshoot. One of the fundamental rules of troubleshooting is to assume the most basic failure first (and never assume anything in general). Also, even though it may not be the most likely cause of a failure, always check the easiest thing first. Following these two rules will get you a long way.
Given this guidance, let’s examine lack of shore power. If you find you are experiencing failure #3 on the chart, you should first check whether shore or generator power is present in the RV. Let’s assume your RV is plugged into shore power, but your battery banks are not charging. The first thing you should assume is that a power issue exists. It is the most likely as well as the easiest to verify. One way is to check whether the wall outlets, microwave, and air conditioner have power.
Be very careful with this one, because if you have an inverter, it may be masking a shore power issue, as it will be energizing some of your 120-volt-AC circuits from the battery bank. If you have an inverter, turn it off and check your 120-volt-AC power.
I highly recommend an AC circuit tester for all RVers. It should be used on the power pedestal before you plug in your RV. It is not uncommon for a park pedestal to be wired incorrectly, which can lead to RV damage, injury, or death by electric shock. Plug an electrical adapter (15-amp/30-amp/50-amp) into the park pedestal, and then plug the circuit tester into that. Make sure the circuit is correctly wired based on the lights on the tester. If it’s good to go, plug in the RV.
If your RV has power but the batteries still aren’t charging, check each circuit breaker to make sure none has tripped. Check the 12-volt fuse box to ensure that the battery protection fuses (usually two 30-amp or 40-amp fuses) are not blown. If they are, replace them, and then watch to make sure they don’t blow again. If they do, you need to troubleshoot the underlying issue.
If you have a travel trailer with a stand-alone charge module mounted behind the fuse panel or a basement wall, the battery protection fuse is often on the module itself. If you can’t identify the issue, take your RV to your local service center, as the charge module has likely failed.
If you are faced with scenario #1 or #4, you can take a similar approach, this time by first checking the 12-volt system. Locate the isolation solenoid. It usually will be in the electrical or engine bay or near the batteries. It can be difficult to find. I have found them under driver seats, under the washer fluid reservoir, and everywhere in between. Access to the solenoid for troubleshooting may be difficult also. Avoid demounting the solenoid, as this can risk shorting the battery terminals to ground or eliminating the case ground from the solenoid itself.
Once you find the solenoid, do a quick visual check to make sure all the wires are clean, tight, and undamaged. Start the vehicle engine. Wait for several seconds and you should hear a distinct “click” from the solenoid. Measure between battery or chassis ground and each of the large load lugs on the solenoid. Both should measure a charge voltage of less than/approximately 13.8 volts DC. It may be that only one lug measures charge voltage, while the other measures battery voltage. This means the solenoid is not closing, and you will have to determine whether the solenoid has failed or whether it did not receive the signal current.
Locate the small control terminals on the solenoid. If the solenoid has an attached solid-state controller, the terminals should be labeled. Measure the voltage between ground and the other terminals (measure between ground and all other terminals if you can’t identify the correct control terminal). If you measure approximately 12 volts between ground and any terminal, the solenoid likely has failed and will need replacement. If you can’t find any 12-volt signal, a wiring or control module issue may exist. I suggest having a professional RV service center identify the problem for you.
For issue #5 above, many RV owners are unaware of parasitic loads. A parasitic load is any load that draws down the battery when the RV is not plugged in and the engine is not running, or even when the battery storage switch is turned on. In other words, this is any load on the battery that occurs when the batteries should be isolated from the entire system.
A good example of a parasitic load is a propane alarm. These usually are hard-wired directly to the battery, or to the battery side of a disconnect switch. Therefore, turning on the battery disconnect switch during storage will NOT disconnect the propane alarm from the battery, and the alarm will drain the battery over time. An inverter left on during storage will do the same thing. So will stereo systems, since 12 volts will be consumed constantly for the stereo clock, memory, etc.
Unintended parasitic loads can occur because of wiring shorts and other problems. If you find that your RV battery seemingly discharges by itself, consider a parasitic draw or defective batteries (the latter usually caused by age or lack of proper maintenance). If the discharge is occurring with the chassis battery when the key is off, the issue may be related to an isolation solenoid that is stuck closed. Have this verified by an RV technician.
For all other failures listed above, it is important to seek assistance from a mechanic or RV service center. Advanced troubleshooting is outside the scope of this article, as electrical troubleshooting can be difficult and time-consuming, even for a professional. The goal of this two-part article was to provide some insight into how isolation solenoids work and how to troubleshoot some basic and common issues with RV charging systems.