
Whether you are a do-it-yourselfer or prefer to take your vehicle to a service center, having a good understanding of the work required will reap rewards.
By Mark Quasius, F333630
June 2022
Like anything with moving parts, motorhome chassis require regular service to ensure their continued operation and to prevent component failures. Whether powered by diesel or gasoline, motorhome chassis have evolved over the years. Earlier models composed of a simple engine and driveline, axles, and structural members have been superseded by more complex chassis with features such as electronically assisted steering systems; antilock braking; digital dashboards; remote start; and a whole slew of new safety systems, among them adaptive cruise control, collision mitigation, and electronic stability control. But even with these substantial technological advances, the basic maintenance tasks have not changed drastically.
The purpose of this article is to familiarize readers with the fundamental tasks involved in maintaining a diesel chassis. Please note that you should always refer to your chassis owners manual for specific requirements. This information can be beneficial in two ways. If you are a DIYer with a few tools and a place to do light service work, the following tips should help you perform some of your own maintenance. The majority of chassis service bills will be labor related. So, doing these tasks yourself can save you quite a bit of money. If you prefer to have service centers perform your maintenance, this information will help you to communicate effectively with your service writer to make sure everything is covered.
Preparing For Service
If you have ever changed the oil in your daily driver, replaced filters, or greased a few tie-rod ends, you know what tools you will need to service your motorhome. It is not that much different — everything is just larger. For instance, a typical 6-quart oil drain pan is not going to work for a large diesel engine that can hold up to 50 quarts of oil. I recommend acquiring a few 5-gallon buckets with screw-on lids so that you can easily transport the used oil to a recycling center. Some RVers opt to use one large oil drain pan in place of several smaller buckets. You also will need large-diameter oil filter wrenches and some other larger wrenches. Upgrading your tools will not be very expensive, and you will recover that investment the first time you change your oil versus paying to have it changed.
You will need a bit of ground clearance to get underneath the motorhome. You can use the leveling jacks to raise the coach high enough to allow large buckets to fit beneath it, but be sure to add heavy-duty jack stands with the appropriate weight rating to support your axles. For your safety, never work beneath a motorhome that is supported strictly by the leveling jacks.
Once you have your tools in order, you will need to acquire the necessary fluids. This may include oil, gear lube, and/or coolant. Check your owners manual for the capacities and service intervals. Filter part numbers usually can be obtained from the chassis manufacturer, online filter cross-reference charts, or by checking the numbers on your existing filters. Other great resources include various RV-related online forums with brand-specific sections. You can borrow from the experience of other owners of your coach brand. When in doubt, though, check with the manufacturer. Once you acquire the right information, create a checklist with everything you have learned and use it as a service record log.
Lastly, you will need to find somewhere to conduct the service. Because of their size, most motorhomes will not fit into a typical garage. If you wait for a nice day, you can do this kind of work in your driveway — just be sure to put down a plastic tarp to prevent unintended oil spills from staining it. If you travel for extended periods of time, you most likely will find yourself parked at campgrounds that do not permit service work on your RV, so you’ll need to find another place, or have it done at a truck service center.
Engine Oil
Engine oil is the key lubricant in any vehicle. Without it, an engine will seize up and become damaged. If the oil is old or does not meet the manufacturer’s minimum standards, it will wear excessively and not last long. It is critical to use the recommended oil and to keep on top of your vehicle’s oil changes.
Modern engine oil contains many additives, including antifoaming agents, detergents, and antiwear additives. It is not so much the oil itself that wears out as it is the additives that become depleted. Diesel engine oil is designed to collect the contaminants that are created as a byproduct of diesel fuel combustion. These contaminants are held in suspension in the oil to prevent them from scratching critical bearing surfaces and causing excessive wear. It’s just one more reason why it’s important to change engine oil according to the required intervals.
Verify how much oil your engine requires and obtain that amount before starting your service project. My previous motorhome was equipped with a 400-horsepower Cummins ISL9 engine that held 28 quarts of oil, while our current coach has a 600-horsepower ISL that holds 50 quarts of oil. Obviously, a single 5-gallon bucket would not contain either quantity, so multiple buckets are needed. Switching buckets while the oil is draining can be a bit messy, so I recommend adding a Fumoto oil change valve. These quarter-turn valves replace the oil drain plug and allow you to easily stop the flow while you switch buckets. Various sizes are available to fit most oil pan thread sizes.
Be sure to change the oil filter every time you change the oil. You will need a larger-diameter oil filter wrench for these filters. Most manufacturers recommend prefilling the filter with oil so that your engine does not have to wait so long for oil pressure when you first start the engine after the oil change. Fleetguard even shows this in little pictographs on the side of its filters.
Wipe a little oil onto the gasket to prevent binding when you tighten the filter. Most manufacturers recommend hand-tightening the filter to snug and then giving it another quarter turn.
Once you have added the correct amount of oil, start the engine to circulate the oil and then shut it off and let it rest for at least five minutes. Next, check the oil on your dipstick. Remove it from the dipstick tube, wipe it off, and reinsert it. Do this a few times to ensure that any oil that entered the dipstick tube is gone, and you should have an accurate reading. Dipstick tubes are not always exact, so check to see how close the oil is to the full mark. If you have the correct amount of oil in the engine but the dipstick is a bit off, just remember that point and rely on the factory recommendation rather than what the dipstick shows. In some cases, you can adjust the dipstick tube to calibrate the dipstick so that it gives you an accurate reading in the future.
Do not overfill the engine with oil, as this can cause foaming when the crankshaft throws hit the oil. Foaming causes poor lubrication and can foul up your crankcase breather filter.
Fuel Systems
Diesel fuel systems have extremely tight tolerances and rely on the fuel for proper lubrication and to prevent damage. This means the fuel must be clean and free of water, which it normally will be if your filters are changed regularly.
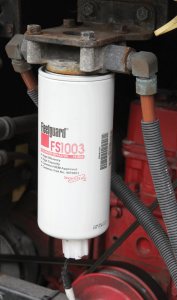
The primary fuel filter element may contain a water-in-fuel sensor, which must be disconnected before removal.
Most diesel engines have two fuel filters: a primary filter, sometimes referred to as a water separator, and a secondary filter. The primary filter’s main purposes are to retrieve larger sediment and to remove any water that may be in the fuel. Water can wreak havoc with a fuel system and can quickly score and pit the critical parts in the injection pump and damage the fuel-injector nozzles. Typically, this filter will have a drain valve for removing the water, as well as a sensor that warns the driver if any water is detected. The actual filter element removes larger pieces of sediment, such as rust scale, to prevent plugging up the secondary filter.
The secondary filter has a much finer micron rating than the primary filter and will filter out any harmful sediment that could damage the fuel injection system. A micron rating refers to the particle size a filter can capture. One micron equals 1/1,000th of a millimeter; in comparison, the diameter of a human hair ranges from 40 to 90 microns. A 5-micron filter, for example, can retain particles 5 microns or larger.
Diesel engines require a fuel supply that continually circulates from the tank through the injection pump and back again, drawing off whatever it needs from the constant rail pressure. If you run a diesel engine dry on fuel or change the fuel filters, this introduces air into the system, and the engine will not start until you bleed the air out. Prefilling the fuel filters may help. However, by doing so, you also could introduce dirt or contaminants into the fuel, which may damage the system. Many opinions exist about whether prefilling is the best course of action, but I will not go into all of those. As a former diesel mechanic, I always have prefilled the fuel filters and have never had a problem. On my motorhome, I now prefill the primary filter with clean fuel but leave the secondary filter dry. That helps but does not eliminate the dry fuel system issue.
The fuel system needs to be bled. Some older engines, as well as some newer, smaller engines, have manual primer levers on their fuel lift pumps. Cummins uses an electric lift pump that makes bleeding the system much easier. As soon as you turn the key switch, the lift pump will activate and run. After about 30 seconds, it will stop unless it senses that the engine is running. This will start to draw fuel from the tank and purge air out of the system. It will not do that in one shot, however; so, after 30 seconds, switch the key to the off position, wait about 10 seconds, and switch it back on to restart the cycle. You most likely will have to repeat this process multiple times until the system is completely bled. It all depends on how much air is in the system. Once all the air is purged, you can restart the engine.
Personally, I prefer to perform this procedure and run the engine twice – once after I have changed the primary filter and then a second time after I have changed the secondary filter. It goes a bit faster that way, rather than trying to bleed all the air out at once.
For the exact procedure to bleed the air from your motorhome’s fuel system, refer to the owners manual.
Air Filters
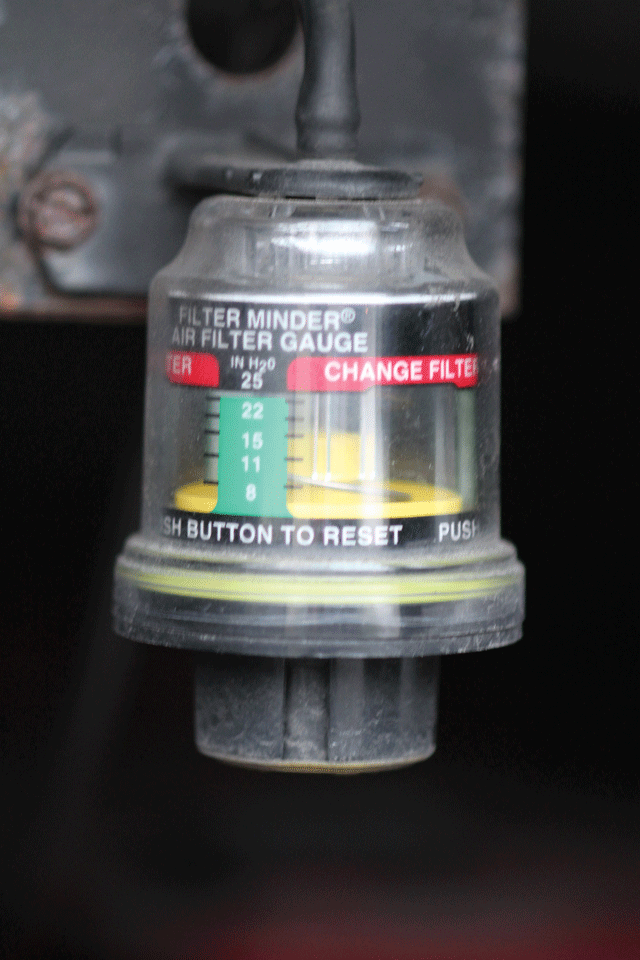
A diesel engine needs more than fuel; it also needs air to breathe. A clogged air filter will restrict airflow, resulting in reduced power and efficiency. Most engines are equipped with a filter restriction indicator, a small vacuum-operated device located in the intake pipe between the air filter and the engine that records the vacuum level in that pipe. (In some motorhomes, the indicator is mounted remotely in a more visible place.) The vacuum in the line will increase as the filter begins to plug up, and this indicator will record and display that vacuum until you reset it using the little button on the device.
Typically, a filter should be replaced when the restriction reaches 15 inches of vacuum. There will always be some restriction, even with a new filter, so you need to consider this baseline figure to determine when to change the filter. For example, a filter may have 4 to 6 inches of vacuum when new. If your baseline is 4 inches, then you will add the 15 inches to that number, leaving 19 inches as your true vacuum threshold for replacement. If your baseline is 6 inches, then you’ll replace your filter when the indicator shows 21 inches, and so forth. These vacuum readings are accurate only at full rpm when the turbo is working hard, not at idle.
The filter restriction indicator will lock in the highest reading. If you need to find your baseline, just rev up the engine to full rpm by tapping the throttle a few times to allow the turbo to hit full boost for a second. Or you can take your vehicle for a quick test drive once you have installed a new filter. Air filters are made with paper elements that can lose their integrity over time, so you should change them at least every three years, regardless of what the indicator says. If the paper element fails, it will allow dirt to enter your engine. Cummins literature warns that it takes just one tablespoon of dirt to ruin an engine.
Cooling Systems
Without a cooling system, an engine would overheat and melt down within a brief period. Cooling systems rely on both air and coolant flow to allow the engine to maintain temperature. The engine’s water pump circulates hot coolant from the engine to the radiator, where it is cooled by airflow through the radiator. If the fins on the radiator plug up with debris, the reduced airflow will prevent the coolant from working effectively. Rear radiators tend to gunk up more than side radiators, so the former should be cleaned from the inside out. Products such as Simple Green or other degreasers can be used for this, but make sure that they are safe for use on aluminum.
To check the coolant level, use the sight glass in the coolant surge tank.
Coolant also wears out and has a recommended replacement schedule. If you are using coolant precharged with supplemental coolant additives (SCAs), you will need to check their level using test strips, or upgrade to an organic acid technology (OAT) coolant, such as Final Charge, to prevent cylinder liner pitting from cavitation. OAT coolant does not require testing, has a longer life, and typically is what manufacturers add to new chassis these days.
Belts and hoses also require regular maintenance. They do not usually have specified replacement schedules, but you should inspect them every time you service the engine. Be sure to check for loose hose clamps, as even constant-tension hose clamps can loosen over time. Rubber does not last forever, so if you see cracking on the belts, or dry and leaky hoses, it is time to replace them. Five to six years is the typical expected lifespan of rubber components. Silicone hoses and synthetic belts will last longer.
Transmissions
Transmissions also require lubrication. Automatic transmission fluid handles this task, and it also serves to prevent the transmission from overheating and to allow power to transfer through from the engine. So, it is simultaneously a lubricant, a coolant, and a power transfer fluid. Transmission fluid does have a service life, and you need to consult your owners manual to see exactly what that is for your particular application.
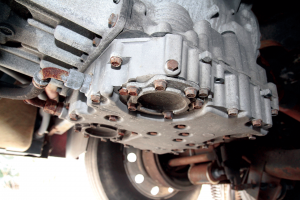
The transmission filters on this Allison 3000 Series transmission are behind two access plates in the transmission’s oil pan.
Allison transmissions have two standards – one is for standard Dexron ATF; the other is for synthetic fluid such as Allison TranSynd or other approved synthetic fluids meeting Allison TES-295 or TES-668 specifications, which offer extended service intervals. If you have an Allison Generation 5 transmission, you can use its advanced prognostics via the shift display panel to determine both fluid and filter life.
Brakes
Brakes on a large Type A motorhome can be either disc, drum, or a combination of the two (usually with discs on the front and drums on the rear). Diesel pushers generally have air brakes, while some lighter diesel-powered RVs and most gasoline-powered coaches may use hydraulic brakes.
Air drum brakes are equipped with self-adjusting slack adjusters that rotate a shaft to apply the brakes. An “S”-shaped cam at the end will press against the brake shoes to expand them. The camshafts and slack adjuster are equipped with grease fittings, so it is important to give them a shot of grease once or twice a year. If your coach sits for extended periods of time, the surfaces of these cams can become rusty, which will result in sticky brakes that could freeze in the locked-up position. Operating your RV on a regular basis will eliminate this problem.
Disc brakes are more maintenance-free, although a regular inspection of the pads and rotors can warn you of any impending failure. Large pneumatic multi-piston brake calipers are self-adjusting, while smaller single-piston calipers rely on a sliding caliper bracket to operate. The calipers need to be cleaned and lubricated periodically to prevent them from sticking and wearing down one side of the brake rotor. Again, most brake issues tend to be more prevalent on vehicles that sit idle for an extended time without regular exercise.
If you have hydraulic brakes, flushing and replacing the brake fluid every three years is recommended. Brake fluid is hygroscopic, meaning it attracts and retains water. That water can turn to steam when it encounters a hot brake caliper, resulting in a spongy brake pedal and lack of braking ability.
Air System
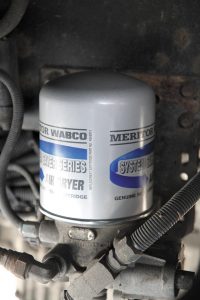
The air dryer’s filter, or desiccant cartridge, is designed to last three years on average.
Diesel pushers utilize an air system to operate air brakes and control the air-ride suspension. This consists of an engine-driven air compressor, various air tanks, valves, and an air dryer. To keep the system performing as designed, the air must be clean and free of oil or moisture. The air dryer is designed to make this possible by using a combination of airflow valving and a desiccant coalescing filter. This filter element will need to be replaced, and the general recommendation is that this be done approximately every three years. In reality, it should be replaced when it no longer removes moisture from the air. The time interval can vary depending on how often you drive the vehicle and the humidity levels you encounter.
You may need to change the desiccant filter element sooner than three years, or it may be fine for up to five years. The best way to test its effectiveness is by draining the air tanks. When you pull the lanyard, look at what comes out of the tank drain. If the air blast is fairly dry, the dryer is working. But if you are seeing more moisture coming out of the tank drain, that means it’s time to replace the element. Regularly testing the tanks in this manner will familiarize you with the process.
Suspension And Driveline
Your suspension, steering, and driveline systems contain moving joints that need lubrication to prevent wear and seizing. Tie-rod ends, ball joints, kingpins, steering linkages, and drive shafts are all equipped with grease fittings that can be serviced using a standard grease gun. The exact locations vary between chassis, so this is another area you will need to research in your chassis owners manual and make notes on your checklist.
Grease tends to get displaced as bearing surfaces impact each other during normal operation, so it typically will need to be replenished every six months. A moly grease provides ideal protection against this displacement, because the small molybdenum particles in the grease prevent the two surfaces from touching each other, retaining grease more effectively.
Molybdenum is a unique material. It will not shatter or fall apart with impact, thus allowing the grease to remain in place. It is also nonabrasive, so it won’t scratch or score what it’s supposed to protect.
When you grease your chassis, be sure to add enough to flush any water or dirt out of the joint. In the case of drive-shaft universal joints, you may find two grease fittings on each U-joint — one on each side. Ideally, you will grease both of them to achieve even coverage; however, if you can’t reach the fitting on the far side, be sure to pump enough grease in the closer fitting until you see it flow out of every one of the four bearing caps; then wipe off the excess with a rag or paper towel.
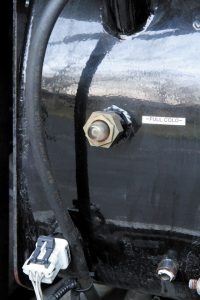
Many diesel pushers have oil-bath wheel bearings for the steer and tag axles. Inspect the gear lube level through the clear glass window on the Stemco hub seal. This level does not normally change unless a leak exists. If you have a wheel seal leak, it will be evident on the backside of the wheel and tire as the lube slings when driving.
The Stemco hub caps also can leak if the gasket has failed. In that case, check the mounting bolts to see whether they are tight. The best repair technique is to apply gasket sealant to the gasket and retorque the bolts. Gear lube does wear out, so be sure to check your manual to determine the recommended service interval and what viscosity gear lube to use.
Final Checks
Tire pressure should be checked frequently. A tire with low air pressure will overheat, which can lead to failure. Checking pressures should be part of your pre-trip inspection, but tires also should be visually inspected on a regular basis. Check for any sidewall cracking or other damage. Also take a close look at the tread pattern. If your tires are wearing unevenly, it might be time for an alignment. Tire sidewalls contain natural lubricants that are released when the vehicle is being driven. If your coach sits idle for extended periods of time, the sidewalls can dry out. If it is parked in a hot, sunny area, consider tire covers, which can help to extend the tires’ lifespan.
Batteries also require regular checks and maintenance. All batteries have connections that need to be kept clean and free of corrosion. If you find any evidence of corrosion, clean those connections to allow electricity to flow properly again. For top-post batteries, make sure the battery tops are kept clean. Moisture and dirt act as a conductive path for battery power to trickle from one post to the other, which will gradually drain your battery’s charge level. A quick rinse or spray with a glass cleaner such as Windex will help keep them clean.
If your RV house batteries are the flooded type, as opposed to AGM or lithium-ion, keep an eye on the battery electrolyte level. As these batteries are charged, they tend to boil and outgas, which reduces electrolyte levels. Top them off with distilled water to keep them from drying out and becoming damaged.
Keeping a vehicle properly maintained is the key to avoiding unpleasant surprises while traveling. Operating a motorhome is always preferable to parking it for prolonged periods of time, as more damage occurs when it sits idle. And whenever you service your RV, consider that the perfect time to do a thorough inspection. If you see anything that is loose, or hoses that are rubbing against something, take proactive measures to prevent future failures.