
Getting Your Bearings: Part 2
In this installment, the brakes and bearings are inspected —and replaced if needed — then cleaned and prepared for reinstallation.
By Steve Froese, F276276
In the last issue of Family RVing, I began a series about trailer bearing repacks and brake adjustment. Although I am treating them as two separate procedures, they should be performed at the same time, since both require removal of the brake drums.
Part 1 (see page 10 in the September-October issue) finished with pulling the inner bearing seal and setting the inner bearings aside, sorted by driver’s and passenger side, front and rear. While the bearings may look the same, it’s important to separate them, because the brake drums incorporate bearing races that wear together with the bearings.
If you followed along with the first article in the series, we now have the brake drums removed and the bearings set aside, having pulled the inner seals and bearings.
The next step is to thoroughly clean the parts and inspect the brake components on the axles. Parts cleaning tanks are relatively inexpensive and are a great way to get your bearings and drums clean. However, any metal or high-density polyethylene (HDPE) plastic container large enough to hold the parts will work fine. You also will need automotive cleaning solvent, brake cleaner spray, and nitrile or butyl gloves. This procedure rates a difficulty of 3 out of 5, if you have the proper tools and equipment, as well as basic mechanical skills.
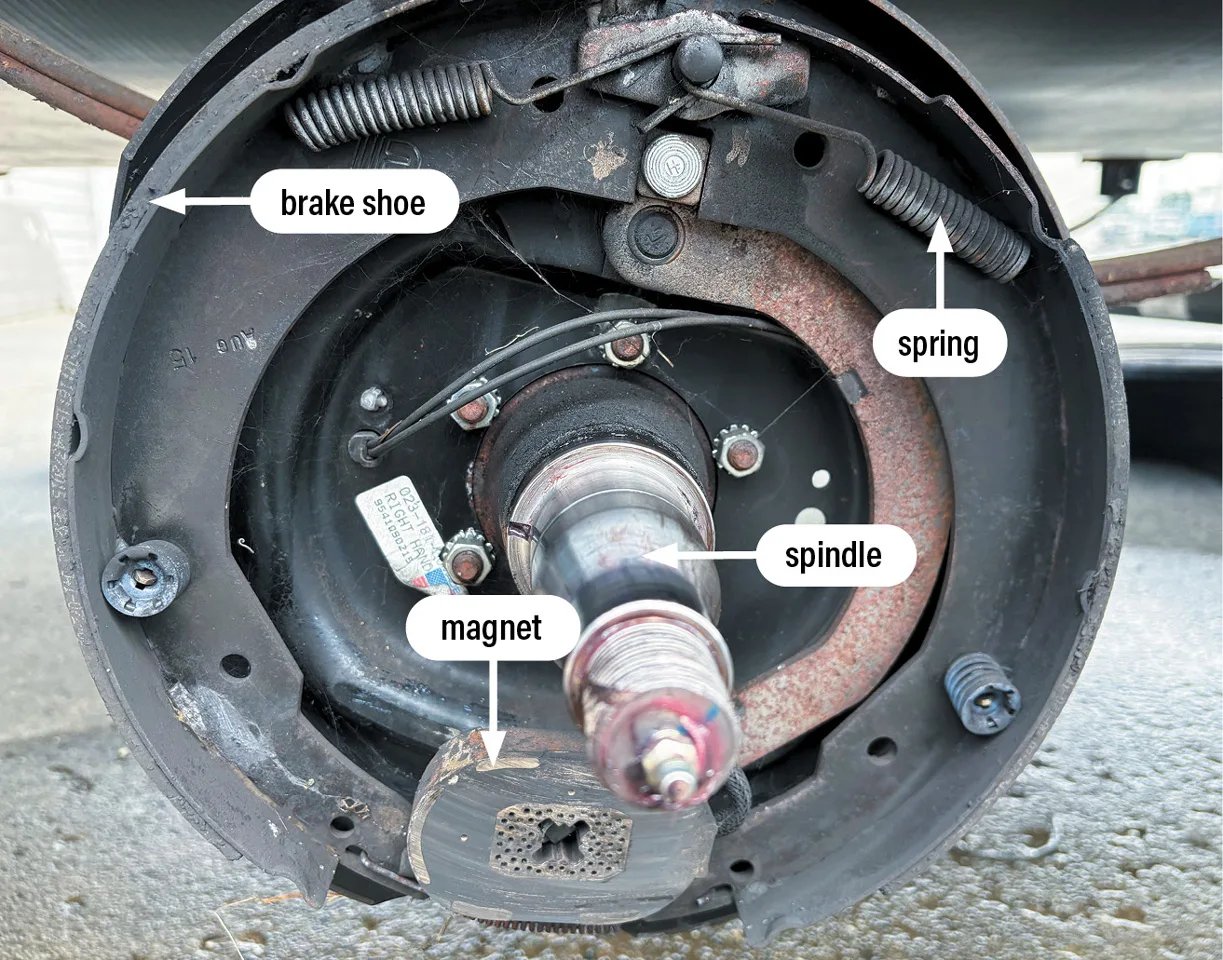
Use the cleaner spray to thoroughly coat all brake components on the axle, including the shoes, springs, spindles, and magnets. Carefully inspect all components, paying attention to the following:
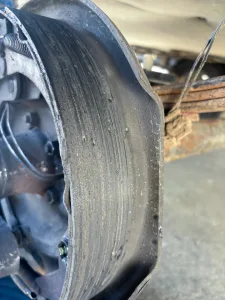
A worn brake shoe.
Brake shoes. Check for wear. Ensure that at least 1/16-inch of shoe surface remains and that the wear is relatively even. If you find horizontal cracks across the shoes, they must be replaced. Vertical cracks are acceptable as long as they are no wider than the thickness of a pencil tip. If the shoe is missing pieces, it needs to be replaced. It is often faster and cheaper to replace the entire backing plate assembly. I will discuss this procedure later. Replacing individual components is out of the scope here.
Spindle. Ensure the spindle is not damaged. Significant damage, especially at the bearing surfaces, will require replacement, which is best left to an RV service center.
Springs and hardware. Inspect the springs and hardware for damage, especially looking for broken springs or components. As with damaged brake shoes, often the best option is to replace the entire backing plate.
Magnets. The magnets need to be thoroughly inspected. Check for damaged or broken wires, as well as wear to the magnet surface. The magnets are integral to electric trailer brake operation, so it is important for them to be in good condition. Also ensure they are not coming off the magnet arm, although they will have some play, as a spring holds them to the arm. Most magnets have “wear holes” that become visible to indicate when they should be replaced. If two of the four wear holes are gone, the magnets should be replaced.
Again, you may opt to replace the entire backing plate assembly. In the last article, I mentioned the importance of testing the brakes once the trailer was jacked up. If any of the wheels failed to lock up when the breakaway switch was pulled and the wheels spun, an issue exists with the magnet or the wiring on those wheels. I’ll address that later in this article.
Drum brake surface. The inner circumferential surface of the drum is where the shoe makes contact. Inspect this surface for deep scratches, contamination (usually caused by oil or grease), or other defects. Minor scratches, rust, and the like are not a concern. Deep scratches warrant machining of the drum, however. Find a local machine shop or auto parts store for this service. If the drums were previously machined, they will reach a point where they can no longer be turned, as they will have reached their minimum diameter.
Drum armature surface. The inside of the brake drum should appear relatively smooth and shiny. This is the surface the magnet sticks to when the brakes are applied, so it’s important this surface appears similar to the brake shoe surface of the drum. You should see no deep scratches, cracks, etc. If the surface appears overly rough, scratched, or damaged, it can be machined. If you suspect that the drums need machining, tell the shop technician whether the shoe or armature surface, or both, need the work. If you are unsure, ask for their opinion.
Make sure to clean the drums with solvent to remove as much grease as possible, especially if you are taking them to a shop for machining. The drums should be marked with LR, LF, RR, RF. Better yet, punch the drums by taking a center punch and making one, two, three, or four simple punches in the outer diameter of each drum, since ink or paint marking will likely be removed when the machine shop soaks the drums in solvent.
Entire backing plate assemblies are relatively inexpensive. The same goes for brake drums. In fact, when you purchase new brake drums, they generally have the bearings installed and packed with grease. This alleviates concerns about the condition of the magnets, hardware, shoes, and drum wear and the installation is easy to perform. Just remember to always replace backing plate assemblies and/or drums as a pair on both ends of the axle. So for a two-axle trailer, you would replace two components (front or rear axle only), or all four.
If you are satisfied that all brake components are in good condition, you are ready to reinstall the drums. This will be covered in the next article with the bearing repack.
As mentioned earlier, the assumption is that you wish to replace the entire backing plate assembly, brake drum, or both. Be sure to purchase these parts in pairs. Replacing both sides of an axle is recommended. Be sure to check the make and configuration of your existing parts. For instance, you need to know what size drums your RV has. Most small to large travel trailers use 10-inch drums. Large trailers and fifth wheels use 12-inch drums, while very small trailers may use 8-inch drums. Also, make sure you know how many lug bolts are on the drums. Measure the diameter of the drum and the width of the brake shoe surface. These measurements will tell your supplier exactly what parts you need. You also will need to purchase the correct wheel seals if you are re-using your existing brake drums. It’s important that you purchase the right parts, and a good idea is to take one of the old wheel seals with you.
Replacing the backing plates is quite simple. The first step is to cut the brake wires leading to the magnet. Make the cut on the axle side of the existing splice, which is likely to be a cap connector, right at the cap. This way you are not left with two splice points on the wire, which would allow for a weak point. Strip the wires leading either into the trailer or into the axle for re-splicing later.
Next, remove the four nuts securing the backing plate to the spindle plate. These may be rusted to the studs, but generally putting a wrench on the nut and hitting it with a hammer will do the trick. A bit of penetrating oil such as Liquid Wrench, Kroil, or PB B’laster will help as well. You can try other tricks such as heating the nut, or even grinding them off, but these measures are more drastic.
Once you’ve cut the wires and removed the nuts, take off the old backing plate assembly and install the new one. Splice the brake wires from the magnet to the trailer brake wiring. These wires are not polarized, so it doesn’t matter how you connect them. Perform a “tug test” on the wires by pulling on each wire to make sure they don’t pull out of the crimp.
In the final part of this series, we’ll cover repacking the bearings, replacing or reinstalling the brake drums, and completing the wheel service.
Send your troubleshooting questions to Steve Froese at techtalk@frva.com. The volume of correspondence may preclude personal replies. Not all responses will apply in every instance. Some situations may require a visual inspection and hands-on testing. If you choose to follow any procedures outlined in this column, first satisfy yourself that neither personal nor product safety will be jeopardized. If you feel uncomfortable about a procedure, stop and make an appointment with an RV service facility.
RV Recalls
Looking for the latest RV-related recall information? Visit FRVA.com for a list of the most recent recalls issued by RV and component manufacturers. Or, to search for recalls, investigations, and complaints by vehicle year, make, model, and VIN, visit nhtsa.gov/recalls. NHTSA’s Vehicle Safety Hotline is (888) 327-4236.