

Do-it-yourselfers can take steps to ensure the RV stays cool.
By Gary Bunzer, Technical Editor
August 2019
RVers often choose destinations where temperatures can soar, so it’s important to have cool air flowing through the RV, season after season. Therefore, maintenance of the air conditioner is a must.
This article addresses the maintenance procedures for the most common type of RV air conditioners — rooftop models, including ducted and direct flow-through units. Owners of RVs that are equipped with basement models, heat pumps, heat strips, and split systems should refer to their supplier’s literature.
The good news is that with a little investment and a few basic hand tools, most RVers can perform their own preventive maintenance on the air conditioner. Keep in mind that it will be necessary to access components on the roof as well as inside the RV.
Always put personal safety first when working on rooftop air conditioners.
As always, safety is the number-one consideration when servicing an appliance. In this case, that applies to climbing onto and working on the RV roof, as well as working with a device that utilizes 120 volts AC. If you do not feel comfortable performing the following steps, do not proceed beyond reading this article. As I often state, you must satisfy yourself thoroughly that neither personal nor product safety will be jeopardized. A certified RV service technician can perform these steps should you decide not to proceed.
First, be sure all sources of AC electricity are shut down. Unplug the RV from shore power and disable the inverter, as well as the generator auto-start capability (if so equipped). As an added safety step, turn off the main circuit breakers at the distribution panel inside the RV.
With a basic understanding of the components and operation of a typical rooftop air conditioner, RVers may be able to prevent problems from developing.
How The System Works
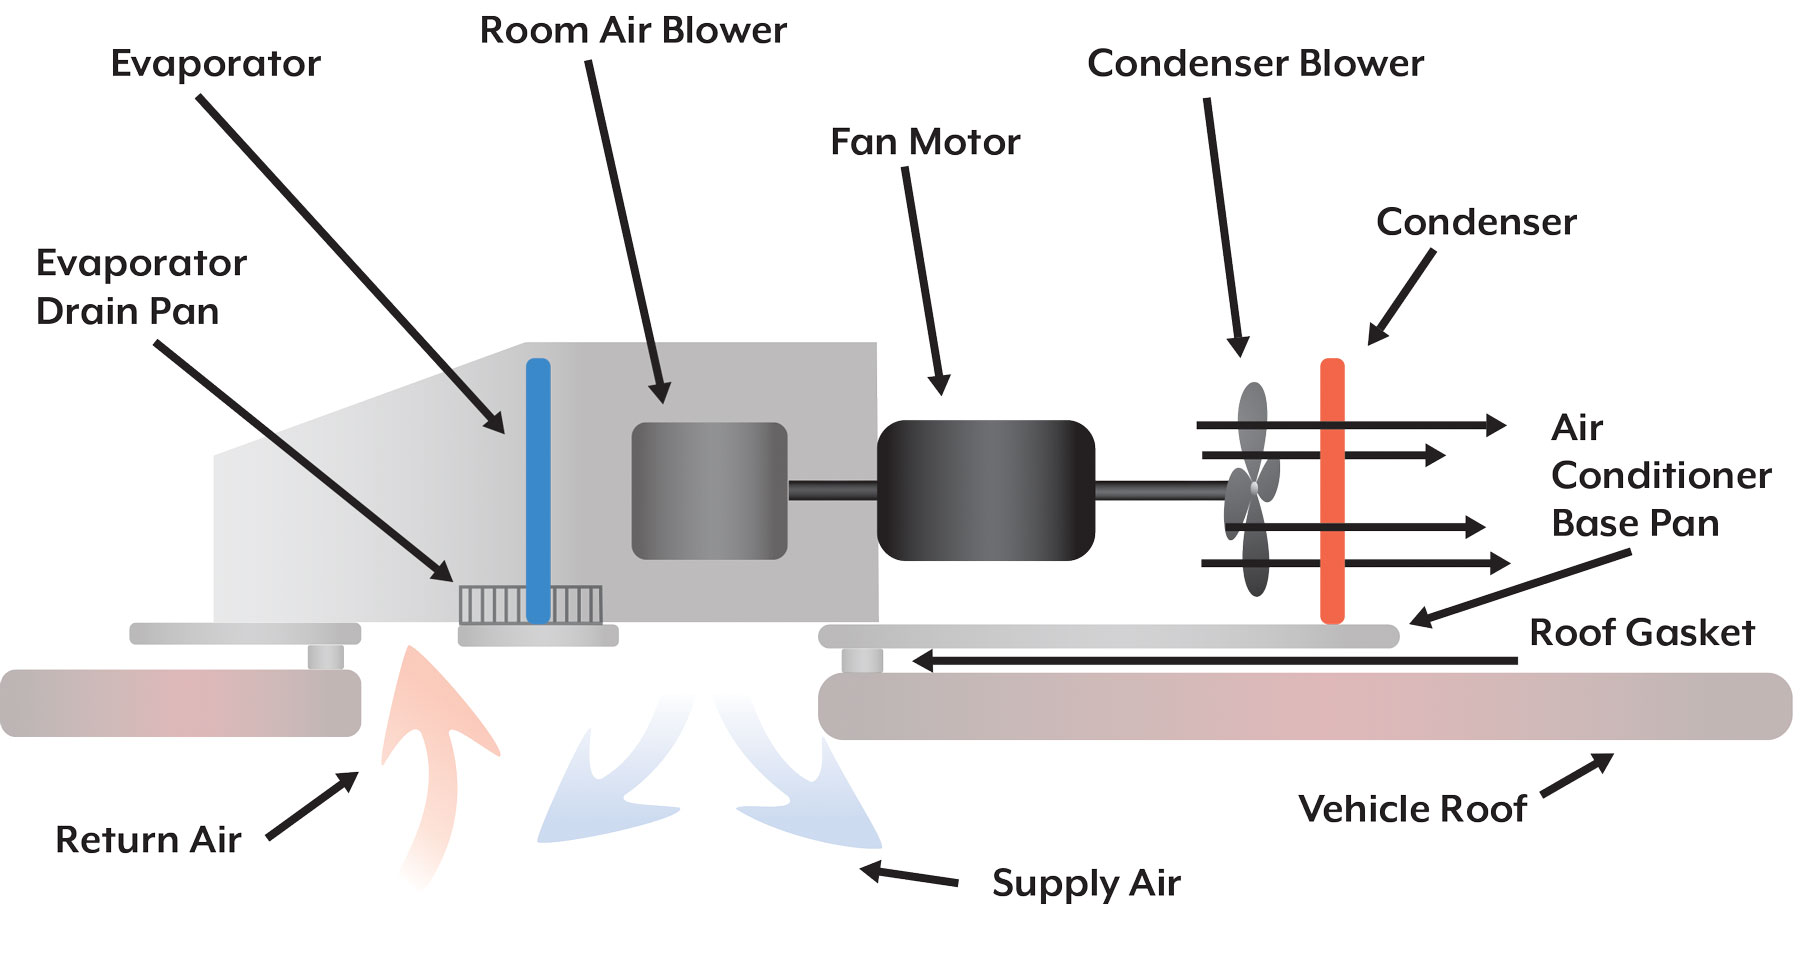
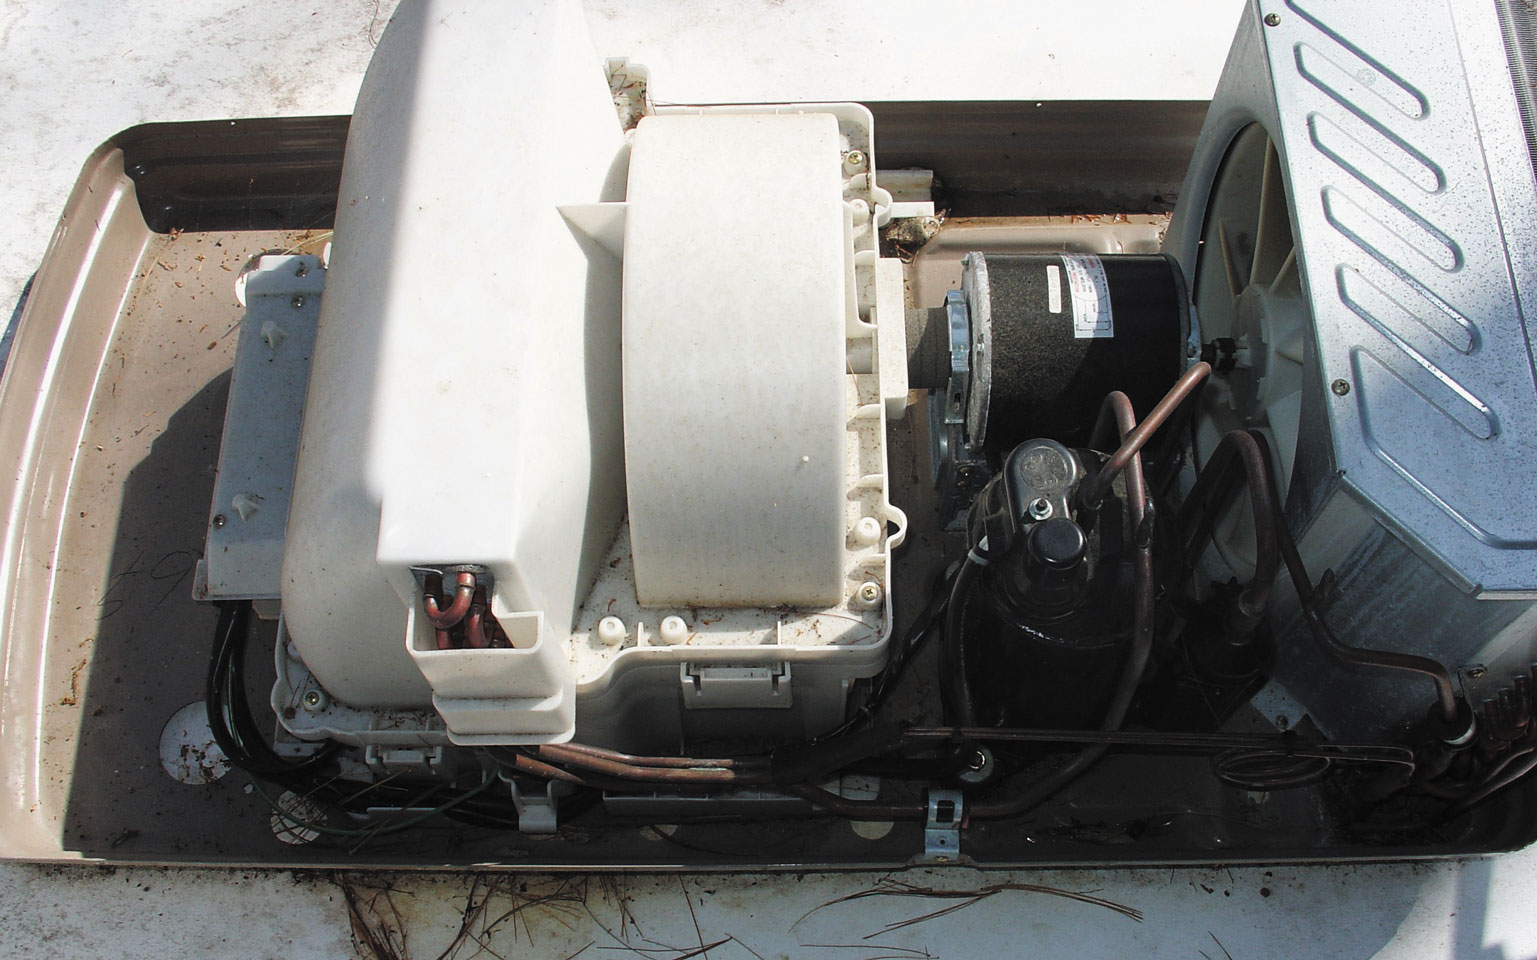
The main components of an RV rooftop air-conditioning system.
The laws of physics apply here. According to the second law of thermodynamics, heat always moves from an object at a higher temperature to an object at a lower temperature; it never moves from cold to hot. Because of this, and through the application of pressure, condensation, and evaporation, the roof air conditioner transfers the inside heat to the outside. The air conditioner also removes moisture from the air, which is especially important in humid areas.
Most RV rooftop air conditioners consist of six major components: a compressor; a condenser; an evaporator; a fan/blower assembly; a capillary tube; and control circuitry.
To transfer heat, an air conditioner takes advantage of the fact that when a substance (including liquid) vaporizes, heat is absorbed. In the motor-driven compressor air conditioner, this process employs a circulating refrigerant that boils at a low temperature and can be used over and over. The refrigerant inside the air conditioner’s sealed system changes its state, which allows for the transfer of heat.
The entire air-conditioning system is sealed and pressurized with a specific amount of refrigerant inside. Each refrigeration cycle starts with the compressor. It takes in low-pressure refrigerant and, just as the name implies, compresses it and discharges it as a high-pressure vapor. When the refrigerant is compressed, heat radiates, which causes the discharge tubing to become rather warm. Since temperature directly impacts pr
essure, on hot, sunny days the pressure inside the discharge line can be 360 psi or higher.
The high-pressure vapor moves to the condenser coil. The condenser is visible at the rear of the rooftop air conditioner. In the condenser, the vaporized refrigerant is cooled by air passing through the coils, which turns the refrigerant back into a liquid. When it leaves the condenser on the way to the capillary tube, the refrigerant stays in a liquid state.
The capillary tube is a metering device that controls the flow of the refrigerant. The typical rooftop air conditioner is said to be “capillary-tube controlled.” This capillary, or cap tube, determines how much refrigerant enters the evaporator, and the force at which it enters.
When the high-pressure liquid enters the low-pressure atmosphere of the evaporator, the refrigerant rapidly evaporates into a gas. When this happens, heat is absorbed from the air, which is blown over and through the evaporator coils. This air, with the heat removed, then is delivered to the inside of the RV through the discharge ducts, and the RV interior becomes cooler.
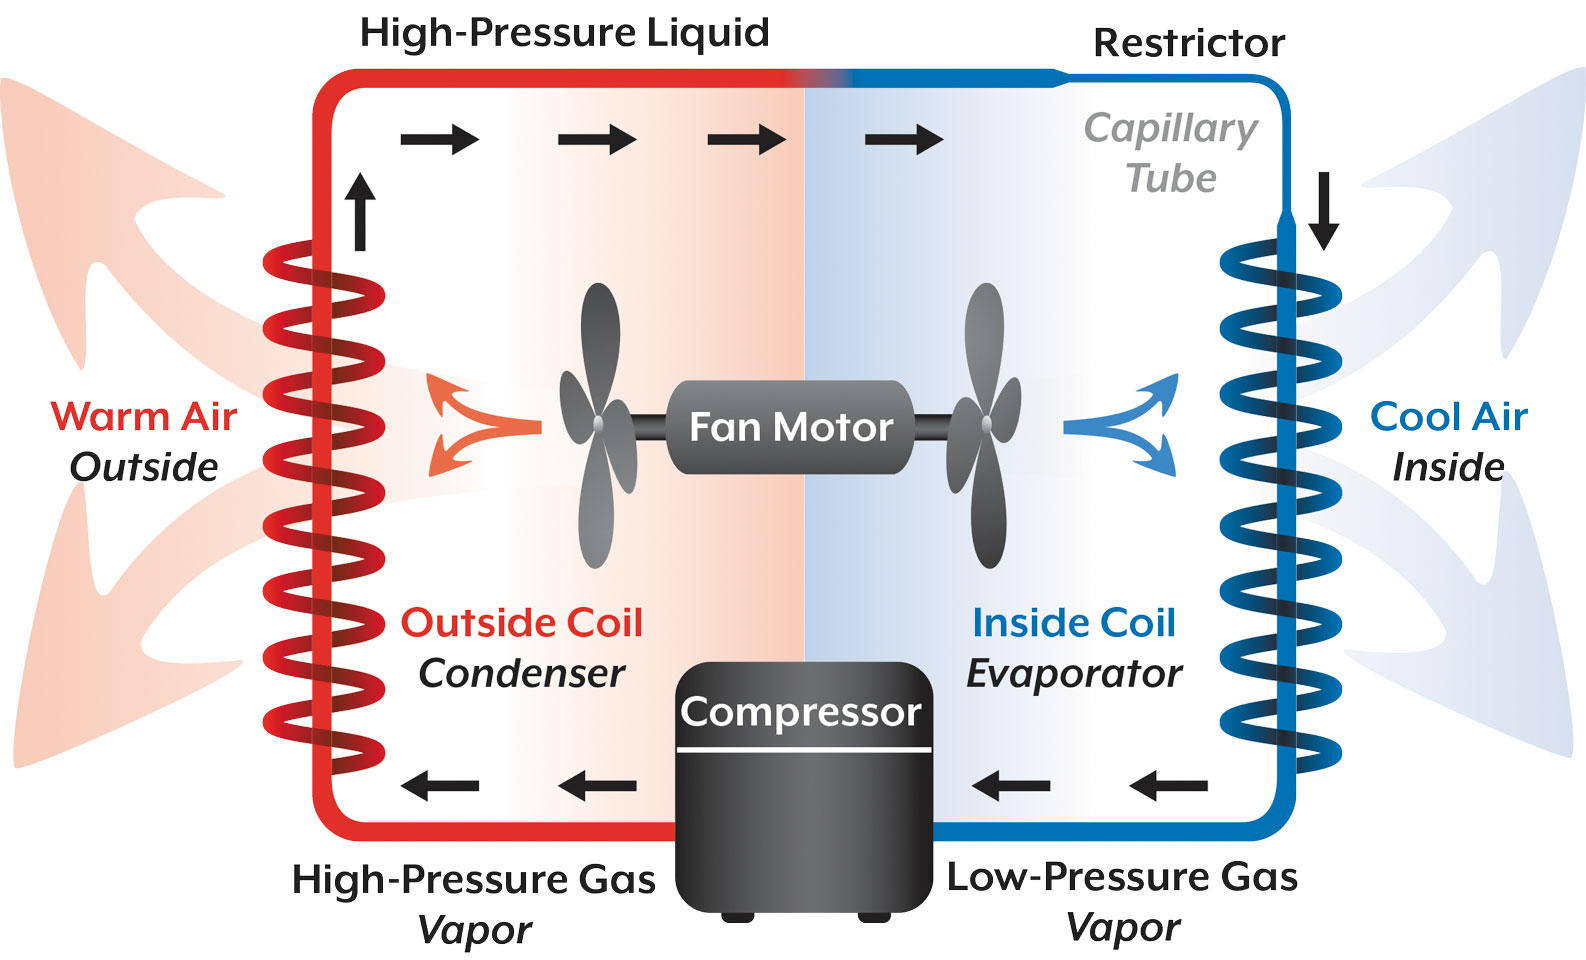
The refrigeration cycle of an RV rooftop air conditioner.
A blower motor and fan distribute the newly cooled air throughout the RV. In some designs, the same electric motor draws air across the condenser fins with the addition of a fan attached to the opposite end of the motor shaft. In other configurations, fans are powered by two separate motors; one for inside airflow and one for outside airflow through the condenser.
After the refrigerant passes through the evaporator, the low-pressure vapor returns to the compressor through the suction side or low-pressure line to begin the cooling cycle again. If no breaks or cracks exist in the tubing, joints, and the various components, this process continues as long as the compressor is running. Typically, once the thermostat has been satisfied, the compressor shuts down. I encourage you to read the owners manual for your air conditioner to become familiar with the unit’s design and operation.
12-Step Maintenance Plan
You can stay informed about the state of the air conditioner through periodic inspection and regular maintenance. If you ever notice a drastic decrease in cooling or you suspect a refrigerant leak, do not operate the air conditioner until it has been thoroughly checked by a qualified (certified or master certified) RV service technician. Damage to other components may result.
Performing the following steps once or twice a year will yield many years of cool, conditioned air. Remember, be sure to perform these checks with all power turned off and/or disabled.
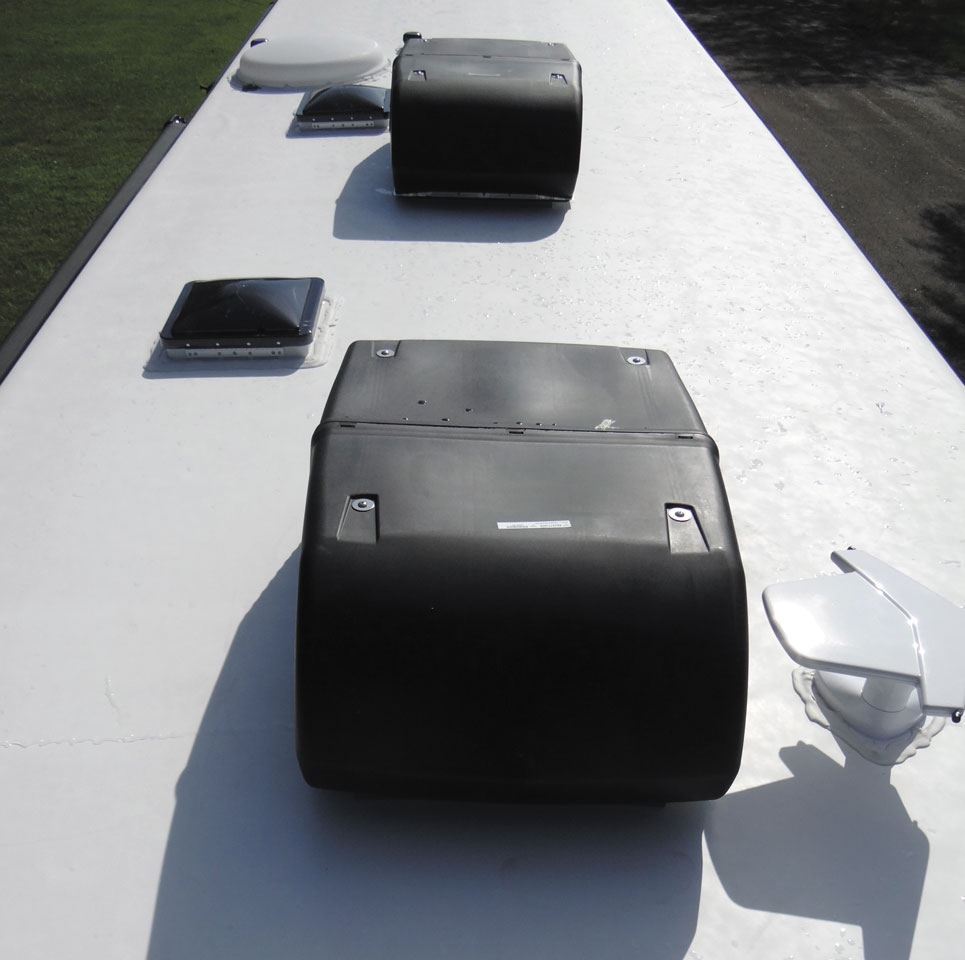
On The Roof
After removing the exterior shroud, inspect refrigerant tubing lines for cracks or leaks.
1. Inspect the air conditioner’s exterior shroud or cover. Shrouds typically are made of plastic and are pretty durable; however, such durability has limitations. Besides normal degradation caused by the sun’s ultraviolet rays, low-hanging tree branches can quickly remove an exterior shroud. Some plastic shrouds can be repaired if cracked or damaged, but another option is to replace a damaged shroud with a stronger and more durable one made of fiberglass.
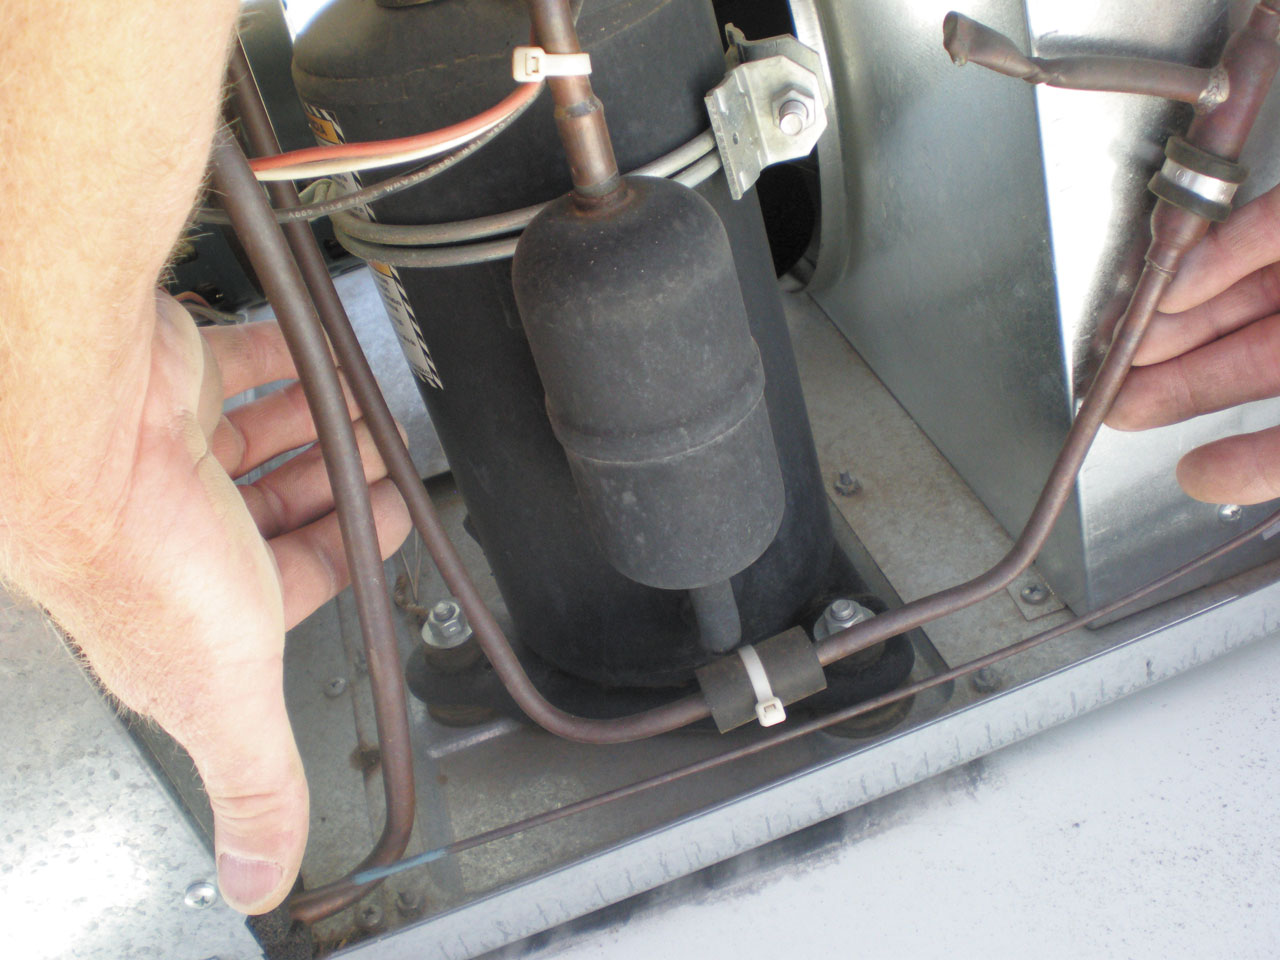
2. Remove the shroud and inspect all refrigerant tubing lines for cracks or leaks. A refrigerant leak often is accompanied by an oily stain. Remember, do not operate the air conditioner if a leak has been discovered.
Check the drain holes in the air conditioner pan and remove debris.
3. Check the drain holes in the air conditioner pan. If any debris is found, remove it. Rainwater and snowmelt will invade the innards of the air conditioner. Plugged drain holes may permit moisture to drip inside the RV while the air conditioner is operating.
4. Check all electrical wiring. Look for loose connections and worn or burned insulation on all the exposed wiring. Make sure any existing wire nuts are secured with electrician’s tape to prevent them from coming loose as a result of the vibrations that normally occur while running an air conditioner or simply driving down the road. Do not touch any bare, metallic connections. Some components, such as capacitors, may be charged with electricity, even with the power off.
5. If possible, inspect the motor and fan assembly for free mobility. Be sure the fan blades and squirrel cage do not rub or hit any other portion of the housing. On some units, it may be necessary to remove portions of the plastic housing to gain access.
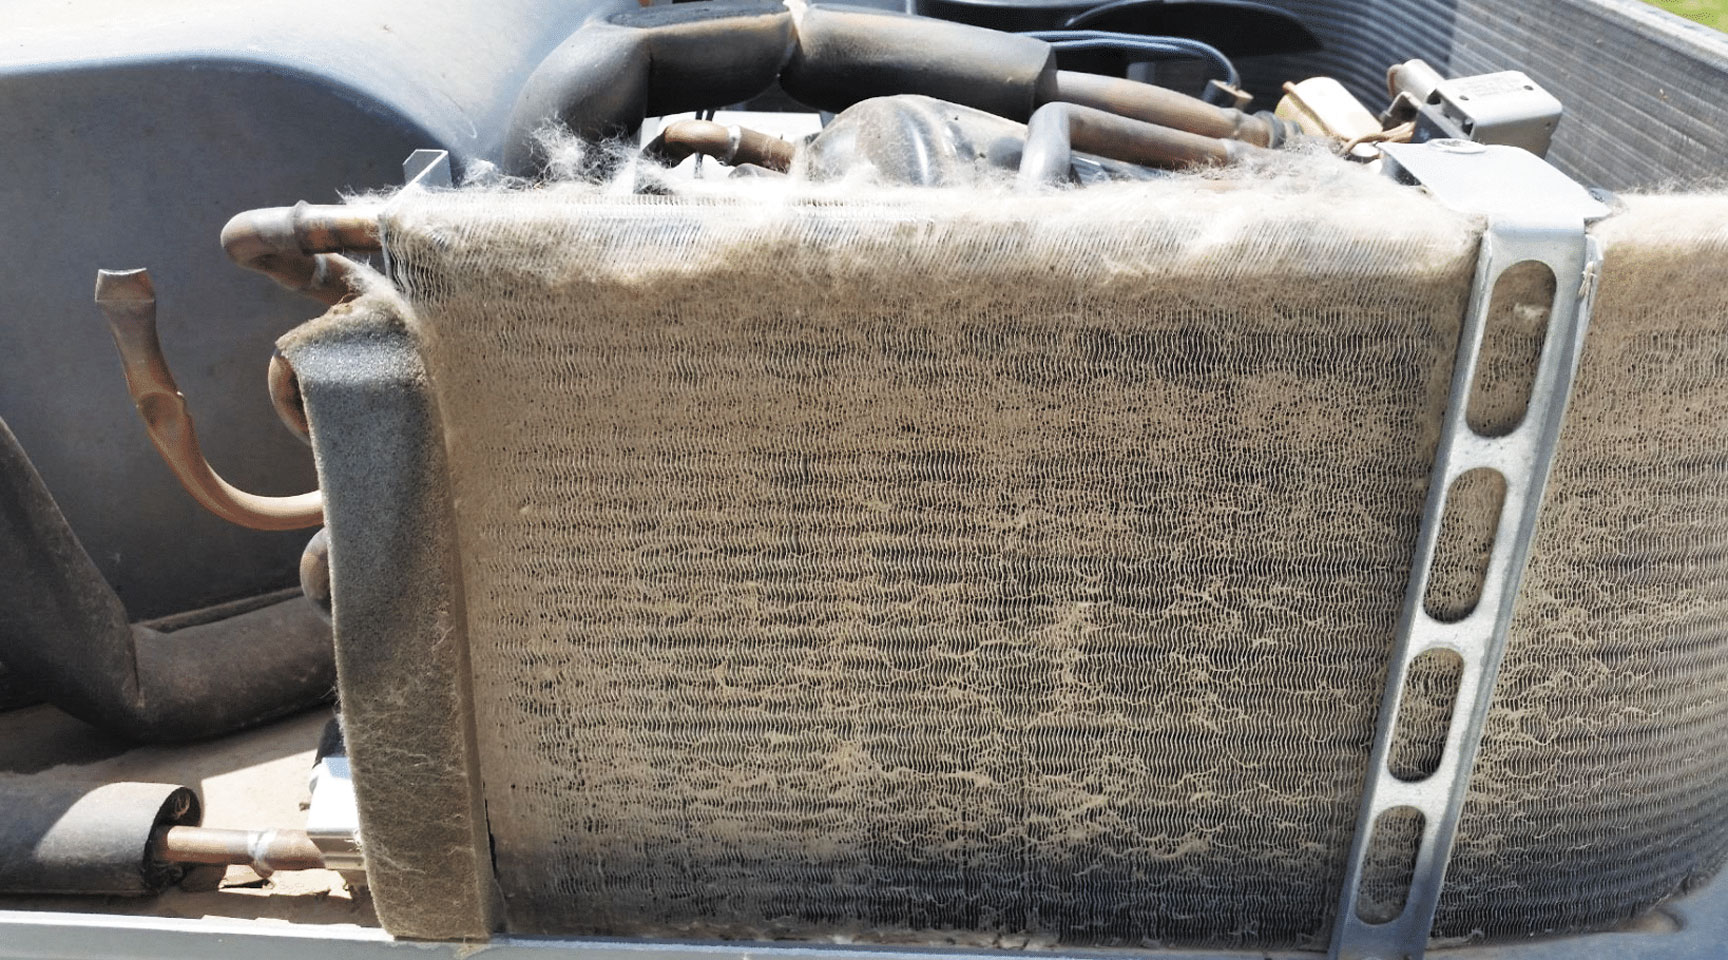
A shop vacuum can be used to remove lint and dust from the condenser coils.
6. Inspect and clean the condenser coils. Use a shop vacuum to remove the bulk of the contaminants. In some cases, it may be necessary to use a cleaning solvent, but typically that is a messy procedure that is best left to a professional. If any of the fins on the exposed coils are damaged, carefully straighten them as best as possible using a fin comb. Fin combs can be purchased at any heating, ventilation, and air conditioning (HVAC) supply store. Take care not to disturb the cold control sensor on the condenser, if the unit is so equipped.
Inside The RV
7. Replace the return air filter. Some filters can be rinsed with warm water. However, this usually results in a clumping of the dirt, dust, and dander. I recommend replacing the filters at least annually; twice a year if the unit is subjected to dusty or dirty conditions. Cleaner air means less chance of blockages occurring in the fins. RV Air Inc. (https://rvair.com) sells one of the better filters, with a Merv 8 rating (which means it blocks particles as small as 3 to 10 microns).
In addition, remove the louvers of the cold-air discharge ducts. Use a mirror and a flashlight to inspect as far back as possible for evidence of dirty or damaged ducts. If dust is evident, vacuum as far as you can reach.
8. If the RV has an interior ceiling plenum, remove it and check the positioning of the sensing probe attached to the thermostat, if so equipped. The sensing probe is common in simple nonducted, blow-through units.
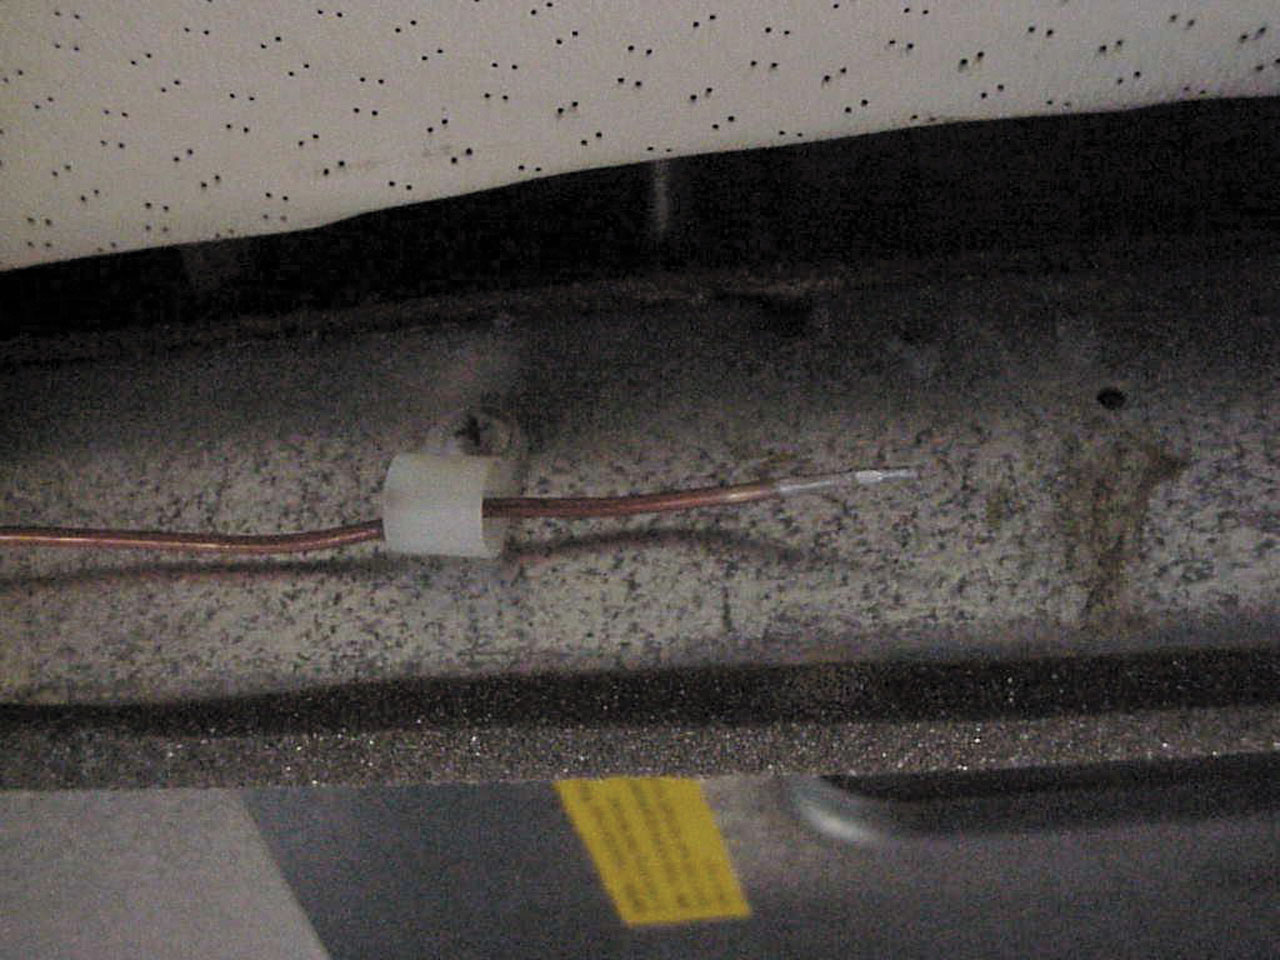
If a sensing probe is attached to the thermostat, check the probe’s positioning.
Be sure the sensing probe is situated in the direct flow of return air to the unit and suspended or attached without making metal-to-metal contact with any frame members. Look closely for grime or a film that may have accumulated from cooking oils and/or cigarette smoke. If contaminants are found, gently clean the sensing probe with a warm, moist rag. Take special care not to kink the small capillary tubing leading to the end of the probe.
9. Check the condition of the mounting gasket located between the bottom of the rooftop unit and the roof itself. It will be visible from inside the RV by looking up and into the 14-inch opening in the roof. If the gasket has been compressed beyond usefulness or if there is evidence of water leaks, install a new gasket. Replacement gaskets that exceed the quality of the original gasket now are available. Ask a local RV parts store to order one if necessary.
10. Check the tightness of the mounting bolts. Snug them up only enough to compress the gasket to half its original thickness. The thickness of most original gaskets is approximately 1/2 inch to 5/8 inch.
11. Check the cleanliness of the evaporator coils by shining a flashlight into the unit from inside the RV. In rare, severe cases, it may be necessary to use a cleaning solvent and/or compressed air to remove contaminants. As mentioned in number 6 above, this is a messy task probably best left to professionals. Chances are it will not be necessary.
12. Keep the battery bank charged. But wait — isn’t the air conditioner a 120-volt-AC device? The air conditioner compressor and fan(s) are indeed powered by 120 volts AC, but modern control circuits are powered by the 12-volt-DC low-voltage system. Operational problems with various relays, circuit boards, and the wall thermostat can develop under low-voltage battery conditions.
Checking Refrigerant Charge
The average do-it-yourselfer with a few hand tools can effectively perform the above procedures relatively quickly. An additional step will indicate the effectiveness of the refrigerant in the roof unit. This process is easily accomplished using a probe-type pocket thermometer. The goal isn’t so much a pinpoint, accurate temperature reading, but to obtain the difference in temperature (known as Delta T) between the cold-air supply and the return air.
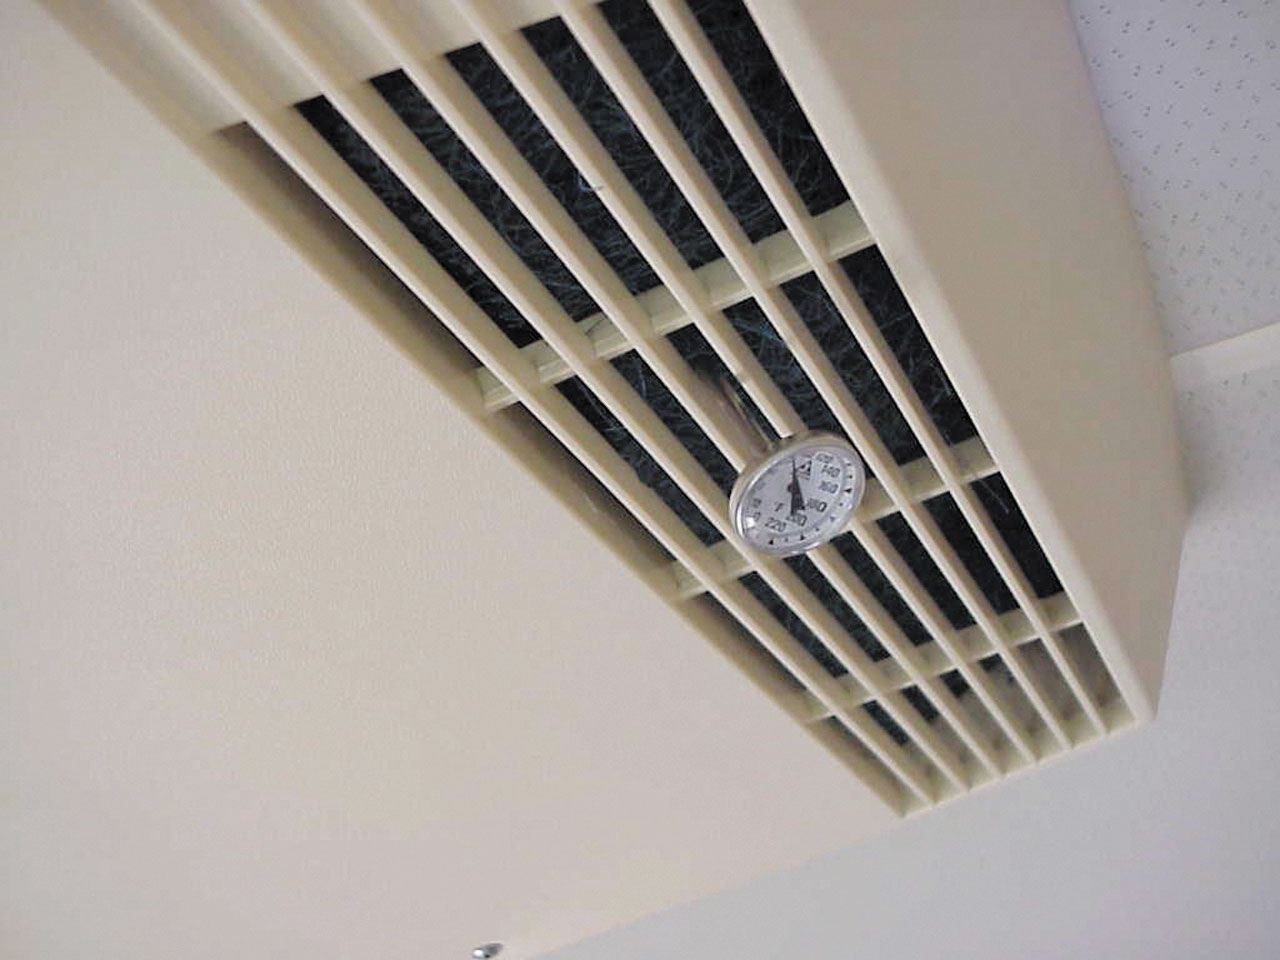
To check refrigerant charge, place a thermometer probe in the return air path.
Begin by running the air conditioner on “high cool” or the maximum setting for a minimum of 30 minutes. Be sure all the RV windows and vents are closed, and all air conditioner ducts are open. Position the thermometer directly in the flow of the cool air being discharged into the RV. After the temperature stabilizes, note this reading.
Next, place the thermometer probe in the path of return air to the unit. The return air path goes directly through the filters. Usually, the probe can be inserted into the filtering element. Note this reading as well. In ducted systems with a number of return air vents, measure the temperature at the closest return air vent to the main rooftop unit.
On the “high cool” setting, a temperature differential of 18 to 22 degrees Fahrenheit indicates a system with the proper amount of refrigerant. In areas of high humidity, however, the temperature differential may be somewhat less, but 18 to 22 degrees difference is the goal.
Also realize that even on extremely hot days, the RV rooftop air conditioner can reduce the ambient temperature only by this differential. If it’s 105 degrees outside, it’s the fortunate RVer who can obtain an inside comfort level of 85 degrees consistently. Because of their relative size and capacity, most RV air conditioners are simply no match for extremely high temperatures. That’s why many larger RVs are outfitted with two, three, or four rooftop units.
If the temperature differential is substantially less than 20 degrees Fahrenheit, contact an RV service facility; further troubleshooting may be necessary. A slow refrigerant leak may exist somewhere in the closed system, or a faulty component may have reduced the overall cooling efficiency.
Though many RV owners can safely perform rooftop air conditioner preventive maintenance procedures, repairs should be handled professionally. In most cases today, the air conditioner is replaced when a major component fails. But by performing the above steps annually — preferably before the hot season begins — cooling woes can be minimized or possibly eliminated. Remember, RVing is more than a hobby; it’s a lifestyle!