
In the first installment of a two-part article, the “RV Doctor” delves into a vital RV system.
By Gary Bunzer, Technical Editor
March 2020
How important is an RV’s 12-volt-direct-current (DC) system? Consider this: It either powers directly or controls almost everything in and on an RV. Even though today’s RV rooftop air-conditioner compressor is energized by 120-volt-AC electricity, it’s the 12-volt-DC battery system that controls its operation. You cannot even turn on a modern absorption refrigerator without a healthy battery bank. And in a typical motorized or towable RV, all (or nearly all) lamps and every pump and relay are powered by the 12-volt-DC system.
Because of its relatively complex design, the 12-volt-DC system can frustrate RV owners, especially those with more sophisticated RVs. That’s why we’re taking an in-depth look at this important system in a two-part article that continues next month. The goal is to provide information and tips to help you better manage your 12-volt-DC system.
A typical maintenance-free wet-cell 12-volt battery.
If you choose to follow any instructions or procedures outlined in these articles, first satisfy yourself that neither personal nor product safety will be jeopardized. If you are in doubt or do not feel comfortable about a procedure, do not continue. Make an appointment with an RV service facility.
The house battery bank is at the heart of the 12-volt-DC system, so it behooves us to optimize the batteries’ potential. That’s important even if you have only one battery in your RV, especially if you enjoy boondocking or dry camping.
RV Battery Systems
The DC systems in RVs sometimes are referred to as battery systems. Motorhomes utilize at least two distinct battery systems. One is the chassis battery bank that typically starts the motorhome engine and powers the dash components, such as the horn, heater/air-conditioner fan, running lamps, etc. The other is the house battery bank. It provides the current for everything in the living portion — water pump, furnace blower, all exhaust fans, slideout motors, and low-voltage lighting, along with myriad 12-volt components. Current (amperage) for 12-volt-DC components is provided by these items (if so equipped):
- House battery bank
- Power converter or inverter/charger
- Engine alternator
- Solar array
As noted, the house battery bank is the center of the 12-volt-DC system. Most RVs are equipped with multiple batteries configured into the same bank.
For an overview of the types of RV batteries (flooded lead-acid, gel-cell, absorbed glass mat, lithium-ion) and their specific applications, see Steve Froese’s Family RVing article “RV Battery Types” (April 2019, page 40). In addition, check out the article I wrote about the future of lithium-ion battery banks, “A Boon For RV Batteries” (May 2019, page 42).
A battery, regardless of type, is an energy bank, if you will. The current or amperage is the actual energy stored. Current, which is the flow of electrons in a circuit, sometimes may be referred to as a “draw” or a “drain.” For instance, you might hear, “How much current does that slideout motor draw?” Or, “The battery has a 650-milliamp drain on it.”
When discussing batteries, it’s important to understand the terms efficiency and capacity. An RVer who says, “How much power does that battery bank have?” is asking about capacity. “How come the battery is dead when I only used the furnace overnight?” is a question about efficiency.
The capacity of a chemical battery (lithium-ion notwithstanding) depends on the following:
- Area of the plates in direct contact with the electrolyte
- Specific gravity of the electrolyte
- Type and thickness of the internal separators and plates
- General condition of the plates (that is, how much sulfation has taken place)
- Limiting voltage (beyond which there is very little useful amperage or energy available)
Battery capacity is directly proportional to the efficiency of a battery. A battery’s efficiency is determined primarily by these factors:
- The mechanical and physical condition (especially the internal components)
- The state of charge of the battery
- Temperature
Inside The Battery
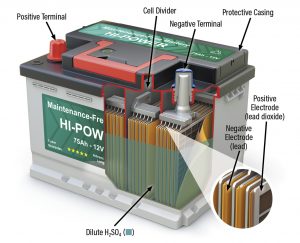
The flooded lead-acid battery remains the most common RV battery. A typical flooded battery has a case made of polypropylene or similar plastic, and usually it is one piece, topped by a cover. Indentations and ribs impart strength to the case, but take care never to drop a battery; always use a battery strap or clamp for carrying. Eye protection, closed-toe footwear, and rubber gloves should be worn when handling lead-acid batteries.
The typical 12-volt storage battery has six individual compartments known as cells. (A 6-volt battery has three cells.) The compartments house positive and negative plates. The plates — which must be insulated and separated from each other while immersed in the electrolyte — make up the bulk of the battery’s interior.
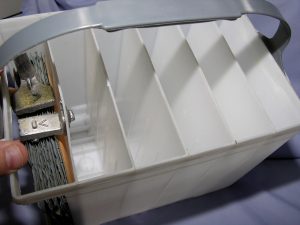
The plastic case of a typical 12-volt battery has six cells with an insulating separator between each plate.
Between each plate is an insulating plate separator. The separator must be resistant to the acid in the electrolyte as well as to heat, since charging and discharging a battery always produces a temperature rise. Each cell plate is connected by a welded strap or cell connector. They are interconnected in series, with each cell producing approximately 2.0 volts DC. Being connected in series results in the six cells being able to produce the nominal 12 volts DC. When a battery is said to have a bad cell, it usually means two or more of the cell’s plates have shorted out, or the cell is suffering from a prolonged sulfated condition.
One positive plate and one negative plate ultimately end up on either end of the battery and protrude through the top as the terminal posts. Side-post batteries are made to meet certain design needs.
Battery manufacturers recommend adding distilled water to the battery, because such water contains fewer contaminants than tap water. Internal contamination also is kept to a minimum by the battery design. The plate within each cell is elevated above the bottom of the battery case by a plate foot or by a ribbed and raised case bottom. Contaminants in the electrolyte sink to the bottom, as do active materials that are shed from each cell. They accumulate within the ribbed portion on the bottom of the case. If sediment rises above the ribbed bottom and contacts both a positive and a negative plate, the cells can short-circuit.
The battery’s electrolyte consists of sulfuric acid and water. Sulfuric acid is a mineral acid composed of sulfur, oxygen, and hydrogen. Water, of course, consists of hydrogen and oxygen. These elements combine during the charging cycle, and they separate during discharge.
Positive plates in the battery contain an active material, lead oxide, a combination of lead and oxygen. These elements also can separate. The negative plates contain sponge lead as their active material.
Battery Discharge
During periods of battery discharge, as the stored electrical current (measured in amp-hours) is being consumed by the DC loads in the RV, a chemical reaction between the sulfuric acid and the lead plates produces electricity. The reaction causes lead sulfate to begin to form on the positive and the negative plates. The oxygen of the positive plates combines with the hydrogen of the sulfuric acid to transform into water, which drastically reduces the strength of the electrolyte. When the negative and positive plates have heavy buildups of lead sulfate and are immersed in a solution of mostly water, the battery, which is said to be in a sulfated condition, is basically dead.
Battery Charge Cycle
During recharging of the battery, the above chemical reactions are reversed as the current flow through the battery is reversed. Water is converted to hydrogen and oxygen. Lead sulfate is converted back into lead (on the plates) and sulfuric acid. As the sulfuric acid replaces the water, the specific gravity increases and the battery becomes charged. One complete discharge and recharge constitutes one life cycle.
For each charging cycle, the battery can never be fully recharged to the level that existed before that cycle, because some sulfate remains on the plates. That buildup continues with each recharging cycle. Therefore, it’s impossible to “refill” a battery to the same level of amp-hours that was withdrawn. That’s why lead-acid batteries have a finite lifetime. At some point a battery will no longer accept a charge.
Battery Banks
RVers must ensure the house battery bank has adequate amp-hours to meet electrical demand. Because the electrical current each battery can store at full charge is limited, it may be necessary to add more batteries. For optimum performance, all batteries in the battery bank should be the same type, the same size (amp-hour rating), and the same age.
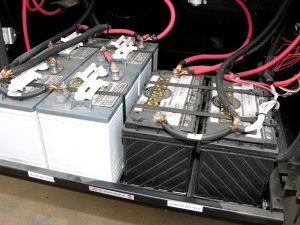
Rather than rely on a single battery, many RVs are equipped with battery banks that consist of at least two 12-volt batteries wired in parallel, which increases the capacity to store current. In some cases, multiple 6-volt batteries are wired in a series/parallel configuration to provide even more capacity.
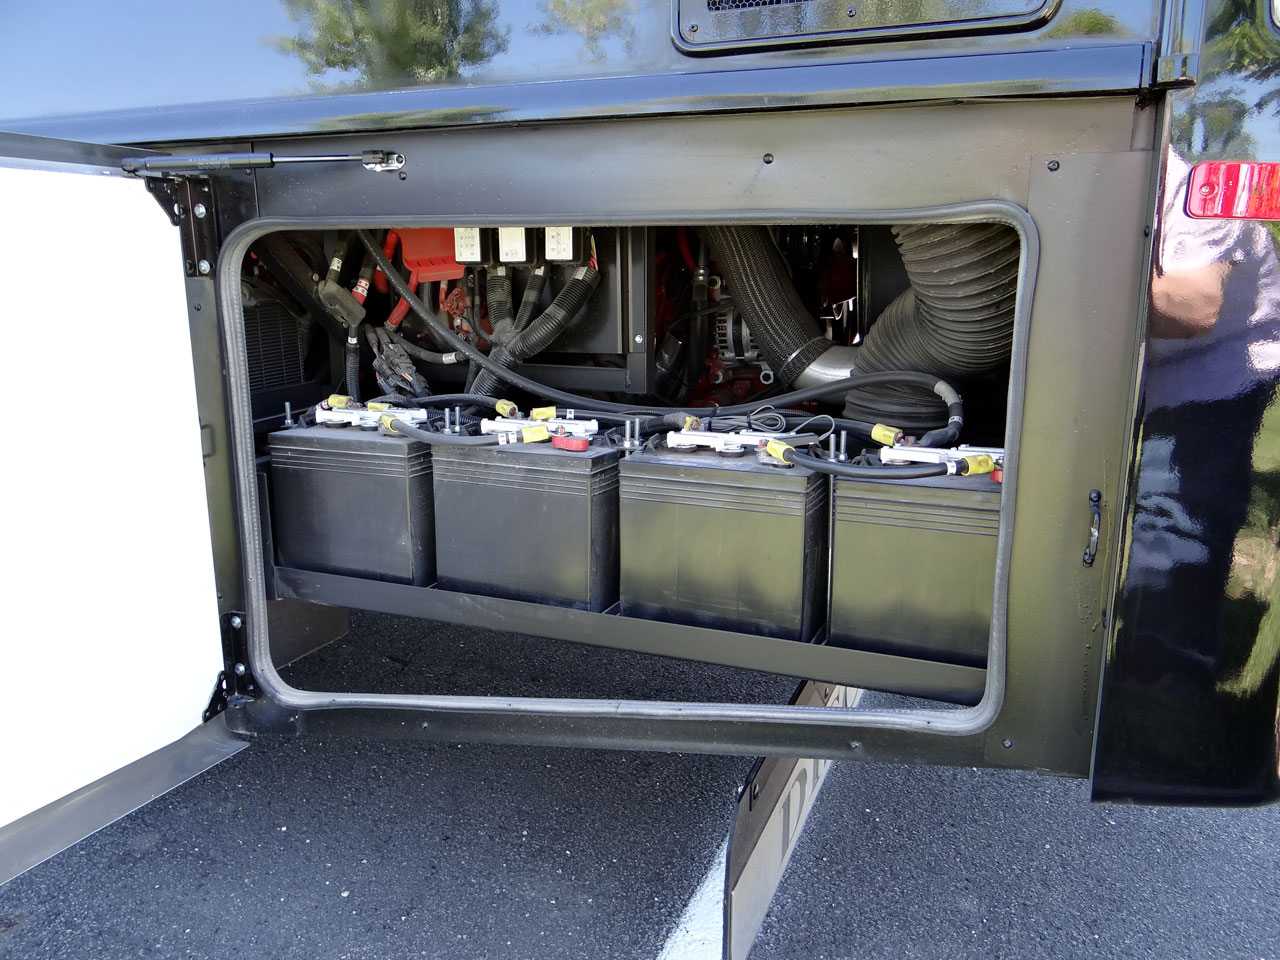
The photo below shows two battery systems in a Type A motorhome. Four 6-volt batteries, wired in a series/parallel configuration, provide 12-volt-DC electricity for the house portion of the RV. Two 12-volt chassis batteries wired in parallel are used to start the engine and energize the dash components. Proper configuring of 6-volt and 12-volt battery banks was covered in a Family RVing article titled “The Balance of Power” (January 2012, page 46).
Six-volt house batteries wired in series/parallel are on the left; 12-volt chassis batteries wired in parallel are on the right.
RV batteries come with a substantial cost, so it makes sense to get the most out of that investment. For optimum performance of a flooded or absorbed glass mat deep-cycle RV battery bank, the depth of discharge (DOD) should never fall below 50 percent. This rule does not apply to lithium systems.
Battery state of charge is related to DOD; for example, if a battery is at 70 percent state of charge, the DOD is 30 percent, since the total must be 100 percent. For removable filler-cap batteries, a hydrometer is the most efficient means of determining state of charge or DOD. For maintenance-free batteries, use a digital voltmeter. But for any RV battery bank, the best option is to invest in a quality voltmeter mounted at the control panel inside the RV. Meters are available that measure battery bank capacity, similar to a fuel gauge. Some indicate percent of charge as well.
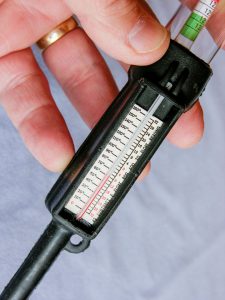
A hydrometer can be used to measure a battery cell’s state of charge.
Testing The Battery
Four tests can be performed on any RV battery.
Visual test: Some batteries that have experienced extreme cold while in a sulfated condition may become freeze damaged. If a battery has cracks, bulges, or loose posts, it should be replaced.
Specific gravity test (nonsealed batteries): Also called the hydrometer test, this can determine whether a battery is charged and to what extent. That information is important when troubleshooting a 12-volt-DC-related problem, because one of the first steps is to try to eliminate the battery as the culprit.
The term “fully charged” often is misused. It means a battery is storing the maximum amount of amp-hours, or current, it can hold, regardless of its age or condition.
One way to determine when a typical flooded lead-acid battery becomes fully charged is to carefully monitor the specific gravity while the battery is being charged. As a battery accepts a charge, the specific gravity continues to rise. When the specific gravity stays constant for two to three hours, the battery is considered fully charged. Any additional charging wastes energy and exposes the battery to unnecessary heat and possible gassing or boiling of the electrolyte, which lessens its capacity to store current after subsequent discharge and recharge cycles.
The specific gravity of pure water is 1.0. A fully charged battery has a specific gravity of approximately 1.265. That means the electrolyte in the battery is 1.265 times heavier than the same amount of pure water (at 80 degrees Fahrenheit), because it contains sulfuric acid.
As I noted earlier, when a battery is sulfated (discharged), the hydrogen in the sulfuric acid combines with the oxygen in the lead oxide of the positive plates, producing water. In other words, the higher-than-normal water content in a sulfated battery results in a lower specific gravity.
When monitoring the specific gravity during or after charging, remember that the temperature of the electrolyte also affects the readings. If the temperature of the electrolyte varies above or below 80 degrees, you must compensate for the difference. The industry-accepted rule is that for every 10 degrees above 80, add 0.004 to the reading. Likewise, for every 10 degrees below 80, subtract 0.004. Typically, this won’t matter much in more temperate areas, but the correction can be substantial in places that are very cold or hot. Some key points to remember:
- Do not take a hydrometer reading immediately after adding water.
- Replace a battery that has a 0.050-point difference between any two cells.
- Always use a temperature-corrected hydrometer.
Specific gravity varies with temperature and the amount of electrolyte in each cell. When the electrolyte is nearing the lowest mark, the specific gravity is higher than nominal, but it drops as water is added to replenish the electrolyte. Also, the volume of electrolyte expands or contracts according to rises or drops in temperature, therefore affecting the specific gravity reading.
Open-circuit voltage test: This can provide an indication of battery health or state of charge for sealed-top batteries. After charging, allow the battery to stabilize a few hours, connected only to components some would consider to be parasitic, but which often are necessary, such as the propane leak detector. Voltage stabilizes rather quickly (five to 30 minutes) after discharging, but stabilization following a full charge typically takes longer (four to 12 hours). Stabilization is necessary to obtain accurate test results and to allow the electrolyte in the pores of the active ingredients on the plates to mix and indicate the battery’s average electrolyte. After stabilization, open the circuit by disconnecting the negative terminal that leads directly to the chassis grounding point. Attach voltmeter leads directly to the battery posts and compare the readings to the accompanying “Open-Circuit Voltage Test Comparisons” table.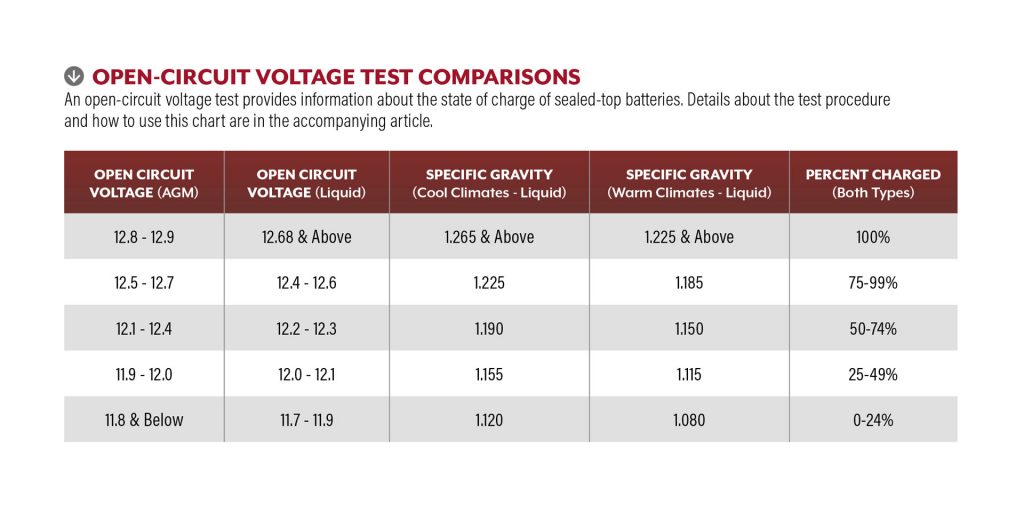 Notice that small increments in open-circuit voltage correlate to large jumps in the “Percent Charged” column. This is why the open-circuit voltage test is not 100 percent accurate as a stand-alone method of battery testing, with the exception of sealed-top batteries. This also validates using a digital multimeter to measure the voltage. And, this underscores the misperception that if a 12-volt battery measures 12.0 volts DC, it must be healthy. Actually, if a battery measures just 12.0 volts DC, it might be only about 25 percent charged.
Load test: If you cannot determine whether a battery is viable by performing the tests above, find a facility where a certified or master certified service technician can perform a high-current carbon pile load test. It is the most effective method of testing the battery on an RV, but it requires an expensive piece of equipment not usually found in RVers’ tool kits. A carbon pile tester draws a massive load on each individual battery and truly determines the interior condition of the plates. A load test should not be performed on the entire bank at one time; each battery should be disconnected and tested separately. Many less expensive, coil-type testers claim to be battery load testers, but they do not perform as effectively as the carbon pile tester.
Now that we’ve taken a look inside flooded batteries and discussed how to test them, next month we’ll focus on battery charging methods; keeping the chassis battery bank and house battery bank separate; overcurrent protection; troubleshooting tips; and more.
Remember, RVing is more than a hobby; it’s a lifestyle!