
Advantages include rapid heating and precise temperature control.
By Ron Jones, F115768
June 2020
Common cooking methods in RVs involve using propane, traditional electric, and the newest option, induction. While all three create heat, the cooking process differs for each.![]()
With propane, you cook using an open flame. With electric, it’s a red-hot coil. Both methods cause a pan and the food inside it to become hot. The transfer of heat from hot objects to cold objects by direct contact is called conduction.
Induction, as we’ll explain in more detail below, is a bit different. Induction cooker patents date to the early 1900s, but the method did not gain popularity until just a few years ago. Some commercial kitchens use induction cookers, because they are fast, easy, and safe. The induction method is not difficult, but it requires some minor changes in how you cook.
Our Dilemma
When gas and electric stoves were our only choices, we always chose gas for our RV and house, simply because we preferred it. We are full-timers, and when we got our current RV, the lack of a propane tank meant that was not an option, and we didn’t want traditional electric. Plus, the two-burner built-in cooktop that came with the RV was broken.
We had been testing induction cooking for about a year in our previous RV, and we decided the most efficient arrangement was to have two portable induction cookers instead of a permanently installed two-burner, drop-in induction cooktop. So, with a minor renovation, we changed our current RV to have only an induction-cooking option. We removed and discarded the electric cooktop, disconnected the original wiring, and installed a new 120-volt receptacle (hidden under the counter surface) so we could plug in two portable induction cookers.
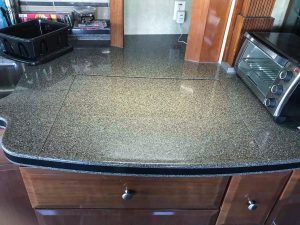
When the stove cover is closed, there is ample workspace on the kitchen counter.
With many portable induction cookers, you can use larger-diameter pots and pans (I use up to a 12-inch skillet). If electricity is available, the cookers can be moved outside onto a picnic table or set directly on the table to use as a warmer — any place they can be plugged in.
Induction Cookware
Induction cooking requires pots and pans (magnetic stainless steel, cast iron, nonstick, etc.) that are “induction ready.” That is, they must have a magnetic bottom. You probably have some now.
To determine whether cookware is induction ready, look for the induction symbol, which is stamped into the bottom of newer cookware. Or, use a small magnet to check the bottom of a pot. If the magnet sticks, the pot should work on an induction cooker. If the magnet doesn’t stick, the food will not cook or even get warm.
How Induction Works
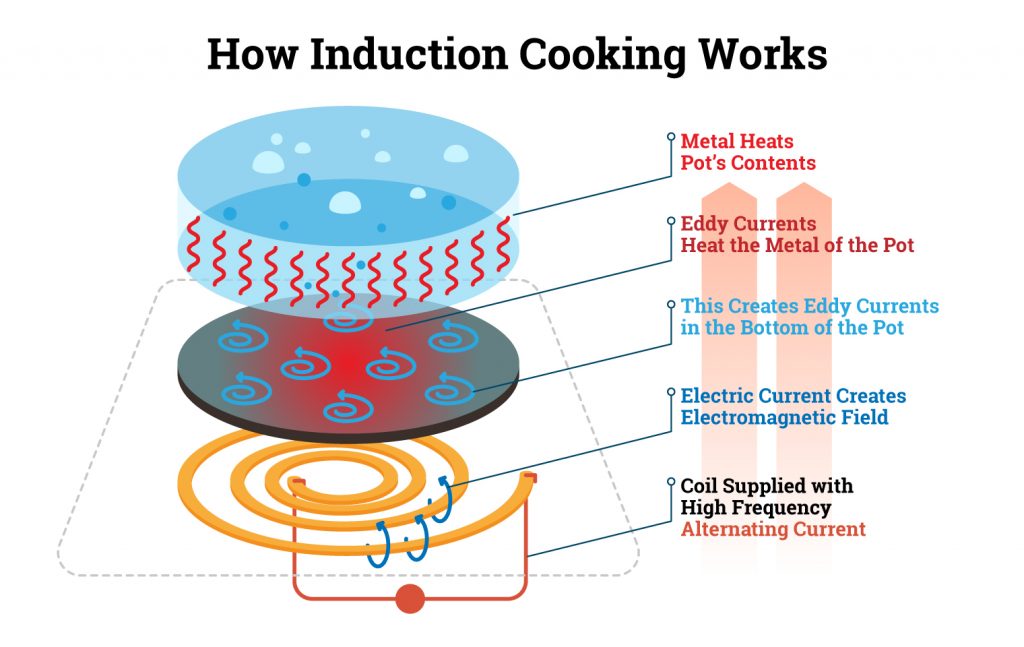
Induction cooking generates electricity using magnetism. Electricity from a wall plug flows through the coils in the induction cooker to create a magnetic field. But without a pot on it, the induction cooker’s surface does not get hot; you can turn on an induction cooker and toss a piece of cheese or a paper towel on it, and nothing happens. However, if you place an induction-ready pan on the cooking surface, the magnetic field produced by the cooker’s coils penetrates the iron in the pan, causing the electrons in the metal to move rapidly. The resulting friction generates heat. The hot pan then passes heat energy to the food or liquid inside it.
The magnetic field generated by induction cooking could affect the operation of a pacemaker or similar medical device of a person standing close to an induction unit while it’s in use. Therefore, people with such medical devices should consult with their doctor about the use of induction cookers.
 Induction cookers have more precise heat control than other methods of cooking. Ours has settings from 100 degrees Fahrenheit to 575 degrees Fahrenheit, adjustable in 5-degree increments. That’s real control.
Induction cookers for RVs are designed to run on 120 volts, whereas commercial induction cookers may use 220 volts. The latter are fast and will boil a small amount of water in seconds. The cooker in your RV will take a bit longer (due to lower power) but will work just fine.
Induction Cooking Myths
Here are some common misconceptions regarding induction cooking.
- On some cast-iron cookware, a ring is molded into the bottom, close to the outer edge. The ring simply raises the pan slightly so the flat bottom does not sit directly on the cooking surface. A common myth is that cast-iron cookware with this ring will not work on induction cookers, because the cookware bottom does not come in contact with the cooker. This is true only if the ring is so thick that it causes the cookware’s flat bottom to be raised up too far from the cooker’s surface.
Most of the time, cast-iron cookware with the ring will work just fine. The best solution: Simply test it. Put the cookware on an induction cooker and turn it on. If the cookware instantly becomes warm (and then hot), it works. Many stores will do this test for you.
- Another myth is that the cooking surface on the induction cooker does not get hot. It will get hot, but not from the cooker. The induction cooker causes the food to get hot (and cook), and heat then transfers from the food down through the pot to the surface of the cooker. Therefore, both the pot and cooker’s surface can be extremely hot.
- Finally, you may hear that you can use nonmagnetic cookware on an induction cooker with help from an accessory sometimes called an induction interface disk. This is a plain, flat, metal disk, usually promoted as being made of magnetic stainless steel. Some are sold with a handle attached. Many are expensive.
The flat disk sits directly on top of the induction cooker, and then any pot or pan is placed on top of the disk. Since the disk is magnetic, it can be heated via induction and, in turn, food will become hot and cook. While this is true in theory, I have heard that it does not work consistently, plus it is inefficient and, therefore, slow.
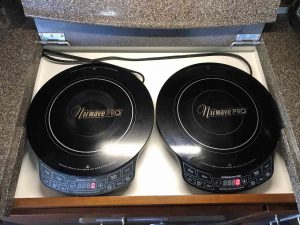
The author chose portable induction cookers, which easily can be replaced.
Preheating
Since induction heats rapidly, very little preheating time is needed. The trick I use is to let the cookware get hot (10 to 15 seconds on mine), and then pour one drop of regular olive oil into the pot and see whether it spreads out. If so, the pot is hot and ready to use. The total preheat time with my induction cooker is no longer than 30 seconds.
Heavy cookware (such as cast iron) requires a bit longer preheat time, so be aware of this when you start using induction. Cast iron is considered hot (with no cold/cool spots) when you can’t touch the handle, but I don’t wait that long. I use my drop of oil method on cast iron, too.
The Cooking Process
Pot/pan selection is easy. For those with the magnetic bottom, just use the same sizes and types as you typically use and cook normally. You must watch the heat, especially while learning. Most people have a tendency to set the temperature too high. With induction cooking, you set the cooker to a specific temperature rather than guess the heat level on a burner. An oven is always set to an exact temperature, so why not control your burners with the same precision?
Lowering the temperature is also a bit different. When you select a lower temperature, you may not see an instant change in the food cooking; that is, it continues boiling, simmering, etc. That is because the food is at a certain temperature and does not instantly cool to a lower temperature. It will. Give it a few seconds.
When following recipes created with traditional gas or electric stoves in mind, you often are directed to “use low heat,” or some such statement. What is low heat? Plus, even if your traditional gas or electric stove has a burner setting for “low,” is it too hot or too cool for your food preparation?

The large utility drawer is used regularly when the author cooks, so no changes were made to it.
With induction cooking, preparing foods becomes a bit more exacting, because you cook with specific temperatures. That means a recipe can be followed precisely the same way, time after time.
Some cooks have a tendency to shake cookware while cooking in order to move the food around without actually using a utensil to stir it. Don’t do this with an induction cooker, especially when using cast iron. Cast-iron cookware may have a rough bottom; shaking it while it is on an induction cooker may scratch the cooker’s surface. If you need to move the food around, use a utensil to stir it.
Other Advantages
I believe my actual cooking time is a bit faster with induction, but I have not tested this. I do know that temperatures are easier to control. For example, reducing the temperature just 5 degrees may slow a simmer the perfect amount. That is easier than guessing and more accurate than just turning a knob.
You will rapidly learn the best temperature settings when using induction cooking. You can follow traditional recipes and the preparation steps found on prepackaged foods, too. You don’t have to change anything.
I do nearly all of our cooking in our RV, preparing meals four to five times a week. I have always been concerned with the smaller food-preparation area in an RV and having to work close to the stove. So, with no open flame or red-hot coils, induction is safer. I can lay a paper towel directly on the induction cook surface without danger.
Having extensively tested induction cooking in our RV, we can report that everything is fine, and our decision was good.
How We Retrofitted Our RV For Induction Cooking
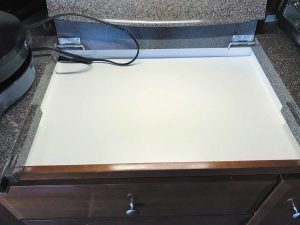
A shallow box was built to replace the electric drop-in unit and the base that supported it.
We are full-time RVers who decided to rely on two portable induction cookers. That meant discarding the nonworking electric built-in unit in our motorhome, as well as the flat surface in which it was mounted. But we wanted to keep the large utility drawer under the existing cook surface.
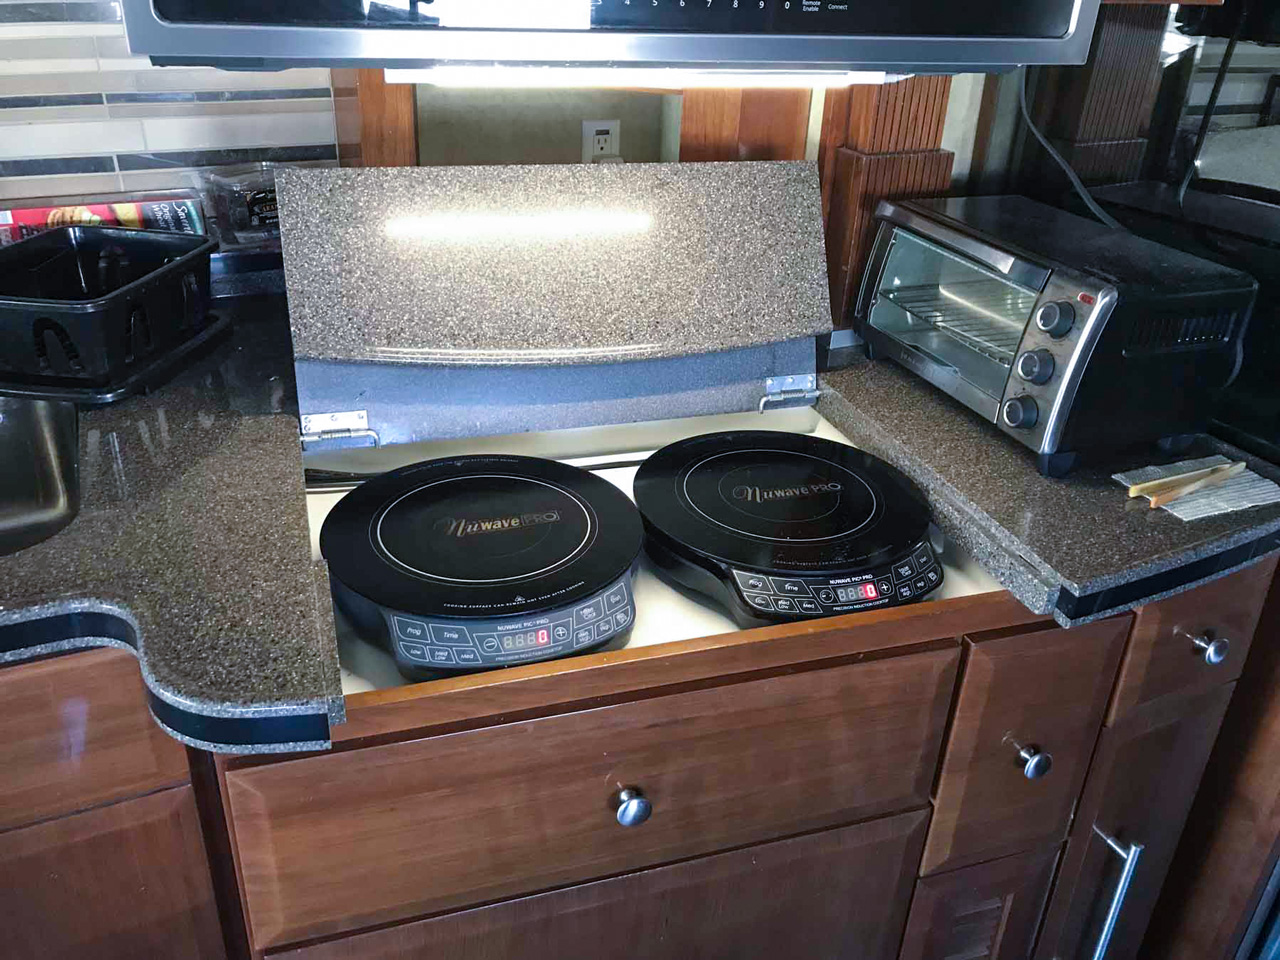
The standard electric built-in unit was mounted under a portion of the kitchen counter. The counter had a folding cover that lifted and tilted back to expose the stove while cooking.
We had a shallow box built to replace the electric drop-in unit and the surface that held it. The box is lined with a light-colored plastic-like material that shows spots and cleans easily. The box is situated under the folding counter surface — not so low that it interferes with the utility drawer, but low enough to give us about the same height between the cooking surface and a microwave oven above.
A new receptacle was installed for the two portable cookers. The receptacle, mounted under the rear counter, is hidden behind the box. Both induction cookers stay in the box, which has a hole in its wall for their cords. The cookers are plugged in all the time to a noninverted circuit. They travel well in the motorhome and are ready to use when the countertop is raised and the coach is plugged in or the generator is turned on. The new receptacle was mounted as high as possible for safety. If liquids run down the cords, they cannot leak into the receptacle, since the cords hang down and the receptacle is mounted higher up.
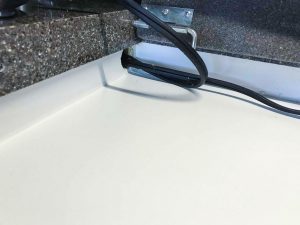
Both induction cookers’ cords are run through a hole in the wall, which is big enough for plugs to pass through should a replacement cooker be needed.
Our induction cookers are from NuWave, but this design should work with any brand of cooker that fits your existing space.
The arrangement works well. We have had no problems with excessive heat, and we frequently use both induction cookers with two large pots. I have had no problems using 50-amp shore power or our generator. We didn’t change the folding stove cover, so it can be in the up position (for cooking) or down (for traveling).
We chose portable induction cookers, rather than a double induction cooktop, because if anything happens to one of the portable units, it can be replaced for less than $80 (as of this writing), set into the space, and plugged in. I can easily do that. A double cooktop induction unit costs significantly more and would have to be professionally installed. Plus, we can remove the portable units and take them outside or to the table if needed. A cooktop installation is considered permanent. Our design is both less expensive and more flexible.