
Tips for guarding your home on wheels against damage while it’s in hibernation.
By Mark Quasius, F333630
September 2023
RV North who must stay put and deal with cold weather and snow during the winter need to protect their RV by “winterizing” it. Preparing the RV for a long winter’s nap helps to ensure that its systems are in good shape when you wake it up next spring. This process primarily focuses on preventing damage to the fresh-water and waste-water plumbing system. When water freezes, it expands, which can cause all sorts of issues, such as split water lines, cracked valves, and leaks in other places that will need to be fixed before the RV is ready for travel. Winterizing is a fairly simple DIY project.
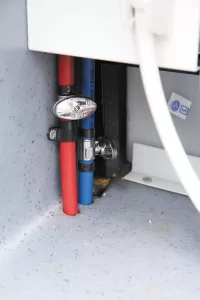
Low-point drain valves help remove water from the fresh-water system.
THE CASE FOR AIR
In early RVs, water could be drained from the plumbing system easily via low-point drain valves. These valves are, as the name suggests, the lowest points in the fresh-water system — one for cold-water plumbing and a second for hot water. Most RVs use blue PEX tubing for the cold-water lines and red PEX for the hot-water lines. With more plumbing fixtures being added to today’s RVs, it’s possible some water may not make it to the low-point drain valves when they are opened. Dips and lack of adequate slope from the fixtures to the drains may prevent this; so, a little help is needed.
If your RV doesn’t have a lot of plumbing fixtures, you can consider blowing the water out of the system using a clean source of compressed air. In theory, this will remove water and prevent freeze-ups. You’ll need to connect an air compressor to your fresh-water hose and blow the water out through every fixture and the low-point drain valves.
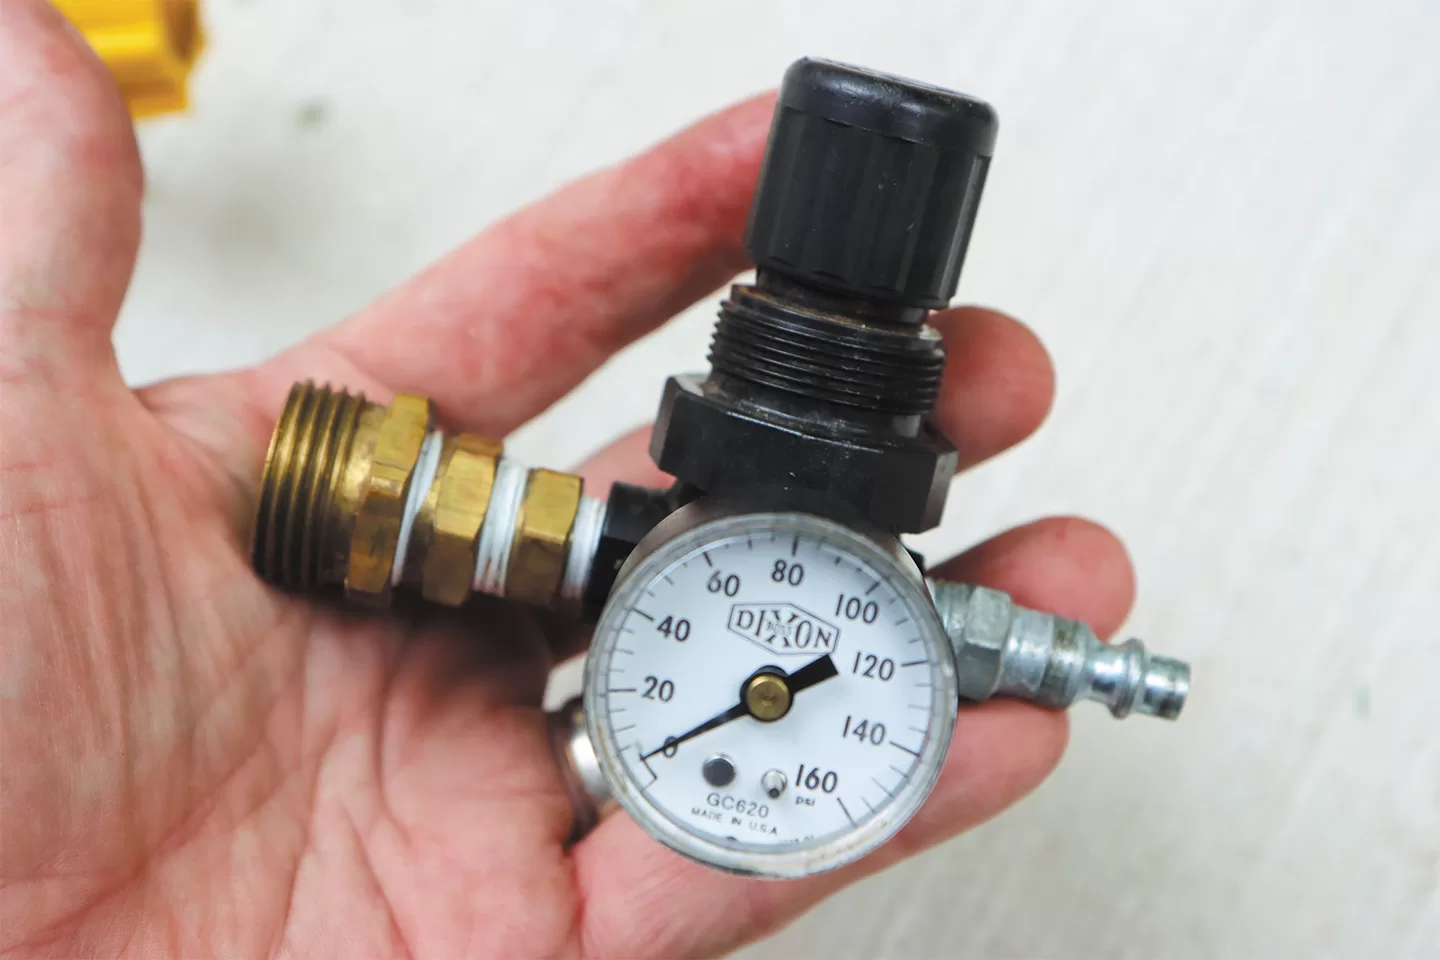
By connecting an air compressor to the fresh-water inlet hose, you can use compressed air to force water out of the system. To prevent damage from excessive air pressure, a pressure regulator should be used to reduce the pressure to approximately 20 to 25 psi. Simple blow-out adapters are available at RV supply stores, but unless you buy a locking tire chuck adapter, these require holding a tire chuck onto the fitting, which can become tedious and requires an assistant. To make the task easier, go to your local home-improvement or auto-parts store and pick up a small pressure regulator with a gauge; a male garden hose fitting; and a coupler plug that fits your air compressor’s hose.
THE CASE FOR ANTIFREEZE
Using compressed air when winterizing an RV is an attractive option because it’s free; however, it has drawbacks. Although air pushes most water out of the lines, a bit always condenses and remains. It can settle after a while and collect in a low spot in the lines, where it can freeze, expand, and cause damage.
On a very simple system with minimal plumbing lines, this may not be an issue. But for more complex systems, air may not be enough to prevent freeze damage. Where I live, the winters are long and cold, so most RV dealers use antifreeze, as they’ve seen all too often that air alone isn’t always effective at preventing freeze damage. If any water remains in the system, antifreeze will push it out. If any condensation remains, it will mix with the antifreeze and be rendered harmless.
Keep in mind that RV antifreeze is not the same as automotive antifreeze. RV antifreeze will freeze but not solidify. Instead, it will turn to slush and won’t expand and crack fittings or PEX water lines. It is also nontoxic and safe to use in a fresh-water system.
One drawback is that it’s a little messy to work with, and you must buy a few gallons at the store every season. Also, antifreeze can leave a bitter taste in the PEX water lines. One way to minimize this is to blow out the lines with air and then follow up by adding antifreeze. Once the antifreeze has been thoroughly distributed throughout the system, you can leave it or reconnect your air compressor and blow the antifreeze out of the system. By blowing the antifreeze out, you will minimize that aftertaste, and you won’t have to flush the system quite as long next spring when you prepare the RV for travel.
GETTING STARTED
Begin your winterizing procedure by thoroughly preparing the RV holding tanks. Drain the gray and black tanks and use the RV’s built-in flush attachment, if so equipped, to rinse the black tank well. If your RV does not have that feature, purchase a portable wand from an RV supply store and use it to go through the toilet to rinse and flush the tank. A clear sewer hose fitting makes it easy to see the results of your flushing. Once the tank is clean, continue with the next step.
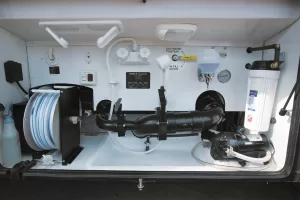
The wet bay is the place to start the process.
If you have a tank-style water heater, you’ll want to drain it. Look for a set of valves that allow antifreeze to bypass the tank, which avoids wasting several gallons of antifreeze when filling the fresh-water system. Remove the water heater drain plug and open the pressure and temperature relief valve to allow air in. Be sure to switch off the power to the heater to prevent damage to the electric heating element (if so equipped) should someone accidentally turn on the water heater while the tank is empty.
Some water heaters incorporate an anode rod as part of the drain plug. This rod is a sacrificial element designed to curb tank corrosion. If the rod has eroded, you’ll want to replace it prior to putting the RV back into service again. Some tanks, typically those made of aluminum, do not use anode rods, and they have a nylon drain plug. Be sure to install the exact same type of plug as the original. Never use a steel plug on an aluminum tank, as galvanic corrosion may cause the plug to weld itself onto the tank threads, making it difficult to remove without damaging the tank.
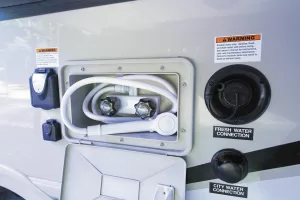
Don’t forget outside shower fixtures.
You are now ready to purge the water from the system. Begin by blowing out the water using your blowout fitting and air pressure regulated to no more than 25 psi. RV water systems are tested and safe to operate at a higher pressure, but increasing the pressure when winterizing will cause a blast of air and spray from each faucet, making a mess. Open each faucet one at a time and run until the water stops and air begins to spit. Then close that faucet and move on to the next plumbing fixture. Even if you plan on using antifreeze, it’s best practice to use air to initially evacuate most water from the system. However, note that just using air won’t remove all the water from washing machine solenoid valves and other more complex fixtures.
This is also the time to remove any water filter elements. Your RV may have multiple filters, including one in a drinking water dispenser in the galley. And don’t forget about your refrigerator. If it has an in-door water dispenser and/or ice maker, it may have a filter. Remove and discard the filters; replace them with bypass tubes or plugs for winterizing and install new filters in the spring.
After blowing out the fixtures, open the low-point drain valves to clear the lines of any remaining water. Then open the gray-water and black-water tank valves to remove any water that has accumulated from blowing out the various fixtures.
USING ANTIFREEZE
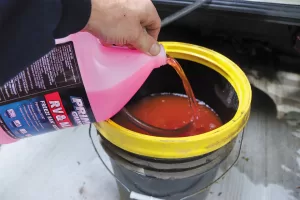
To thoroughly drain and protect fixtures such as clothes washers, dishwashers, hydronic heating systems, and refrigerators with ice makers and in-door water dispensers, you’ll need to use antifreeze. As previously noted, RV antifreeze is not the same as antifreeze used as engine coolant, nor is it the same as heat transfer antifreeze used in hydronic heating systems. RV antifreeze is sold at RV dealerships as well as big box stores; is generally pink in color; and is either ethanol glycol (EG) or propylene glycol (PG) based.
Although safe as a component in RV antifreeze, ethanol is flammable and tends to leave a bitter aftertaste. It also is hard on rubber seals, so it’s not the best choice. PG antifreeze is not flammable, and the aftertaste is not as bad. It’s also easier on rubber seals in the plumbing system and water pump. When selecting PG antifreeze, check the label and be sure to purchase 100 percent virgin antifreeze — not recycled. Recycled antifreeze generally comes from airports and has been used to de-ice the wings of airplanes, so it may have contaminants that aren’t the best for an RV fresh-water system.
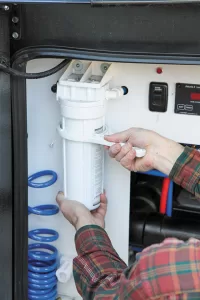
If your RV has a whole-house water filter, be sure to remove it before pumping antifreeze through the system.
Begin by dropping your antifreeze pickup hose into a jug of RV antifreeze. Note that one gallon of antifreeze doesn’t go very far on a large RV. My preference is to fill a clean 5-gallon bucket with several jugs of antifreeze and then insert the hose into the bucket to prevent running dry and losing the water pump’s prime.
Open the winterization valve to bypass the fresh-water tank and allow the water pump to draw the antifreeze from the container. If you do not have a winterization valve, you’ll need to disconnect the inlet line from the fresh-water tank to the water pump and install an antifreeze pickup hose, which may have come with your RV.
Be sure all faucets and fixtures are turned off before powering up the water pump. When you turn on the pump, it will run until it purges the air from the hose and the antifreeze reaches the pump. Then, if your RV is so equipped, open the run/fill valve for a few seconds to purge any water from that line and to allow a bit of antifreeze to enter the fresh tank before you close the valve.
Next, begin to pump antifreeze to the various sinks, starting at the fixture that is farthest from the water pump. Once antifreeze comes out of the faucet, leave it open a few seconds longer to fill the trap with antifreeze. This will prevent any freeze-ups in the trap and stop holding tank odors from wafting into the RV interior. Repeat the process for the other fixtures, ensuring that both the hot and cold lines are purged.
For larger RVs that require more antifreeze, fill a 5-gallon pail to keep from running dry during the process.
If you have a tank-type water heater, I recommend opening the bypass valve for a few seconds to ensure that no water remains in the short lines and the check valves that lead from the bypass valve to the water heater inlet.
Showers and toilets also need to be purged. You can dump antifreeze down the drains, but be sure to leave some in the shower drain and also a bit in the toilet bowl to keep the dump valve from drying out. Don’t forget the outside shower attachment.
Keep an eye on the antifreeze bucket to avoid running out. Actual antifreeze usage will vary by RV. Some simple systems need only 3 gallons, while larger coaches with hydronic heating systems, full laundry centers, dishwashers, and bath-and-a-half layouts may require as many as 8 gallons.
Be sure you have enough antifreeze in the traps. If there wasn’t a significant amount or if it was diluted with water, you can pour some into the trap from a gallon jug.
HYDRONIC HEATING SYSTEMS
If you have a hydronic heating system such as an Aqua-Hot or an Oasis, note that the manufacturer requires antifreeze for winterizing to avoid damage and expensive repairs. Hydronic heating systems provide unlimited domestic hot water by running cold water through a heat exchanger coil inside the boiler, which draws heat from the hot boiler antifreeze. To ensure that all water is purged from the system, you will need to pump in antifreeze until you see it exiting a hot water faucet on one of your sinks. You can still operate the burner to provide heat for the coach without damaging the system.
APPLIANCES
Washing machines have both cold- and hot-water solenoid valves and internal plumbing that can freeze and leak if not properly winterized. Begin by starting a wash cycle to allow antifreeze to flow into the drum. To flush both input lines with antifreeze, choose a cycle that uses cold and hot water, or start one cycle with cold water, stop it, and then initiate another cycle with hot water. Once the antifreeze appears in the bottom of the drum, switch over to a spin cycle and drain the drum. This ensures that antifreeze enters the drain pump as well. Refer to the washing machine owner’s manual for the exact procedure.
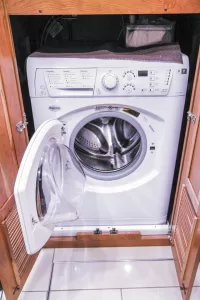
If your RV has a washing machine, it will need to be winterized also.
If you have a drawer-style dishwasher, the procedure is similar. Begin a cycle to fill the drawer and then pause the cycle once you hear the antifreeze spraying in the drawer. Once it stops, open the drawer and you should see antifreeze puddling in the bottom. Close the drawer and cancel the cycle. This will engage the drain pump and cause the antifreeze to drain from the drawer and pass through the drain lines.
Refrigerators with ice makers have a water supply, and these also must be protected. Several methods are commonly used. On the backside of most absorption-style RV refrigerators is a water solenoid that generally is connected to a 120-volt receptacle behind the fridge. You can remove the hose from the solenoid valve and let it dangle behind the fridge. Sometimes this will drain the water from the line, but it doesn’t guarantee that you won’t still have water up in the mechanism.
Electricity poses an electrocution hazard, so attempt the following only if you have adequate knowledge and tools. Disconnect the wires from the solenoid and connect a power cord with a pair of female spade terminals to the solenoid. When you plug the cord into a receptacle, you’ll open the solenoid valve so that air or antifreeze can pass through the system. This should purge any water out through the ice maker. This is best done with air during the initial blowout process rather than with antifreeze. Once blown clear, you can close the petcock, if so equipped, to prevent antifreeze from entering the refrigerator’s water line. The petcock generally is in the basement beneath the refrigerator. Place a towel in the freezer to catch any water spray that leaves the ice maker.
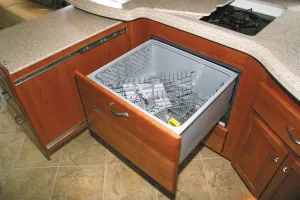
If your RV has a drawer-type dishwasher, run a brief cycle until antifreeze appears in the drum. Then switch to the spin cycle to drain it and pass it through the drain lines and trap.
Some refrigerators have a way to manually cycle the ice maker. You can do this while the system is under air pressure. It takes a few cycles to completely purge all the water from the system, but once finished you can close the petcock to seal off this line prior to pumping antifreeze through the rest of the system. If you have a fridge with an in-door water dispenser, you’ll need to run lots of air through that as well to empty the bladder inside. It’s also possible to cycle the ice maker while pumping antifreeze and just run it until you see pink ice cubes in the bin. However, this uses more antifreeze and requires a few cycles before the pink cubes appear.
FINAL TASKS
The fresh-water system isn’t the only thing that needs attention. If you own a motorized RV, this is a good time to service the engine and chassis. Dirty engine oil contains acidic contaminants, so changing it now will provide the motorhome fresh lubricants and give you a jump start when it comes to preparing for the next camping season.
Check the tire pressures and add air if necessary. Remove some of the weight from the tires to prevent flat spots from forming. Do this by lowering the leveling jacks, which are designed to support the RV. When parked on concrete or asphalt, place a plastic barrier beneath the tires to prevent wicking of the tire’s natural lubricants.
Clean the interior and exterior of the RV while the dirt is still fresh, removing any contaminants that might eat into its finish over the winter or leave stains that are harder to remove later. Any cleaning materials or supplies that might freeze should be removed from the RV, along with anything that might attract mice or other rodents.
Clean the outside of your RV before the dirt and grime becomes more difficult to remove.
Numerous methods are used to dissuade mice, but they all seem to have mixed results. Setting traps works after they have already entered. I’ve had good success with d-CON bait traps, which knock them out in a hurry, so I keep some in the RV basement as my first line of defense and a few more in the living area.
Ideally, seal off areas where critters can enter. When it comes to mice, stuffing openings with steel wool will deter them. Birds and insects will use any available opening, so keep roof openings in mind when considering prevention. Mesh screening is a good deterrent.
Mold can form in damp enclosed areas. Keeping cabinet doors propped open allows the interior to breathe a bit. Also, most absorption-style RV refrigerators have latches that can double as vent locks to keep the doors open. Unless your fridge is plugged into electricity, you’ll need to keep the doors cracked somehow during the off-season or you’ll be cleaning mold out of it the following spring.
Take measures now to prevent problems when it comes time to prepare the RV for the next travel season.