
Having all your travel photos in one easy-to-access location for yourself, your friends, and your loved ones is a great way to remember and show off your adventures.
By Chris Guld, F349932
April 2024
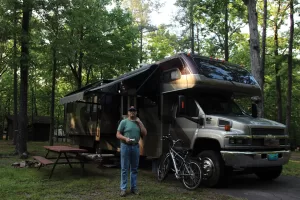
Road trip! You plan to be traveling for a month or more, and you’re going to take a lot of photos. You still haven’t organized the photos from your last RV trip, and the only ones your friends and family have seen are the few you shared on Facebook. What gems on your cellphone are still waiting to be discovered and shared?
My husband, Jim, and I lived full-time in an RV from 2003 to 2017. We still take RV trips, but we also travel internationally and scuba dive. We use a simple and effective system for organizing and sharing travel photos as we go. We love capturing memories using our cellphones and rely upon Google Photos to effortlessly store them in the cloud.
Do we spend hours sorting through our photos when we get back home? Never! Do we worry about losing our photos if we lose our phones? Nope! Sharing trip photos? It’s a breeze! We create an album on the first day and simply send the link to all our friends and family. They can then view photos as we add them, making them feel like they are part of the journey. I’ll guide you through our simple recipe.
While my instructions will focus on Google Photos, other cloud-based photo management systems can do many of the same things. Once you understand the different concepts, you can adapt them to other software.
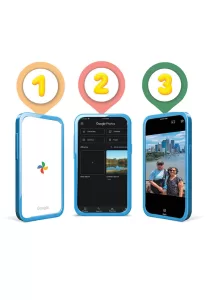 OUR THREE-STEP SYSTEM
- Take all photos with your cellphone and use an app, such as Google Photos, that automatically uploads to your account in the cloud.
- Create an album on the first day of your trip and share a link to it with your friends and family.
- Whenever you take more pictures, look them over and choose the best ones to add to the album.
If you follow these steps, friends and family can see your photos as you add them. They can leave comments, too. It’s like taking them along for the ride without, you know, actually taking them! By the time you get home, a curated album of your trip is all done. The only thing left to do is enjoy the memories.
STEP ONE
Take photos with your cellphone and have Google Photos automatically upload them to the cloud. The best camera is the one you have with you — for most of us, that means our cellphone. I still have a big Canon camera with multiple lenses, but I never use it. The photos taken with my phone are just as good and sometimes better. Professional photographers might disagree. But for most of us, phones are great; just remember to clean your lens — especially the selfie lens.
Don’t lose your photos if you lose your phone. Google Photos will automatically upload your phone’s photos to the cloud in your personal Google account. They are private, for your eyes only, and stored behind your username, password, and two-factor authentication. You can view them with any connected device as long as you can sign into your account. If you have an Android phone, Google Photos is probably already installed. Simply open it, sign into your Google account, and turn on the “Backup” option.
If you have an iPhone, you can install Google Photos from the App Store. If you don’t want to use Google Photos, Apple’s iCloud Photos is a good alternative that does the same things. Just go to Settings, then Photos, and turn on the switch for iCloud Photos.
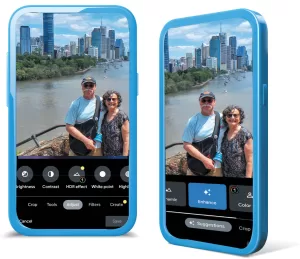
Find the “Adjust” tab on the primary menu (left); the “Enhance” tab is on the secondary menu (right).
Apple provides 5GB of free storage, and Google provides 15GB. You can always purchase more storage space if needed. Google’s extra storage starts at $2 per month; Apple’s starts at $1 per month.
STEP TWO
Create an album on day one of your travels, and get a link to share that album with your friends and family. I create an album even before we leave home. A selfie of ourselves with a suitcase in hand, a screenshot of a map of our destination, or the cover of a brochure gets our album started. Using the Google Photos app, I select the photo, tap the three-dot menu in the upper right corner, and then choose “Add to Album.” Give the album a name and tap the checkmark to complete it. The best way to share it is to get a link.
Open the album and tap the share button.
- On iOS, tap “Share To,” “Create Link,” and then “Copy Link.”
- On Android, tap “Get Link” and “Create Link.” It will then say, “Copied to clipboard.”
Paste that link anywhere your friends or family members will see it, such as through email, text, WhatsApp, or Facebook. Your friend or family member can click that link any time and see the photos in the album. There’s no need for them to use Google Photos or even have a Google account. If they do use Google Photos, they will have the option to “join” the album. Once they join, they can be notified every time you add a new photo. They can also like and comment on each photo.
If you later decide to send the link to additional people, you can get that link again. Open the album and tap the “Link” button at the left end of the list of people, then scroll down and tap on “Copy Link.” You can then paste that link anywhere you like.
If you’re interested in polishing your photos, read past step three for a bonus step.
STEP THREE
Whenever you take more pictures, look them over and choose the best ones to add to the album. Let’s say you’re on a river cruise and looking at a castle on the banks of the river. You take five, 10, or maybe even 20 photos. Pick the best one or two! To add one photo to the album, open the photo, swipe up, and tap “Add to Album.” Select the album name you created in step two. To add multiple photos to the album, press on one until you see a checkmark appear, and then tap additional photos to select. Tap the “+ Add to” and then scroll down until you see the name of your album. Be careful not to tap “Album” at the top, because that will create a new album.
As soon as you add new photos, they are available for anyone with the link to view. If anyone joined your album, they will even receive an immediate notification that you added new photos.
OPTIONAL STEP BETWEEN STEPS TWO AND THREE
Original photo
Polish your pictures. If you had a beautiful classic car, you wouldn’t show it off when it’s scratched up and dirty. You would wash and polish it. Why not do the same with your photos? Instead of having only plain snapshots of your memories, you can make the photos themselves more memorable. Use the following tips to make your photos the best they can be. I think it’s fun to edit photos and see how they improve. If that doesn’t sound like fun to you, skip it. I don’t want anything to stand in the way of you organizing and sharing your photos as you travel and having a complete album when you get home.

Polished photo
If all you do is look at your photos and pick the best ones for the album, you’ll be fine. It’s hard to take a bad picture with today’s smartphones. But if you’re willing to spend a bit of time playing with your photos before adding them to the album, your friends and family will be impressed with the quality, and you will enjoy them even more in the years to come. You might even want to order canvas prints of your photos to hang on your walls! See below for some polishing tips.
The Edit tool will reveal the edit menu. The first line is the Primary menu. When you select an option on that line, the Secondary menu appears on top.

Crop your photos for more interest.
Crop and straighten your photos. Most photos can be improved with a simple crop. Cropping the photo can allow you to focus on the subject or change the general composition of the photo to be more interesting. And please don’t let a crooked picture through! It’s so easy to use the crop and rotate tools in Google Photos. To crop, you’ll need to tap on the crop tool and then drag the corners to adjust. To straighten photos, use the dial above the “Rotate” symbol. To automatically straighten the photo, tap “Auto.”
Enhance can drastically improve your shots. You might not even notice how dark or dull a photo appears until you tap the “Edit” button and then the “Enhance” button. Boom! It becomes brighter and more colorful.
The Adjust tab has lots of options. I particularly like Vignette! It’s important that this polishing step is done between steps two and three, because some edits create a copy of your photo. If you’ve already put the photo in your album, it will be the original and not the improved version.
Other tools. Every photo editor has all the basic tools, but then there are some fancy options like “Color Pop,” “Background Blur,” and “Vignette” in Google Photos, or “Ambiance” in Snapseed (a free app by Google for iPhone and Android). Just play with them and watch how they affect your photo. “Magic Eraser” is also found in the tool menu, but you will need to be a paid subscriber ($2/month) in order to use it.
BENEFITS OF SHARING YOUR TRAVEL PHOTO ALBUM AS YOU GO
Consider this: You are in the Tetons, and you post a photo of yourself in front of the sign for Grand Teton National Park. A friend who is following your photo album sees that photo and comments, “Hey! My favorite winery is just outside of Jackson Hole.” This happened to us! We were looking for somewhere to go the next day, and here was a recommendation from a trusted friend.
Happy trails! Live long and take lots of photos.
Chris Guld is a smartphone and technology teacher, writer, and video producer. She loves to learn, teach, travel, and scuba dive. She and her husband, Jim, have held seminar presentations at RV rallies, computer clubs, and senior centers. They travel the world and continue teaching on their website, GeeksOnTour.com; over Zoom; and on their YouTube channel. Chris specializes in the use of Google Photos and is a Diamond-level Google product expert.