
YOU RAISE ME UP
When ensuring that a towing vehicle and trailer are the same height, it may be necessary to modify the setup by blocking or flipping the trailer’s axles.
By Steve Froese, F276276
March-April 2026
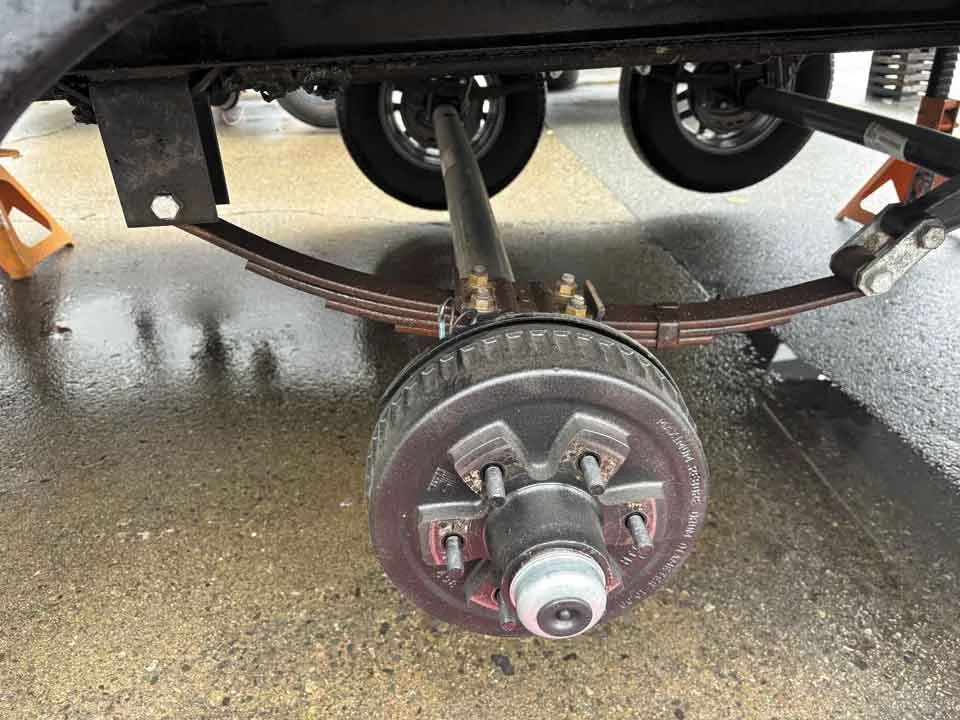
If you’re an experienced trailer owner, you have likely discovered that it’s not always possible to get your trailer level during hitching and towing. This is caused by the tow vehicle and hitch setup not having sufficient adjustability to create a level ride condition. It is also possible the hitch on the tow vehicle is improperly adjusted. For safe and efficient towing, it’s imperative that the towing vehicle and trailer combination be as level as possible. The front and rear of both the towing vehicle and trailer should be the same height from the ground.

1. Remove the wheels to determine that the axles are mounted under the springs.
If your trailer is not in alignment, it’s possible that your hitch may need to be adjusted. In this case, visit your service center and have them make the necessary adjustment. If you have the knowledge and tools, you may be able to do it yourself. Making the adjustment involves disconnecting the trailer and measuring the height of the trailer hitch with the trailer level. Then adjust the hitch on the towing vehicle so the base of the hitch ball is at the same height. This should be the case with the equalizer bars tensioned. Be sure that the hitch bolts are fully tightened.
If the hitch has reached its limit of adjustability and the towing combination is still not level, you can flip or block the trailer axles. Depending on whether the axles are on top or below the leaf springs, blocking or flipping will raise or lower the trailer height.
2. At your first wheel position, raise the floor jack to support the axle.
This article will describe the blocking process that can be used to raise the trailer height. I rate the level of difficulty for this technique at 3 out of 5.
First, you need to plan the job. In this case, you must determine the configuration of the trailer. Some trailers have the axle mounted underneath the leaf springs, while others have them on top of the springs. If the axles are on top of the springs, a common method to raise the trailer is to move the axle under the springs. Conversely, if the axles are under the springs, moving them on top of the springs will drop the trailer height. Since the axles cannot be rotated, flipping requires the installation of saddles either on top or under the axle. Since this requires welding new saddles onto the axles, flipping is out of the scope of this article.
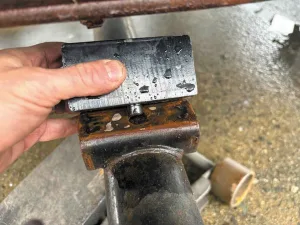
3. Remove the nuts from the U-bolts that attach the axle to the spring.
If you want to lift the trailer and the axle(s) is under the springs (the most common configuration), the best way to accomplish this is to add blocks between the axle and the spring. It’s possible to gain additional height by both flipping and blocking the axle, but this is only the case if the axle is on top of the leaf springs. In this case you would flip the axle(s) to the bottom of the spring and also add blocks.
Axle block kits can be purchased from your local RV parts store, but make sure you know the axle size, as the parts differ. There should be an identification label on the axle(s). Take a photo of the label to show the parts store clerk, who should be able to source the correct kit for you. The existing U-bolts should not be re-used. The block kit will include the lift blocks as well as new U-bolts. Be sure to purchase one kit for each axle.
4. With the bolts removed, drop the floor jack to create space between the axle and the spring.
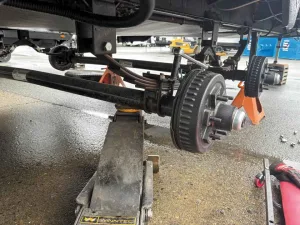
The first step is to safely jack up the trailer. Do not use stabilizing or leveling jacks to lift the RV. You will need two to four jack stands rated for the trailer weight that have adequate height adjustment for the job. One way to jack up the trailer is to retract the tongue jack all the way until the tongue is resting on or close to the ground. Then place the jack stands between the rear axle and bumper. The jack stands should be placed at the same location on both the left and right sides. They must be placed under the frame rails, away from plumbing, water, and sewer lines. Raise the jack stands as high as possible without touching the frame rail. If the jack stands are set too high to be stable, place wood blocks underneath them. Note that propane lines may be difficult to see but often run along the frame rails. Do not let propane lines or other features get stuck between the jack stand saddle and jack point on the trailer. You may have to rotate the jack right or left so the saddle lies parallel to the frame rail to avoid pinching or damaging lines or wiring.
5. Position the spacer so that the pin inserts into the hole on the axle saddle.
Once the rear jack stands are set, extend the tongue jack far enough so that the trailer’s wheels come off the ground. Note that the spring shackles may flip over, which will result in the axle(s) dropping closer to the ground. In this case, you may have to jack the trailer higher. If the trailer is longer than 30 feet, I recommend placing two more jack stands forward of the axle(s) to provide additional stability. You may also want to place a jack stand under the trailer A-frame for safety. Do not proceed until you are sure the trailer is safely jacked up and will not shift.
Next, remove the trailer wheels and use a floor jack to support the axle at one wheel location. Inspect the length of the brake wires running between the trailer and axle. If they are long enough to allow the axle to be dropped, leave them alone. Otherwise, you will have to cut the wires and extend them later.
6. Elevate the axle so the spring pin fits into the spacer hole.
With the jack supporting the axle (you will perform this procedure one wheel position at a time), remove the nuts from the U-bolts that hold the axle to the springs. You can use an impact gun, socket driver, wrench, or breaker bar. If you are unable to loosen the nuts, you may need to cut them off.
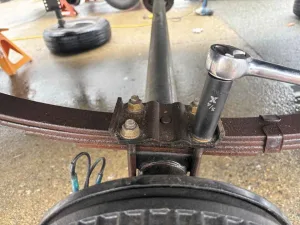
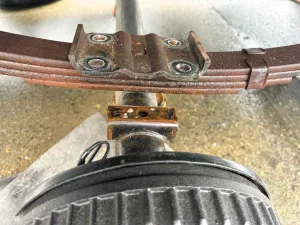
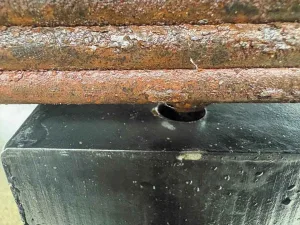
Once the U-bolts are removed, carefully lower the jack until there is sufficient space to insert one of the blocks between the axle saddle and spring post. The blocks should have a hole on one side and a pin on the other. Place the pin side of the block on the axle saddle so the pin seats centered in the hole in the axle saddle. Jack up the axle until the pin on the underside of the spring fits into the hole on the top of the block. Ensure that the block is properly seated and sandwiched between the axle and spring.
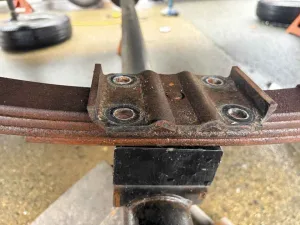
7. Raise the jack and position the new tie plate on top of the spring.
Install the new U-bolts and tie plates that came with the block kit. Hand-tighten the U-bolt nuts, making sure they sit straight up and down and do not splay out from the vertical position by more than a few degrees. The literature that came with the block kit should indicate the proper torque for the U-bolt nuts. If it does not, contact the supplier for this information. Tighten the U-bolt nuts to the recommended torque in a diagonal pattern, much as you would with wheel lug nuts. Using this pattern repeatedly, gradually work up to the recommended torque.
Repeat this process for each wheel position, being careful not to snap the brake wiring. If you had to cut and splice the brake wires, pull the emergency breakaway switch and spin the wheels to make sure the brakes are functioning properly.
Once this process is complete, it may be a good time to adjust your brakes, since the trailer is already jacked up. I described this procedure in a recent article.

8. Install the new U-bolts through the tie plate and tighten the nuts to the specified torque.
Re-install the trailer wheels, being sure to torque the lug nuts to the recommended pressure as indicated in your owner’s information. If the shackles dropped when you jacked up the trailer, flip them up so that the springs are above the hangers. To do so, raise and lower the tongue jack until you hear a loud pop.
Once you have completed these steps, lower the wheels to the ground by dropping the tongue jack, removing the rear jack stands, and raising the tongue jack until the trailer is level. If done correctly, this will result in a sufficient trailer height increase to allow you to set your tow height correctly for a safer, more stable towing experience.
SMOOTHING OUT THE MOTORHOME RIDE
Axle flips do not apply to motorhomes, but aftermarket products are available to smooth out a motorhome’s ride or alter the height. RV suspension upgrades are extremely popular. Factory suspensions may provide a nice ride, but upgrades can improve everything from towing capacity to comfort. The solution is often a third-party upgrade.
Suspension upgrades can provide the following benefits:
- Reduced sway
- Improved comfort
- Improved control/handling
- Increased traction and decreased tire wear
- Moderate to heavy impact absorption
- Heavier hauling capability
- Improved towing capacity
Upgrades include, but are not limited to, spring or airbag upgrades, sway bars, and steering stabilizers, as well as specialized products such as LiquidSpring Smart Suspension Systems (liquidspring.com).
When thinking about upgrading your motorhome suspension, there are many options to consider, and all suspension components and subsystems must be evaluated.
Many aftermarket upgrades don’t involve replacing these systems but instead are add-ons that enhance existing performance. Other systems replace the existing systems with new ones.
Air-ride systems are generally considered the best, especially when combined with aftermarket upgrades. Air-ride suspension systems are often popular as upgrade options as well. However, they are pricy and require a higher degree of annual maintenance.
To explore motorhome suspension upgrade options, search the internet for reputable sellers, consult RV forums, speak to your trusted RV dealership, or consult other motorhome owners who have had work done.
RECALLS
Page 16: Looking for the latest RV-related recall information? Visit FRVA.com for a list of the most recent recalls issued by RV and component manufacturers. Or, to search for recalls, investigations, and complaints by vehicle year, make, model, and VIN, visit nhtsa.gov/recalls. NHTSA’s Vehicle Safety Hotline is (888) 327-4236.
SEND YOUR TROUBLESHOOTING QUESTIONS to Steve Froese at techtalk@frva.com. The volume of correspondence may preclude personal replies. Not all responses will apply in every instance. Some situations may require a visual inspection and hands-on testing. If you choose to follow any procedures outlined in this column, first satisfy yourself that neither personal nor product safety will be jeopardized. If you feel uncomfortable about a procedure, stop and make an appointment with an RV service facility.