
Stripped-Out Awning Lag
Dear RV Doctor:
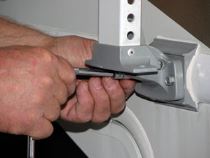
Is there an easy fix for a stripped-out lag bolt on the bottom bracket for the awning arm on my motorhome? The bolts for my awning screw through the bracket that holds the awning arm. They go through the aluminum sidewall and into the frame of the coach.
Troy Workman, Roy, Utah
Typically, the bottom bracket is secured through the sidewall at the floor level, but much depends on how that portion of floor and sidewall is constructed and adjoined on your motorhome. You don’t mention the year, brand, or model of your motorhome, but I’ll cover a few different scenarios here.
If you have wood frame construction (I call these “old school” motorhomes), it’s sometimes possible to cut an access hole into the very bottom of the subfloor directly below the awning bracket and bolt all the way through the sidewall structure at the same location. An aluminum plate can be affixed to the inside of the framing, and the existing hole for the lag screw redrilled all the way through. Then bolts and washers can be used to sandwich the bracket to the frame member.
With other laminated wall assemblies, the awning bracket may actually be mounted slightly above the floor line. In this case, the backing aluminum plate can be installed inside the coach above the floor using bolts.
If the framing structure is wood, it’s possible to drill a hole through the siding and into the framing, and then glue a short piece of dowel rod into that hole. I’ve glued a 1/2-inch dowel hammered into a slightly undersized hole in the wood framing. After the glue dries, a new pilot hole can be drilled into the dowel plug and another lag screw installed as before.
Another option is to drill a new hole in the awning bracket itself, above, below, or next to the problem hole. Then drill a pilot hole into the framing and just install a new, second lag screw.
Shooting City Water Entry
 Dear RV Doctor:
Why does water shoot out of my RV’s city water connection like a jet until the fresh water tank gets down to the one-third-full level? This happened while I was changing the hose for the fresh water connection. I’m not sure what caused this, since there were many things going on at the same time. When I tried to connect the city water again, the pressure was so strong I could hardly get the hose back off. The pump ran constantly and would not turn off on its own; I had to manually turn it off after about five minutes so it would not burn out. I’ve purged everything now and was going to start over, but I wanted to know if you could suggest how to go about it.
Brian, Houston, Texas
All recreation vehicles have at least two backflow preventers (some have three or even four). One is always located at or near the water pump outlet to keep city water from backing through the pump and overfilling the fresh water tank. The other is located at the city water inlet to keep pump pressure from pumping water out through the inlet. From your description, it sounds to me that the latter backflow preventer has failed on your motorhome and will need to be replaced.
Some backflow preventers are integral to the city water entry assembly, while others are an additional fitting secured to the rear of the inlet. In either case, you’ll have to expose the rear of the city water entry to add a new backflow preventer. If gaining access is difficult or you’d rather avoid replacing the entire inlet assembly, you don’t really need to remove the old check valve, since it’s evidently stuck in the open position. Just add a new one in line behind it, taking note of the flow direction. I recommend a brass backflow preventer. Avoid plastic fittings, for they are prone to fail more often than brass. You will need to know the thread size of the fitting prior to purchase, but I’m guessing yours is a typical 1/2-inch NPT. Most well-stocked RV accessory stores will carry the brass backflow preventers. If not, I’m sure you can find one online or at a residential plumbing or hardware store. It might be a good idea to carry a spare with you as well. Also, be sure to use a pressure regulator whenever you connect to a campground water source.
As for why water gushes from the connection until the tank gets down to one-third full, my thought is that the city water entry point is mounted at about the same level as the water pump, and with a gravity assist, the pump’s least path of resistance is out the inlet until the tank level is reduced. After that, the path of least resistance is throughout the rest of the distribution system inside the coach. I would suggest that you have the water pump tested to ensure its check valve and pressure switch are functioning correctly.
The reason the hose was pressurized when you attempted to remove it was probably due to the water pump still being activated. And as long as the check valve at the city inlet remains open, the pump will continue to run.
{loadpositionEndBlurbHouseCalls}