
By Gary Bunzer, Technical Editor
May 2018
Orphan Furnace

An RV owner is seeking a manual for a vintage Flame-Master furnace, model TR12.
I have an old furnace I’ve been refurbishing. It’s a Flame-Master, model TR12. After a thorough cleaning, it appears to work, but I have no literature or owners manual for it. A friend told me that you have an extensive technical library complete with many obsolete manuals. Do you by any chance have one for this old furnace?
Steve Johnstone
Via email
Wow! You’ve got an oldie there! I remember seeing Flame-Masters on early 1970s RVs. I’ve looked through my technical library and I do not have any literature on the Flame-Master, unfortunately. But I am happy we morphed out of the era of gravity heaters in RVs.
I would strongly recommend you have that heater inspected by a certified RV service technician — someone who has experience with a unit this old. The combustion chamber of that old heater must be carefully and completely checked. Some designs were prone to rust through over time, and that could be extremely hazardous with a gravity heater. Any indication of a breach anywhere in the combustion chamber means the entire heater should be replaced.
If the combustion chamber checks out okay, also inspect the gaskets very carefully. If I remember correctly, Flame-Master might have used the old mobile-home-type asbestos gasket material. It would be a good idea to have the technician replace them all, just to be sure. It’s likely the tech will have to make them, since I doubt aftermarket gasket kits are available. Carbon monoxide dangers lurk around these old furnaces in RVs, and that is my primary concern. Remember, never compromise on safety. In fact, we teach RV service technicians never to reuse old gaskets. Always replace gaskets or seals that are used on the combustion chamber.
So, if you plan to continue using the heater, have that firebox carefully inspected for cracks and rust holes, replace the gaskets, keep the orifices clean, and feed it the correct amount of propane at the correct pressure.
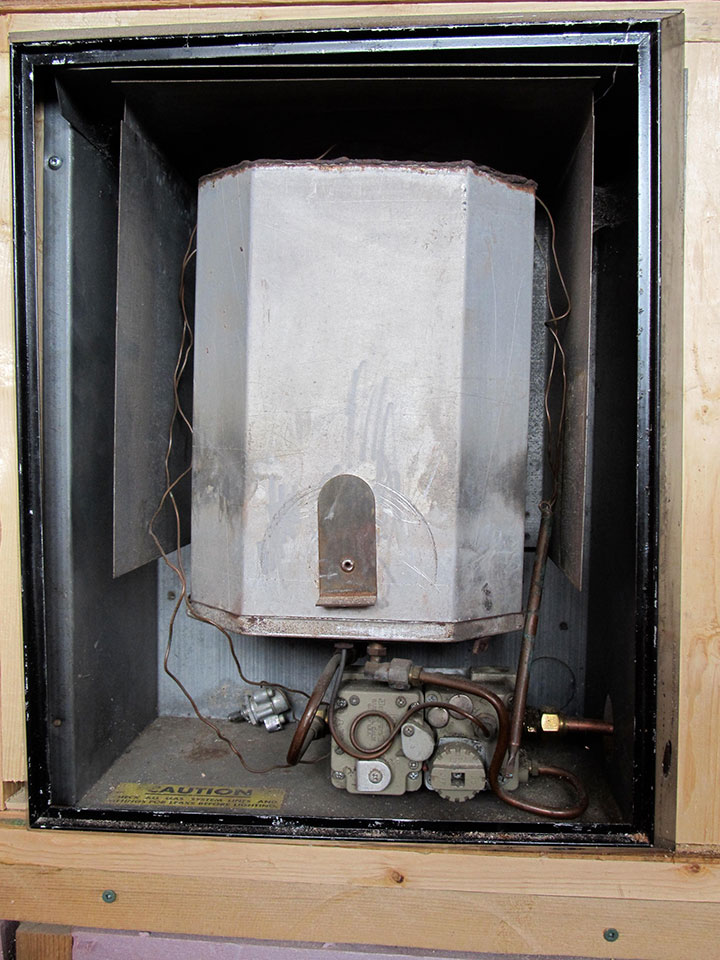
Water Heater Flameout
You may be my final hope before I risk a lot of money replacing parts on my brand-new Suburban water heater. The unit is about a year old but was installed only recently. It works fine on AC power but has never stayed lit on propane. It goes through a normal start/ignition sequence and appears just fine, but immediately at the end of the sequence, the flame is extinguished. I hear the solenoid clicking closed when it goes out. The spark and sense probes are gapped correctly, and the unit is clean and appears undamaged. It actually glows red after the third try for ignition. I’m somewhat technical and have checked the micro-amp circuit, though my digital meter jumps around, so I can’t be sure of the actual measurement. I’m not able to measure the propane gas pressure, but the flame looks good while it is lit. Do you have any more ideas as to why the gas solenoids are closing after each ignition cycle?
Jamie Rohan
Via email
It seems you’ve checked absolutely everything so far — more so than the typical RV handyman. It’s apparent this issue has something to do with the voltage to that redundant solenoid. Be sure the voltage at the water heater connection measures well over 12.5 volts DC. The same at the gas valve during the start of the ignition sequence. And don’t forget the negative side of the circuit. A poor ground connection can interrupt the voltage flow, too.
I would verify the resistance measurements for each coil in the gas valve. If one coil is weaker than the other, it may be causing them to shut off prematurely. Each coil in the gas valve should measure approximately 40 ohms resistance.
Also check the mounting of the energy cutoff (ECO) switch. It’s a thermal sensing device that is held in place right against the inner tank of the heater. If it is not making a good contact with the tank, it inadvertently may be opening the circuit that sends the voltage to the gas valve. The same thing with the thermostat. Both are wired in series between the circuit board and the gas valve.
If you can obtain an old-school analog meter, the kind with needle movement, the flame sense circuit should measure around 3.0 micro-amps or higher. It also would be nice to know the propane gas pressure at the test fitting on the valve, but as long as it’s between 10 to 14 inches of water column, it shouldn’t really matter in this instance. But to be sure, have it dialed in exactly to 11.0 inches of water column by a professional technician.
Alternator Overcharge
We recently took our first long road trip with our 2014 Fleetwood Southwind motorhome, which is equipped with a Ford 6.8-liter V-10 engine. As we traveled, the engine battery and the coach batteries had moisture on the top daily, indicating overcharging. This was supported by having to add water to the coach 6-volt battery bank at least weekly, less often with the engine battery.
We found that the engine alternator applies 14.2 volts to both battery banks at all times, even after four to eight hours of continuous driving. By comparison, the onboard inverter/charger, when plugged into shore power, begins at 14.4 volts and tapers the voltage to 13.5 volts when the batteries are fully charged.
I took the coach to the local Ford dealer that does motorhome repair, twice. Each time, they checked the alternator output under load and pronounced it okay. This was the only test they performed. I asked them about the voltage failing to taper to a lower voltage when the batteries were charged, and they had no data, nor did they seem to have any idea where to get it. I contacted Fleetwood about this and they gave me a number to reach the Ford motorhome chassis folks. The person there had no idea about the voltage taper.
My one and only idea is putting a disconnect switch in the line from the alternator to the coach batteries so I can control how long they are charged. I hope you’ll have some more knowledgeable contacts.
Chuck Peterson
Glendale, Arizona
My first thought is that the alternator appears to have a faulty internal voltage regulator, but you can verify a few things before condemning the alternator.
First, fully test the condition of each battery in each bank. In other words, eliminate the battery banks as a source of the problem. In all honesty, 14.2 volts DC is not truly considered a drastic “overcharge.” It is still below the gassing voltage of most RV batteries, but the fact that the voltage does not taper as the battery banks (supposedly) accept the charge is concerning.
Compare the measurement of the voltage at the output of the alternator and at the positive terminals of each battery bank. Also, it might be wise to have the diodes in the dual battery isolator checked and verified. Anomalies such as voltage drop, loose connections, or undersized conductors can cause quite a bit of difference between what is coming out and what is going in. Have each battery in those banks checked with a carbon-pile tester to be sure all are still healthy.
Also check all the connections on both the positive and negative sides of each charging circuit. Be sure both banks have a good, secure ground connection to the frame (or engine). If you still have the original batteries in each system, it wouldn’t surprise me if your condition is indeed system-related. If, however, the batteries and their associated cable/connection/contact points check out, then have the alternator, and specifically the regulator, checked again by an experienced automotive electrical specialist. Don’t overlook loose belts and mounting hardware irregularities.
If necessary, it’s usually easier and less expensive (labor-wise) to simply replace the complete alternator. But if your motorhome is loaded with DC accessories, it might be prudent to opt for an alternator with a larger output if it comes to that. Before jumping to that conclusion, however, eliminate the batteries and each system as the source of the problem. I would not recommend installing a disconnect switch between the alternator and the battery system.
The Great Gasket
My 1996 motorhome’s rooftop air conditioner may have to be replaced. Years ago I read an article about the best sealing gasket to use with an EPDM roof. Do you recall whether it was white or black?
Ken Simens
Via email
I don’t believe you read that in one of my articles, since I’ve not heard of one gasket being “better” than any other for sealing between the rooftop unit and the rubber membrane. Any 14-inch rubber gasket should work just fine. RV accessory stores should have them in stock. Just be careful not to overtighten the mounting bolts. The gasket should be compressed only about half of its static thickness, and nothing beyond that. Some people (even some technicians) think the mounting bolts should be cranked down tight to stop water from entering. Not so. Too tight and the gasket may actually cause a seepage.
The second-most common error is not properly positioning the gasket. If it gets skewed in any way while lowering the unit to the roof, the chance for a leak increases. Keep everything square to the 14-inch opening in the roof as you lower the upper unit to the roof surface.
Send your troubleshooting questions to rvdoctor@fmca.com. The volume of correspondence may preclude personal replies. Not all responses will apply in every instance. Some situations may require a visual inspection and hands-on testing. If you choose to follow any procedures outlined in this column, first satisfy yourself that neither personal nor product safety will be jeopardized. If you feel uncomfortable about a procedure, stop and make an appointment with an RV service facility.