
Wastewater treatment may not be the most glamorous part of RV life, but it is a necessity. Like any other RV component, the associated tanks require a bit of maintenance, knowledge, and understanding to keep things flowing smoothly.
By Mark Quasius, F333630
July 2022
A typical RV contains three holding tanks — one for fresh water and two for wastewater. Some include four, with a separate tank for the galley sink. And a handful of high-end motorhomes utilize a single large-capacity tank to hold all wastewater. For this article, we’ll stick with the two-tank wastewater system commonly used in RVs.
On a two-tank system, the gray-water tank handles wastewater from the sinks and shower, while the black-water tank collects the toilet waste. In the early days of RVing, it was common practice to dump the gray water onto the ground and to empty only the black tank at a dump station. This previously allowed for extended boondocking times. In today’s environment, it’s illegal to dump gray water on the ground in most places, but there are still advantages to the two-tank system. Gray tanks don’t accumulate significant deposits, because the soapy water keeps them much cleaner. Black tanks aren’t that fortunate, however, as the solid waste can clog tanks and sensors unless proper treatment procedures are followed. These also don’t fill up as fast as gray-water tanks, which is why many RVs are built with larger gray-water tanks and smaller black-water tanks.
Tanks And Plumbing
Black-water and gray-water holding tanks generally are made from ABS plastic, which is black in color. Fresh-water tanks use translucent polypropylene, because ABS plastic is not certified for potable water use. Plumbing connections to these tanks are inserted by spin welding, where the desired fitting is placed in a high-speed router equipped with a spin-weld bit. The high speed of the fitting melts the plastic and forms a plastic-welded joint to hold the fitting in the tank and seal the joint. If any future connections need to be made, they can be done by an RV dealer who has a spin welder, but this generally requires the tank to be removed.
Holding tanks have dump valves so the contents can be drained from the tank. Dump valves have a blade that slides inside the housing. When the valve is opened, the blade moves out of the way so the waste can flow through the opening without catching on any protrusions within the valve. To do this, simply pull the tee handle to open the valve and push it back in to close it.
In some cases, dump valves may be inaccessible. In those situations, the valve can be connected to a remote cable that allows for easier access. In other cases, electric dump valves may be used — these are controlled by a simple rocker switch in the wet bay. Black-tank valves use 3-inch pipe connections, while gray-tank valves can be either 11/2 inches or 3 inches, depending on what the manufacturer chose.
Holding tanks also need ventilation. Air needs to be displaced whenever wastewater is added or removed from the tank. Temperature changes will cause the tank fluids to expand or contract as well. To accommodate for this, vent pipes extend up through the roof of the RV. A vented cap is attached at the top to prevent debris and rainwater from entering the tank vent stack. Odors can build up inside the holding tanks, so these vent pipes can be equipped with a venturi-style cap that will enable airflow to evacuate these odors, which can make a big difference whenever you flush the toilet and open the blade valve.
Monitoring Systems
It’s important to know how full the tank is so you know when to dump it. If you wait too long, the gray water may back up into the shower while you’re using it, and you won’t be a very happy camper.
An older tank design uses internal sensors to identify the level of the tank’s contents. One sensor is located at the top of the tank, a second at the two-thirds mark, a third at the one-third mark, and a fourth at the bottom of the tank. A series of lights is placed on a monitoring panel inside the RV. When the operator presses one of the buttons, the bulbs light up if the sensor detects the presence of any fluids. It isn’t the most accurate, but it gives a close approximation of how full the tank is. The biggest problem with this system is that the internal sensors are in contact with the contents of the tank, and they can foul and give false readings if not kept clean.

The SeeLevel system uses externally mounted digital sensors that display RV holding tank levels in 2 percent increments.
A newer design uses digital technology and sensors that are mounted onto the outside of the tank. These external sensors are not susceptible to fouling. Advanced monitoring systems, such as SeeLevel RV gauges, take it a step further with sensor strips that are applied to the sides of the tanks. These external strips are capable of measuring tank levels in 2 percent increments, rather than by thirds, resulting in greater accuracy. The SeeLevel system displays these measurements on a digital display panel inside the RV. All you have to do is press the desired button and the red LED display shows the exact level. This system comes in a varied configuration, including some that incorporate propane tank measurements, battery voltage levels, and switches for the water pump and water heaters. An RV-C system can interface with a networked RV’s touch-screen control panel.
Toilets
RV toilets are different from residential toilets. Residential toilets hold water in a tank that empties when the flush lever is used. RV toilets seek to minimize water usage so as to preserve fresh water and avoid filling the black tank more than necessary. Instead of a flooded P-trap, RV toilets use a blade valve to open a direct path to the black tank. Foot pedals or electric switches are used to operate the flushing mechanism and administer a small amount of water to help clean the bowl. After the cycle is complete, the blade valve returns to the closed position and a small amount of water will enter and remain in the bowl. In the simplest cases, these toilets are mounted over the black-water tank so that the contents can fall directly into the tank when flushed, saving water that would otherwise be required to flush contents through a series of drainpipes.
In some cases, though, the floor plan of the RV might not allow for the toilet to be located directly over the black tank. This typically occurs when the RV has both a full and a half bath. The full bath may be positioned at the end of the RV while the half bath is located midships. In these cases, a macerator toilet, commonly used in marine applications, may be installed for any location that is not directly over the black-water holding tank.
A macerator toilet contains a grinder head that breaks up the waste into smaller particles and then passes it through a smaller (generally 1-inch or 11/2-inch) drain line to the black-water holding tank. This method does require a bit more water to carry the waste through the line, a downside when dry camping. But a macerator toilet allows for more flexibility when designing floor plans.
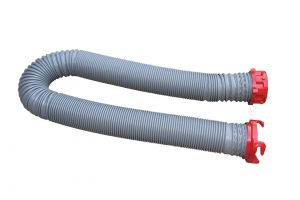
Viper sewer hoses are puncture resistant; have a smooth interior; stay flexible in the cold; and spring back into shape if crushed.
Hoses And Connectors
Now that you have waste in your tank, you’ll need a way to transfer it from the holding tank to a sewer connection or dump station. The black and gray tanks generally dump into a common wye connector so that one hose can be used to handle both tanks. The wye connector is equipped with a bayonet lug connection that is standard throughout the RV world. Industry-standard hoses come with female bayonet connectors that allow you to connect the hose to the RV with a simple twisting action. The hoses have a 3-inch inside diameter and may have a threaded sewer elbow on one end or another male bayonet connector so that additional lengths can be added when needed. Most hoses are either 10 or 20 feet in length.
Hoses are available in a wide variety of colors and quality levels and are often identified by the thickness of the hose wall, expressed in mils (thousandths of an inch). Inexpensive hoses have thin walls, and you’ll find that pinholes develop easily, the hoses may not flex well, and they can tear in colder temperatures. You’ll need to replace them often. Upgrading to a higher-quality hose with a thicker mil rating will help. The basic vinyl hoses have a wire wound inside of them to give them support. If you upgrade to a better-quality hose, such as Camco’s popular RhinoFlex, you’ll have a much better experience. Because I live in a cold climate, my personal choice is Valterra’s Viper hose. The Viper hose is rated for use down to minus 30 degrees Fahrenheit while retaining flexibility. Even when I step on it, it will spring right back — unlike a stiff vinyl hose that can’t rebound. It also has a smooth interior instead of a corrugated interior common to wire-wound vinyl hoses, which allows the waste material to flow more easily and prevents residue from collecting inside the hose.
Macerator hoses are smaller in diameter. Unlike a 3-inch sewer slinky hose that uses gravity to dump, this smaller hose is filled by the macerator pump that can move the waste 100 feet or more and uphill if necessary. The original macerator hose was 1¼ inches in diameter, but the newer Sani-Con Turbo from Thetford is much more powerful, has a higher flow rate, and uses a 1½-inch hose. Macerator hoses may be hard-plumbed to the macerator with a sewer adapter and dust cap on the output end, or may be connected with cam-lock couplers to allow for various lengths using extension hoses. Some macerator hoses are equipped with canvas sleeves to help protect them from abrasions.
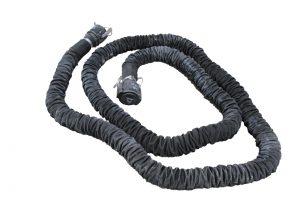
Macerators use a smaller-diameter hose and can pump waste uphill for longer distances than a gravity-dump sewer connection.
Operating Tips
Emptying your gray-water and black-water holding tanks isn’t difficult if you properly maintain them. Just pull the handle to dump and close when finished. But there are a few things to keep in mind when managing your holding tanks. If you ignore these steps, you may pull the handle someday and find that nothing happens.
The first key factor is knowing when to dump the tanks. All holding tanks have something in them other than clear water. A gray-water tank may have food deposits that accumulate on the tank walls from doing dishes, as well as soap scum film built up on the tank walls that can foul up sensors. Even external sensors will eventually have problems reading the levels if the tank wall gets too gunked up. While cooking, try to dispose of uneaten food before washing your dishes. Also be sure to dump cooking oils or greases into a container and then put that in the trash instead of flushing it down the sink drain. Water softeners substantially help remove soap scum, especially in an area with hard water.
Some long-term campers leave the gray tank dump valve open so that the tank never fills up. Doing this allows the tank walls to dry out, and any existing scum will remain and be harder to remove in the future. It can also allow bugs to climb up into the gray tank through the open connection to the sewer. You may be surprised when a bug visits you in the shower the next time you use it.
While traveling, the sloshing action of the water in the gray tank will help loosen up sludge, making it easy to flush everything out when you arrive at your campsite to drain the tank. In cases where the buildup is extreme, you may want to add a holding tank cleaner to a half-full gray-water tank, drive the RV to slosh it around, and then dump when finished. Note that if you fill your gray-water tank completely and later on start to fill it only halfway before draining, this could allow buildup to harden on the top half of the tank. By filling it reasonably close to the top before dumping, you’ll help keep that area clean.
Black-water tanks are a bit touchier. Gray tanks normally don’t need any chemicals in them to digest waste, but the opposite is true for black tanks. You should only flush human waste and toilet paper down the toilet. Never flush paper towels, facial tissue, or menstrual products. Be sure to warn any guests about this before they use the bathroom, as everything that is flushed must be capable of quickly dissolving once in the tank.
You also need to use the correct toilet paper. You can buy RV-specific toilet paper, but this isn’t necessary. Any paper that dissolves quickly will do the job, and there are a number of brands that work well. The best way to determine whether a tissue will work is to place a sample of it in a Mason jar, fill it three-fourths full of water, screw the cap on tight, and shake the jar. If the toilet paper falls apart in a bunch of fluff, you should be able to use it. If it retains its form and just gets soggy, do not use it.
The black tank needs to have enough water to prevent waste from packing up and drying out. Never leave the black tank dump valve open. Human waste will fall through the toilet’s blade valve and create a pile on the floor of the tank directly beneath the toilet. This will result in a dreaded pyramid that will soon turn into a rock-hard mountain. Always keep a small amount of water in the tank, enough to cover the waste, and be sure to use sufficient water when flushing to wash solids away so that they can dissolve in the solution. Again, allowing the tank to fill completely or at least ¾ full will help keep the top from drying out.
Holding tank treatment chemicals are misunderstood by many. Camp-ground septic systems use bacteria to break down waste and control odors. Some chemicals designed for RVs contain formaldehyde, which will kill off that bacteria and should not be used. For this reason, some campgrounds specifically prohibit the use of waste tank treatments that contain formaldehyde. Fortunately, various formaldehyde-free alternatives are available.
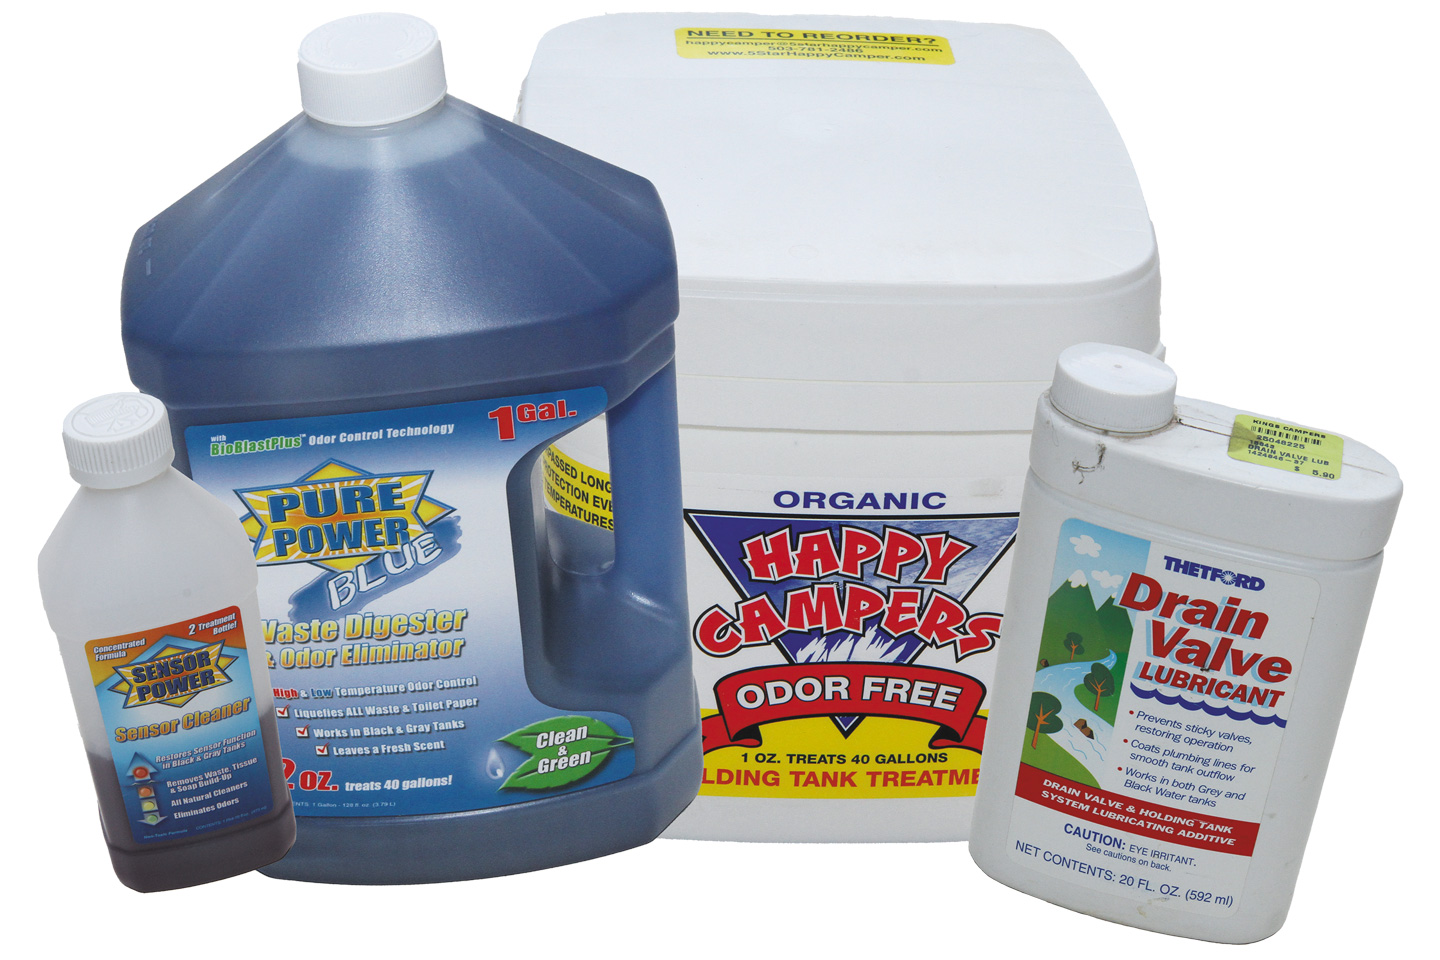
Holding tank treatments that don’t include formaldehyde include Happy Campers, which is a popular dry powder; Valterra Pure Power Blue, an excellent liquid product; and Thetford AquaBio, AquaMax, and Campa-Fresh products. Rid-X, which is commonly used in septic systems, also can be used. Some treatments contain cellulase to break down toilet paper and vegetable matter; lipase to break down fats, oils, and grease; protease to break down proteins; and amylase to break down starches. Note that these products do not dissolve human waste; that occurs naturally just by leaving it covered with water. So, if you allow only human waste and RV-suitable toilet paper in your tanks, you really don’t need chemicals to dissolve your waste.
Chemicals can help control odors and non-human waste. However, the biggest issue with holding tank chemicals is that the enzymes take time to activate and don’t reach their full potential for about five to seven days. That’s fine if you don’t dump your black tank often, but most RV owners dump their tanks every three or four days, before the chemicals become effective.
An alternative method to treat black-water holding tanks, showing up in American Coach and Foretravel motorhomes, is the UViaLite system that uses ultraviolet light for treatment. For details, check out the sidebar regarding the UViaLite system.
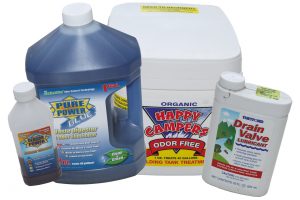
RV holding tank chemicals include (left to right) Sensor Power cleaner for fouled internal sensors; liquid tank treatment such as Pure Power Blue Waste Digester & Odor Eliminator; powder-form tank treatment from Happy Campers; and Thetford Drain Valve Lubricant to help free up sticky dump valves.
If you have a long day’s drive planned, fill the black tank close to two-thirds full before leaving. As you drive, the sloshing action will help rinse off the tank walls and keep everything suspended. Some owners even add a bit of holding tank cleaner before leaving to help clean the sensors. Once you arrive at your campsite, dump the black tank, rinse it out, and it should be reasonably clean. Your sensors may function more accurately as well.
You’ll occasionally need to flush out the black tank to give it a more thorough cleaning. RV dealerships and camping supply stores typically sell flush wands that connect to a garden hose. You stick the wand down through the toilet into the black tank and turn on the water to power wash the inside of the tank. This can be a bit inconvenient, but flushing attachments are available that install right into the tank and oftentimes are standard equipment in many newer RVs. These consist of a spray head that mounts inside the tank and is connected to a female garden hose connection someplace in the wet bay. All you have to do is connect a garden hose to it, open the dump valve, and turn on the water until it comes out clear. You can find 3-inch, see-through inspection tubes that have bayonet connectors to make this easier to monitor. When using these handy accessories, be sure to use a separate garden hose, not your white drinking water hose, to prevent bad bacteria from contaminating your fresh-water supply.
You may eventually find your dump valves leaking, getting sticky, and becoming hard to operate. These valves can be fairly easy to maintain. Adding a bit of Thetford Drain Valve Lubricant to the holding tank will help lubricate the blade and seals. If your drain valve works freely but leaks, you can replace the seals in the dump valve. The entire valve assembly should drop out after you remove four bolts. You can replace the rubber seals, which are very inexpensive and available at any RV dealer. If the blade itself is pitted or sticking, you can replace the entire valve.
If you neglect proper maintenance for your holding tanks, you will develop problems that are harder to deal with later on. But if you take care of them, you’ll find that it’s not that big of a deal.
More Info
360 Siphon Roof Vent
(503) 559-8094
https://360productsnorthamerica.com/shop
Camco
(800) 334-2004
Garnet Instruments
(SeeLevel RV Gauges)
(800) 617-7384
Happy Campers
Thetford
(800) 543-1219
Valterra Products
(818) 898-1671
UViaLite
(540) 362-9636
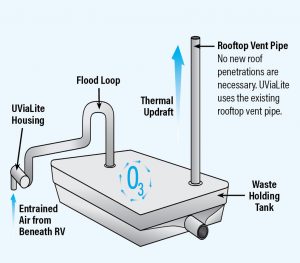
The UViaLite uses specially tuned UV lamps to generate ozone and circulate it through the RV waste holding tank and out the rooftop vent.
UViaLite: An Alternative Holding Tank Treatment
The idea for UViaLite began in prison. A scientist initially developed the technology while working for a Georgia state facility. The prison had contagion issues: airflow from the bathrooms carried viruses and pathogens throughout the cell blocks. The scientist found that an ultraviolet light system could remove these pathogens from the air and improve the health of every inmate.
Eventually, the idea found a home at Safety Step, an RV accessory supplier. When the RV Industry Association (RVIA) released the results of its 2019 RV owner survey, which listed plumbing and sanitation as the number-one concern of RV owners, Safety Step saw another application for the UViaLite system.
While UViaLite is new to the RV industry, the technology behind it has been around for years. UViaLite uses ultraviolet light to treat the air in black-water holding tanks, eliminating odors and pathogens. The system utilizes ultraviolet light tuned to a wavelength of 185 nanometers to react with oxygen (O2) to create ozone (O3). The unit takes fresh air from beneath the coach and passes it through the UV module and into the top of the black-water holding tank through a 1¼-inch pipe. There are no moving parts, because the unit employs the natural chimney effect from the black tank’s existing vent stack to initiate airflow.
The UViaLite uses 0.8 amp of 12-volt-DC power (about 10 watts) to put 6 to 20 ppm of ozone in the RV wastewater holding tank. The vent stack’s thermal updraft draws the ozone into the holding tank at less than 1 cubic foot per minute. Once powered up, the unit can remain on until the user stores the RV at the end of the travel season.
Ozone is a powerful oxidizer that can eliminate bacteria and other pathogens by changing their chemical makeups. UViaLite is said to eliminate odors instead of masking them with a perfumed scent, making a substantial difference whenever someone flushes the toilet, especially when the bathroom exhaust fan is on.
According to Safety Step officials, UViaLite does not chemically change anything in the liquid portion of the holding tank, and it will not destroy the enzymes in any chemicals you may have used in the tank. Beneficial probiotic bacteria and enzymes below the surface in the tank are unaffected, while UViaLite takes care of the smell and pathogens in the air portion of the tank.
UViaLite is said to eliminate the odor and the need to add chemicals, saving the expense, maintenance tasks, and storage space involved with chemical treatments. Rather than noticing that sudden septic smell when you sit outside the RV and the wind shifts in your direction, you may detect a slight fresh scent.
With no moving parts, UViaLite is reportedly easy to maintain. All you need to do is replace the UV bulb every other year. It is patented, listed with the RVIA, and now considered to be standard equipment on American Coach and Foretravel motorhomes. According to the company, other RV manufacturers are testing UViaLite for use in future models. Eventually, certified RV dealers could potentially provide custom installation of the product.