
Regular maintenance helps ensure that hydronic heating units operate efficiently.
By Mark Quasius, F333630
September 2020
N ot so long ago, hydronic heating systems were found mainly in high-end, luxury motorhomes. Today, such systems are being installed in less expensive motorhomes, as well as in towable RVs, allowing more owners to enjoy the benefits of continuous hot water and hydronic heat.
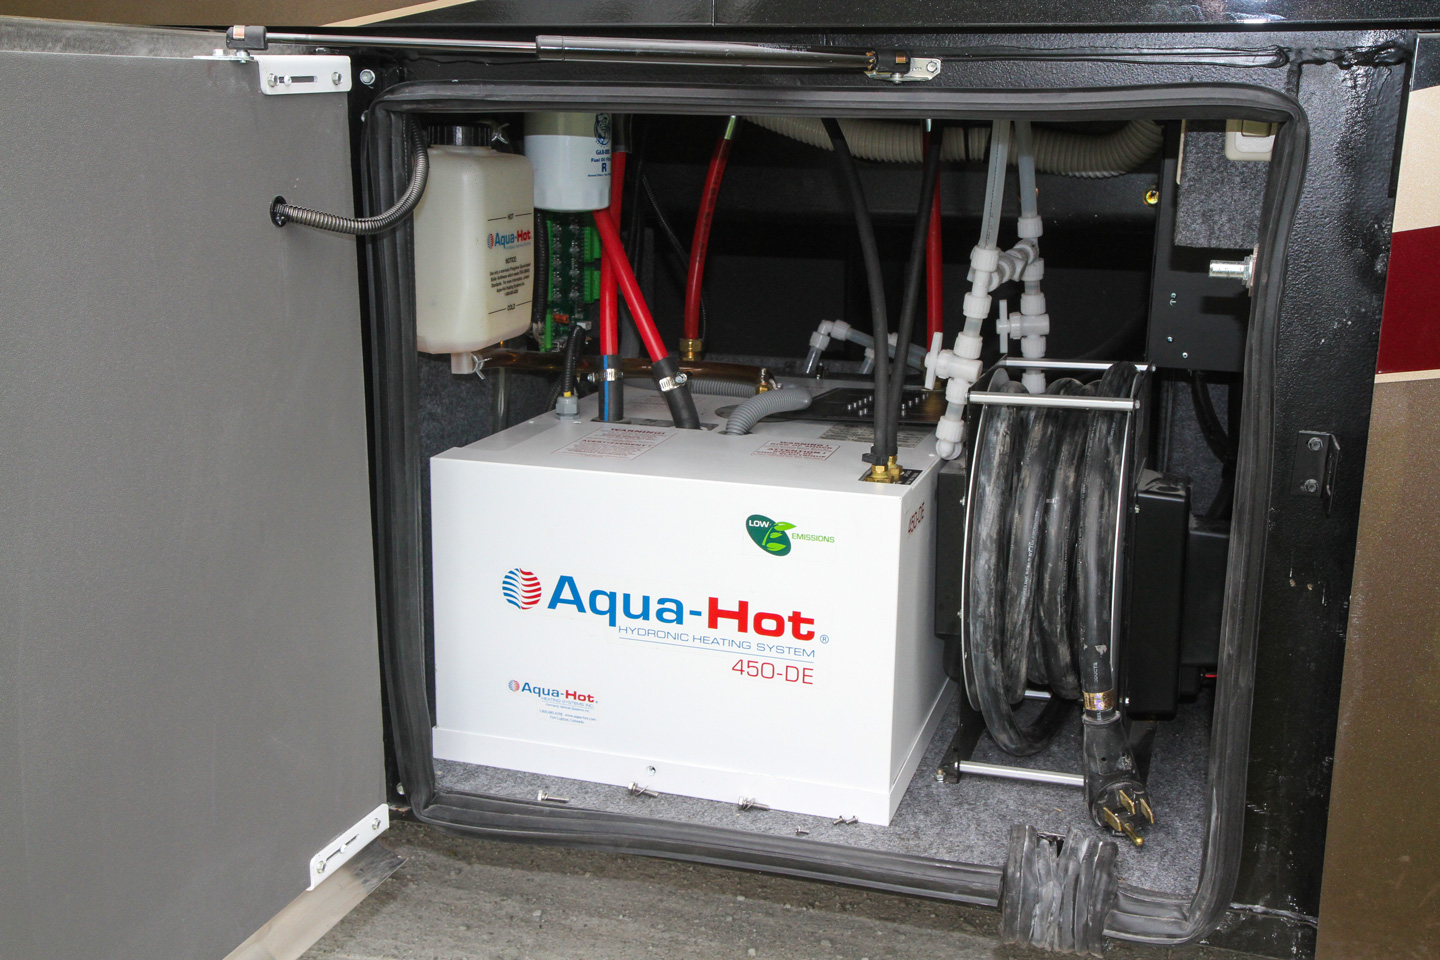
Most hydronic systems are made by Aqua-Hot Heating Systems Inc., an FMCA commercial member (C2723). The company’s lineup includes propane-powered and diesel-powered models. This article focuses on the regular maintenance and service required for an Aqua-Hot diesel-powered hydronic system in a diesel motorhome. But first, a brief explanation of how hydronic systems operate.
Hydronic Overview
Traditional heating systems rely on one or two propane furnaces to warm the RV’s interior, plus a separate propane/electric water heater to supply domestic hot water. A hydronic heating system replaces those items with a single unit that handles both functions.
The heart of the system is a boiler that contains propylene glycol antifreeze. The antifreeze is heated in the boiler and then circulates through various heat exchangers located throughout the RV. Domestic hot water is provided via a fresh-water coil that passes through the boiler. Many models, such as the Aqua-Hot 400D and 450D, are designed to fit into the same space as a traditional 10-gallon propane/electric or on-demand water heater. That allows RV manufacturers to incorporate hydronic heating as an option without requiring major structural changes to the RV design. Other models also are available, such as the larger 600D used in high-end motorhomes, and the compact 250D, which is popular in RVs with smaller basement compartments. While those models are similar in operation and service procedures, this article concentrates on the 400D and 450D series.
The boiler itself can be heated from a number of sources. When minimal heating is required, the system’s 1,650-watt electric element uses 120-volt campground power to provide approximately 5,600 Btu of heat. But if the ambient temperature drops below 40 degrees Fahrenheit, or continuous hot water is desired, you’ll want to fire up the diesel burner. Depending on the model and year, the diesel burner produces between 50,000 and 65,000 Btu, which is plenty of heat to handle the demands of the Aqua-Hot system.
The 450D also offers some free heat while you are driving. Hot coolant from the engine is carried via heater hoses and circulates through a loop in the Aqua-Hot boiler, utilizing the engine’s water pump to transfer up to 12,000 Btu of engine heat to the boiler antifreeze. That same engine coolant loop can be used in reverse when the RV is parked. An engine preheat switch activates an electric pump that circulates the engine coolant through the boiler when the engine is not running. That allows heat from the Aqua-Hot boiler to warm up the engine for cold-morning starts.
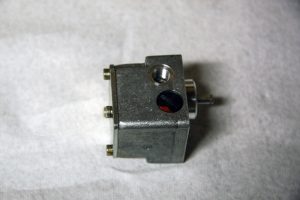
An Aqua-Hot system has been opened up and is ready to be serviced.
Probably the most popular aspect of hydronic heating is continuous, uninterrupted hot water. With the diesel burner switched on, water in the shower can run all day and never turn cold, as long as you don’t exceed the recommended flow rate of 1.5 gallons per minute. Because it’s an on-demand system, there is no tank to preheat. Water is heated as needed.
Another advantage is multiple-zone heating. The Aqua-Hot system is capable of five separate heating zones, although rarely are they all used. Heating zones for the front and rear of the RV are controlled by their own thermostat. A third zone, utilizing a dedicated thermostat in the water tank area, provides basement heat to prevent freeze-ups. Some manufacturers, among them Entegra Coach, add a zone for heated tile floors.
For those who camp in cooler weather, hydronic heating offers efficiency and economic benefits. A 65,000-Btu diesel boiler consumes 0.41 gallon per hour. No. 2 diesel fuel has a Btu rating of 139,200 Btu per gallon. Propane has a rating of 91,500 Btu per gallon, so it’s only 66 percent as efficient as diesel fuel. That means more propane must be burned to produce the same amount of heat as a diesel burner.
Here’s an example: Let’s assume on a cold day your Aqua-Hot will need 12 hours of boiler run time. The system will consume 4.9 gallons of diesel fuel to deliver 684,864 Btu for that day. To meet that same 684,864 daily Btu requirement, a pair of propane furnaces will burn 7.5 gallons of propane. The price of fuel always fluctuates, but 4.9 gallons of diesel fuel costs less than 7.5 gallons of propane. Also, using the same example, consider that an RV with a 150-gallon diesel fuel tank has a theoretical maximum run time of 30.6 days, while a 32-gallon propane tank filled to 80 percent will be empty after 3.4 days. So, the length of stay is seriously limited with propane.
Maintaining The System
A hydronic heating system eventually will require service to maintain peak efficiency and reliability. All Webasto burners used in Aqua-Hot systems are basically the same, so the service procedures generally apply to all the company’s models. But be sure to refer to your model’s service manual for the exact specifications. Service manuals and other documentation are on the Aqua-Hot website.
Aqua-Hot recommends servicing the unit annually. Fortunately, servicing the burner isn’t all that difficult once you know the basic steps. If the burner has no major issues, and you are fairly handy with tools, you may not need a trained service professional. And that will save you money. Of course, if you can’t solve a problem after consulting the troubleshooting chart in the Aqua-Hot service manual, you can contact a certified Aqua-Hot service technician.
The annual service typically consists of replacing the fuel filter, replacing the burner nozzle, and closely inspecting the burner. Combustion chambers tend to become sooty over time, so this is the time to clean them as well. If the Aqua-Hot is running well, changing the fuel filter and replacing the burner nozzle may be all that’s needed.
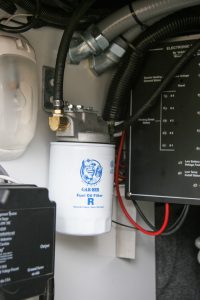
The fuel filter ensures that the diesel burner receives an uninterrupted supply of clean fuel.
The fuel filter’s lifespan depends in large part on whether clean or dirty fuel was used, but replacing the filter annually is a good starting point. The burner nozzle of a 65,000-Btu burner is a finely machined orifice that is designed to spray fuel at a 60-degree angle in a cone-shaped pattern. The nozzle is rated at 0.35 gallon per hour with a fuel pressure of 100 psi; to get a cleaner burning unit, Aqua-Hot increases the fuel pressure to 145 psi, and at that rate, the fuel burns at 0.41 gallon per hour. As fuel passes through the nozzle, the hole erodes over time, increasing in size. With a bigger hole, the fuel flow rate increases. The result is a burner that runs rich, develops an unburned fuel odor, and probably smokes. Aqua-Hot recommends changing the nozzle annually (it is part number WPX-886-41A). If the system runs extensively, the service may be needed more often.
Getting Started
A few basic tools and do-it-yourself skills are needed to service the burner. And before turning any wrenches, have a new fuel filter and replacement nozzle on hand.
The burner nozzle is small compared to those used in home heating systems, so that item won’t be found at a heating supply house or home improvement store. It might be available from an RV dealer who performs service work on hydronic heating systems. Or, it can be ordered directly from Aqua-Hot Heating Systems or from an Aqua-Hot servicing dealer.
A Garber spin-on fuel filter is the most popular choice. It is available from Aqua-Hot or from an RV dealer, but I was able to find a comparable Wix filter (part number 33109) and NAPA filter (part number 3109) that were available locally. Depending on the filter model, either a No. 2 Phillips screwdriver or a 7/16-inch wrench is needed to remove the cover from the unit. Also needed: a 3/8-inch drive ratchet with a long extension, and a 10-mm deep-well socket to loosen the eyebolt nuts that fasten the burner assembly to the unit; a 5/8-inch wrench to remove the nozzle; a ¾-inch wrench to secure the nozzle holder; and an oil filter wrench to remove the spin-on fuel filter. These tools are essential.
A voltmeter and a fuel pressure gauge may be needed if you want to do more testing. A wire brush will be needed to clean out the burner if it’s sooty, along with a shop vacuum or air hose to blow out the loose soot and vacuum it up. A copy of the service manual is indispensable when checking tolerances and voltages.
Changing The Fuel Filter
The first task is to replace the fuel filter. As noted, most systems use the Garber spin-on fuel filter, which easily can be removed with a standard oil filter wrench. Place a small pan or container beneath the filter to catch spillage.
The filter housing threads have a square gasket or O-ring seal. The new filter probably came with a new gasket or O-ring, so replace it. If no new O-ring is provided, leave the old one on; usually there is nothing wrong with it. When installing a new O-ring, be sure to remove the old, lest they stack up and prevent the filter from tightening properly. Prior to spinning on the new filter, rub a little fuel oil on the gasket to prevent it from pinching and binding when the filter is installed. You may wish to use hose pinch-off pliers or locking pliers (such as Vise-Grip) to pinch off the rubber fuel line to eliminate excessive leakage while changing the filter, although in most cases the filter is mounted high enough that the fuel lines don’t siphon any fuel out of the tank.
Purging Air From The Fuel System
Once the filter has been changed, air must be purged from the fuel system. But before we explain that procedure, it may be helpful to understand how the diesel burner cycles through its steps.
When the diesel burner is switched on, the burner motor runs for approximately 15 to 30 seconds before ignition begins. This is a purge cycle, designed to blow cool air through the combustion chamber so that hot spots are cooled and unburned fuel is purged. After the initial purge time has passed, the burner’s electronic controller module allows the fuel solenoid valve to open, and fuel flows through the nozzle. Simultaneously, the transformer energizes, sending high voltage to the electrodes, creating a spark, and igniting the fuel. The electrodes stop sparking once the photocell determines that the burner has been lit. When it’s time to stop heating the boiler, the fuel solenoid closes and the burner flame stops. The blower motor continues to purge air through the combustion chamber for another minute or two to cool down the unit.
The burner’s air inlet can be adjusted to achieve the proper ratio of air to fuel.
It’s important to note that the Webasto controller handles timing and switching of the various components within the burn cycle. The fuel pump, however, is constantly turning and pumping fuel from the fuel tank supply line and back to the tank via the return line whenever the blower is running. The spraying and atomizing of fuel through the nozzle doesn’t happen until the fuel solenoid valve is open.
To purge the air from the fuel system, the fuel pump must be run for a while. To do this, switch on the diesel burner. Allow it to run for 5 to 10 seconds to initiate the pre-burn purge cycle, and then switch it off. The burner will enter the post-burn purge-and-cool-down cycle and will continue to run for a minute or two. During this time, the fuel pump will pump fuel and recirculate it to the fuel tank via the return line. Listen carefully and you will hear a change in the sound of the motor as the revolutions per minute drop once fuel finally gets to the pump. This cycle may have to be repeated if all the air has not been purged from the fuel lines. All air must be purged in order to test the burner’s operation or to check the fuel pump pressure. Once the filter has been
changed and the air purged from the system, you can tackle the burner itself.
Removing The Burner
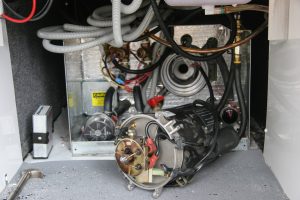
To take out the burner, start by removing the fasteners from the Aqua-Hot cover; lift off the cover and set it aside. Note the fuel lines entering the unit at the top right. One is a supply line that comes from the fuel filter, which is connected to the fuel tank via a dedicated fuel pickup tube within the tank. The second line returns unused fuel to the fuel tank.
The large black item is the Webasto burner. This assembly contains the burner motor, ignition transformer, fuel pump, blower fan, fuel shutoff solenoid, nozzle, electrodes, and photocell sensor. A controller box, attached to the left side of the burner, is responsible for the burner motor, fuel solenoid, ignition transformer, and photocell operations. It performs all of the timing and switching operations needed during the purge and burn cycles. The two larger round items at the bottom left are the circulating pumps for the boiler antifreeze; the square electrical box above them covers the connections to the 120-volt electric heating element.
To be serviced, the burner assembly must be removed from the main unit. Begin by sliding the control box off the burner housing and unplugging it. Using a 10-mm deep-well socket with a long extension, loosen the two nuts that hold the burner to the boiler housing. The nuts do not have to be removed; just back them off to the end of the threads and swing the eyebolts out of the way so that the burner assembly slides out of the boiler. If the fuel lines are rubber, they may not have to be removed during this process. Steel lines must be removed, so keep paper towels handy to catch fuel that dribbles out of the exposed lines.
Nozzle Replacement
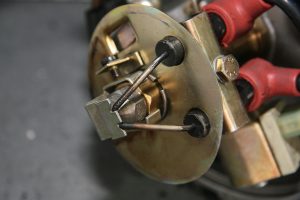
An electrode gapping tool is placed over the burner nozzle.
This is the number one service point on the Aqua-Hot system. The nozzle is the most critical item on any oil-fired burner. The nozzle is finely machined to spray a regulated amount of fuel in a predetermined spray pattern. Even the smallest speck of dirt that enters the nozzle can plug the internal vanes or orifice and cause it to spray erratically. So, it is critical to deliver clean fuel to the burner nozzle. It’s just as important to use clean practices when servicing the burner and handling the nozzle. Do not touch the tip of the nozzle, drop it, or allow dirt to get on the inlet screening.
To replace the nozzle, place a ¾-inch wrench on the nozzle holder to prevent it from turning. Then place a 5/8-inch wrench on the nozzle and unscrew it in a counterclockwise direction. Carefully insert the new nozzle and tighten it using the two wrenches. Once it is tight, back the nozzle off one-quarter of a turn. Then, retighten it. This reseating of the nozzle is necessary to ensure that the threads seal properly and that no fuel will leak past the nozzle threads.
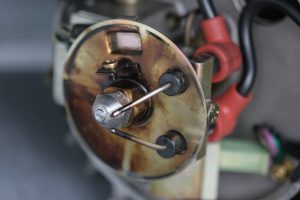
The nozzle is a critical service point.
Electrode Adjustments
The electrodes should be properly gapped and located. If the gap is too large, the spark may not jump across it, and the burner will fail to ignite. If the gap is extreme, the electrodes might have to be replaced. If the gap is too small, the spark may not be bright enough to ignite the fuel. Also, the gap should be placed just outside the cone-shaped pattern of fuel spray, so the electrodes must be properly located in relationship to the nozzle. Fortunately, an electrode gapping gauge is supplied with the unit. Generally it is attached to the side of the burner and can be retrieved by removing the screw that holds it to the motor housing. A missing gauge can be replaced by ordering online via the Aqua-Hot website.
To adjust the electrodes, slip the tool over the nozzle. The tips of the electrodes should rest flush in the notches that are cut into the electrode gapping gauge. If the electrodes do not line up, loosen the electrode retaining clamp bolt and move the electrodes to the correct position. Overtightening the bolt may cause the clamping bar to bend or the electrode’s ceramic insulator to crack. If that happens, the electrodes must be replaced.
Cleaning The Combustion Chamber
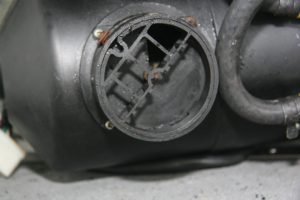
A combustion chamber check is the final step in servicing the burner. The combustion chamber insert consists of an aluminum swirler and a steel tube. Remove four nuts from the burner mounting flange and then remove the tube as one piece. The insert slides into the boiler cavity and is easily removed by hand once the burner motor has been removed. After the combustion chamber insert has been removed, use a wire brush and shop vacuum to eliminate soot buildup from the boiler cavity and restore the burner to peak efficiency.

The combustion chamber and swirler are easily removed.
Also inspect the swirler. In pre-2009 models, it is part of the steel tube insert; in later models, the swirler and insert are separate pieces. The swirler has slots and vanes that direct the combustion air into the chamber in a spiral fashion. The slots can become plugged up with heavy deposits of carbon and gunk. Use a wire brush and possibly a solvent, such as a spray bomb of carburetor and choke cleaner, to loosen and remove the crud so that airflow is unimpeded.
Taking The Extra Step
A burner that is running well needs only a filter and nozzle change and a good cleanup. But if the burner isn’t performing as it should, even after the above steps, further testing and adjustment may be required. This can be very complex, and unless you want to remove the unit for bench testing, it’s best to have it serviced by a professional. To determine whether that’s necessary, three items can be checked easily: fuel pressure, voltage, and air intake.
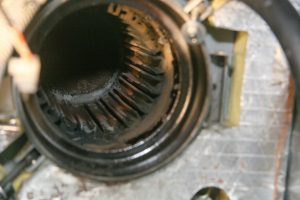
Soot must be removed from the boiler cavity.
Fuel pressure can be checked when servicing the burner. A fuel pressure gauge, available through the Aqua-Hot website, is needed. It’s a bit pricey, so I chose to make my own gauge. I drilled out an old burner nozzle, tapped for 1/8-inch pipe threads, and inserted a 1/8-inch pipe and air pressure gauge with a range of 0-200 psi. It works just as well as the manufactured gauge and saved me quite a bit of money. Even if you do purchase one, it costs far less than paying a service tech and is a good investment if you perform your own service work.
To test the fuel pressure, remove the nozzle and replace it with the gauge. Place the burner assembly on its side so that you can see the gauge without handling the unit. If the burner has steel tubes to pass its fuel, they must be removed and replaced with a pair of rubber test hoses. I ordered a set from RV Hydronic Heater Repair, www.rvhydronicheaterrepair.com.
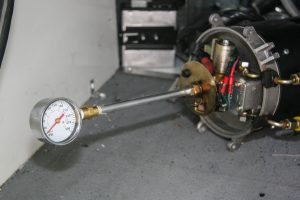
To check fuel pump pressure, remove the burner nozzle and insert a fuel pressure gauge in its place; when the fuel solenoid opens during this test, the gauge should indicate 145 psi.
When the fuel solenoid opens, the ignition creates a high-voltage spark across the electrodes, so you don’t want to be handling the unit when that happens. Then, switch on the diesel burner and watch the gauge. When the burner first runs, it begins its purge cycle as the blower fan pushes air through the combustion chamber. After about 15 to 30 seconds, the fuel solenoid opens, allowing fuel to flow to the nozzle.
The transformer also sends a high-voltage spark across the electrodes. The spark remains on until the photocell detects light from the flame. If this test is performed in bright sunlight, the spark may go out all by itself. If performed inside, an LED flashlight does the trick by making the controller think the flame is lit.
Once the fuel solenoid opens, the needle on the gauge suddenly swings over to the 145-psi position. If the gauge shows 145 psi, the pressure is correct and the burner can be switched off. It will then enter another cool-down cycle with the blower fan continuing to run and finally coming to a stop.
The fuel pump is mounted to the front of the diesel burner; pump pressure can be adjusted by turning the screw very slightly on the side of the pump.
If the pressure is not up to specs, it can be adjusted by turning a small screw on the side of the fuel pump. Only very slight adjustments are needed to bring it to 145 psi, so take it easy. This must be done while the burner is running, so it’s important to remove the high-voltage wires from the electrodes or transformer to prevent voltage from jumping around and stinging you. If the pressure does not come to specification, or gradually drops when the burner is running, other issues must be addressed. Possibilities include air being sucked into the fuel lines; a defective fuel pump; or a partially plugged fuel pump strainer screen. That brass screen is located inside the fuel pump’s inlet port and can be accessed by removing the brass fitting from the port. Then, remove and clean the screen, if necessary. Otherwise, it’s time for a higher level of service. Refer to the troubleshooting section of the service manual, or have a professional handle it.
The speed of Aqua-Hot’s diesel burner motor depends on having enough voltage to obtain its rated rpm. If the voltage is too low, the burner motor will run slowly and airflow through the chamber will be insufficient to provide clean burning. Check for proper voltage using the leads from a voltmeter at the hot terminal on the controller board (refer to your unit’s owners manual for the hot terminal location). Aqua-Hot requires voltage between 11.5 and 14.0 volts DC. If voltage is low, check for loose or dirty connections in the power supply wiring.

To maintain correct burner motor speed, Aqua-Hot requires voltage between 11.5 volts and 14.0 volts DC when tested at the main control board.
A clean-burning flame requires the proper ratio of air to fuel; the Aqua-Hot diesel burner is no different. The air intake tube attaches to the base of the burner, which includes a baffle that can be rotated to increase or decrease the size of the air intake port. The baffle is held in position by a small Phillips-head locking screw. When fully open, the port is one-half of a circle, or 180 degrees. Aqua-Hot systems generally are preset at the factory to a 90-degree opening, which is the middle of the adjustment. Sometimes this can vary, and you may find a red stripe that marks the initial opening position of the baffle adjusting screw. Opening this farther allows more air; reducing the aperture means less air. A proper adjustment of this opening requires sophisticated exhaust gas sampling equipment, which is covered in the service manual but is beyond the scope of this article. In most cases, this setting is preset, and if left alone, it should be fine.
Properly maintaining an Aqua-Hot heating system will provide many hours of clean-burning operation and maximum heating efficiency with minimal fuel consumption.
More Info
Aqua-Hot Heating Systems Inc.
(800) 685-4298
www.aquahot.com