
A simple DIY adventure can lead to efficient lighting.
By Steve Froese, F276276
February 2024
Many RV owners look for ways to conserve electrical energy, especially if they spend time off-grid. One of the easiest ways to help achieve this is to upgrade the RV’s lighting. LED (light-emitting diode) lights use significantly less energy as compared to incandescent.
In terms of interior light fixtures, there are a few options for upgrading to LEDs. The first option is to replace the entire fixture, while the second is to replace only the bulb(s). In the latter case, it is a simple matter of purchasing the bulb type that matches the original. LED bulbs are manufactured to be a direct replacement for incandescent and share the same bulb type. Most of these replacements can be purchased online or at many RV parts stores by matching the bulb type. LED bulbs may be larger than their incandescent counterparts. This is normally not an issue, but be cautious when replacing bulbs in smaller fixtures, such as décor lights, as the bulb clearance may be very limited.

If replacing fluorescent tubes with LED strips, it is important to bypass the fluorescent light ballast to avoid damaging the LED array.
Fixture replacement is generally a very easy procedure — just be sure the chosen replacement fits the space and that you connect the wires with the correct polarity. LED fixtures are polarized and will not function if wired backward.
When it comes to fluorescent lighting upgrades, an extra step may be required, depending on the chosen upgrade path. If you choose to re-place the entire fluorescent fixture, it is the same process as mentioned above: Find a suitable fixture, wire it in, and install it. I did not have this option, since my RV’s fixtures are recessed. As such, openings were cut in the ceiling to allow for the fixtures to protrude into the attic. I couldn’t source replacement recessed or surface-mount fixtures that would fit, so my only option was to replace the fluorescent tubes with LEDs. This was my preferred option anyway, given the significantly lower price tag. Note that fluorescent tubes, and therefore LED replacements, come in different color temperatures: cool, warm, and daylight. You may choose to match the LED lights with the same temperature as your existing tubes if this happens to be printed on the old tubes.
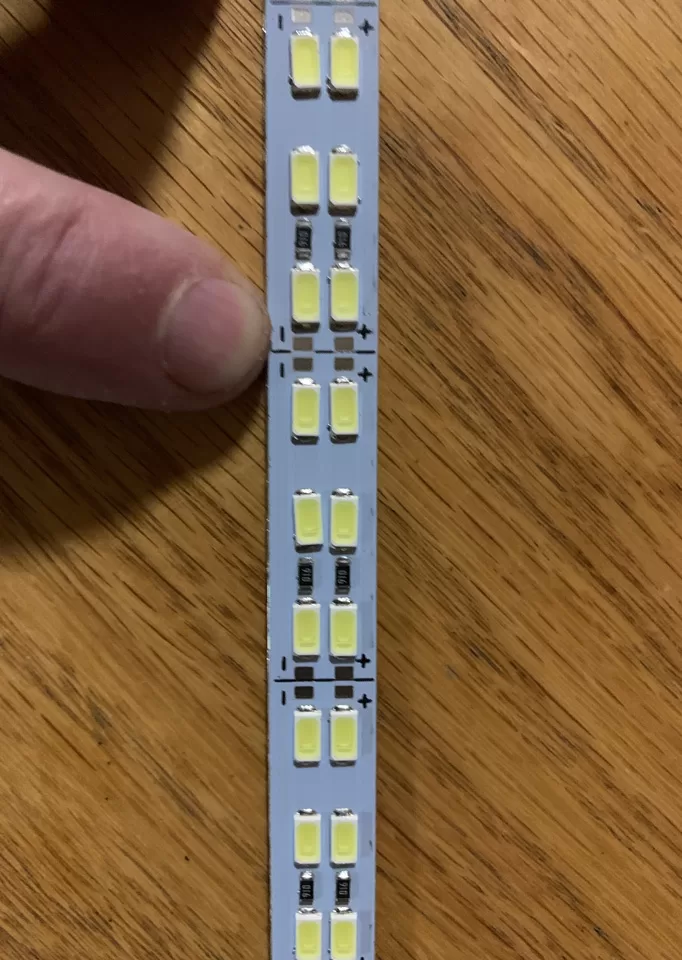
Instead of replacing my 17-inch fluorescent tubes with LEDs, I opted to purchase LED strip lights for the upgrade. These are a great option, since most can be cut to length to fit any fixture size up to the length of the strips. In addition, the LED strip lights I chose have power leads on both ends, which means that if they are cut into two pieces, both ends can be used. They also include adhesive strips on the back so they can be directly applied to the fixture. I would highly recommend this option, as it eliminates the need to source the identical length tube, as well as the possibility of the tubes coming loose.
To install LED strip lighting, simply measure the length of the existing fluorescent tubes and cut the strip lights accordingly. Make sure you cut them to length to fit in the desired fixture space. Note that the strip light must be cut at specific points along the strip. There should be lines at regular intervals marking where it can be cut, and/or it may have “cut here” embossed on the strip.
Another very important step is that the fluorescent ballast must be bypassed to avoid damaging the LED array. Also, if using multiple strip lights in a single fixture, a parallel connection is the preferred wiring method. For instance, a twin-tube fluorescent fixture can be replaced by two LED strip light sections wired in parallel.
To bypass the ballast, first remove the wiring cover running down the middle of the fluorescent fixture. The wiring cover may also be at one end of the fixture. You should find the ballast underneath the cover, which, on a 12-volt fluorescent fixture, is usually a small circuit board with a number of wires leading to it. Two of the wires will be the positive and negative power leads entering the fixture, and the rest will lead to the fluorescent tube sockets. While it may look intimidating, it is quite simple to bypass.
First, locate the power wires entering the fluorescent fixture from the RV. These are likely either red and white or black and white, but they also could be red and black. They are most easily identified as the wires entering the fixture from the ceiling or wall of the RV. If your fixture has a power switch, the positive lead should be easy to identify as the one leading from the switch to the ballast board.
Cut the power leads as close to the ballast board as possible in order to provide the longest possible pigtails for splicing in the LED lights.
Next, stick the cut strip lights onto the fluorescent fixture in the desired locations. Since you want to connect the strips together in parallel, match the colored pigtails together from each strip and crimp them into one end of a butt connector. For example, if the LED strip lights have one black and one white pigtail wire, and you have two strips in the fixture, strip and connect the two white wires together into one end of a butt connector. Then connect the two black wires together into another butt connector. Since LED lights are polarized, it is important to identify positive and negative. LED strips generally will have black as positive and white as negative, but this could vary. Most strip lights will also have a positive (+) and negative (-) symbol embossed on the strip where the wires enter.
Once you have identified positive and negative on the strip lights, do the same with the power wires entering the fluorescent fixture. Strip the wires and insert the positive power wire into the other end of the positive butt connector and the negative wire into the negative butt connector. Crimp the butt connector securely and perform a tug test by pulling on the wires to ensure they do not come out of the connector. If they do, install a new butt connector. Replace the ballast cover to conceal the wiring and connections. There is no need to physically remove the ballast or the fluorescent tube sockets.
Test the fixture by turning on the light. If it doesn’t work, that likely means no power is getting to the strip or you have wired the strip incorrectly. Check your connections and try again.
Once you have completed your LED lighting upgrade, you will find that the RV is consuming much less power, and now you have much longer-lasting lights. Once you reinstall the fluorescent fixture diffuser, you should find that the physical appearance of the LED lights does not differ much from the fluorescent tubes. Another DIY project successfully completed!
Send your troubleshooting questions to Steve Froese at techtalk@fmca.com. The volume of correspondence may preclude personal replies. Not all responses will apply in every instance. Some situations may require a visual inspection and hands-on testing. If you choose to follow any procedures outlined in this column, first satisfy yourself that neither personal nor product safety will be jeopardized. If you feel uncomfortable about a procedure, stop and make an appointment with an RV service facility. You may also want to consult the FMCA Forums (https://community.fmca.com) to see whether your question has already been addressed or, if not, to post it.
Recalls
Looking for the latest RV-related recall information? Visit FMCA.com for a list of the most recent recalls issued by RV and component manufacturers. Or, to search for recalls, investigations, and complaints by vehicle year, make, model, and VIN, visit www.nhtsa.gov/search-safety-issues. NHTSA’s Vehicle Safety Hotline is (888) 327-4236.