
Getting Your Bearings: Part 3
The final installment in a series of articles focusing on trailer bearing repacks and brake inspection and service.
By Steve Froese, F276276
January-February 2026
In the two previous issues of Family RVing magazine, we covered cleaning and inspecting the parts and deciding whether to reinstall or replace the backing plate. We are now at the point where the bearings need to be repacked with grease, the drums replaced on the spindles, and the brakes adjusted.
As mentioned in the previous installment in this series, if you see abnormal or excessive wear to the armature or brake shoe surface of any of the brake drums, they need to be machined or replaced. If you choose to have the part(s) machined, you will need to find a shop that performs this service. Your local auto parts store should be able to assist with shops to contact. However, I recommend replacing the drums and/or backing plate assemblies. These parts are inexpensive, and taking this approach will save you a lot of labor costs and headache.
If you are buying new parts, it’s important to find the right parts that match your axle, so the plates and drums fit. The best way to do this is to make note of the information on the identification label located on the center of the axle. Another reason to purchase new brake drums is that they usually come with the bearings already installed and greased, saving you significant time and effort.
However, if you are cleaning your original parts using a washing tank or bucket of solvent, insert the parts for one wheel at a time into the tank. As previously mentioned, do not mix up the bearings between wheels, or intermingle inner and outer bearings. For most 10-inch and 12-inch drums, the inner bearings are larger than the outer ones.
Wash the bearings and other parts thoroughly in the solvent and be sure to dry them. Compressed air can be used for drying; if you do so, hold the bearings in a clean rag in case the air causes the bearings to fly apart.
Once the bearings are clean and dry, carefully inspect them for damage and/or excessive or uneven wear. Make sure they spin freely and don’t bind. If you have any question about the integrity of the bearings, they should be replaced. When replacing the bearings, be sure to change out the bearing race inside the drum as well.
Once you have inspected the bearings, you need to repack them with grease. This is best achieved using a bearing packer. These are inexpensive, so I recommend adding one to your toolbox. Place the bearing in the packer according to the instructions and operate it until grease oozes out from between the bearing components. Thoroughly pack the bearings and make sure to liberally apply grease to the outside surface so the entire bearing is coated with grease, inside and out.
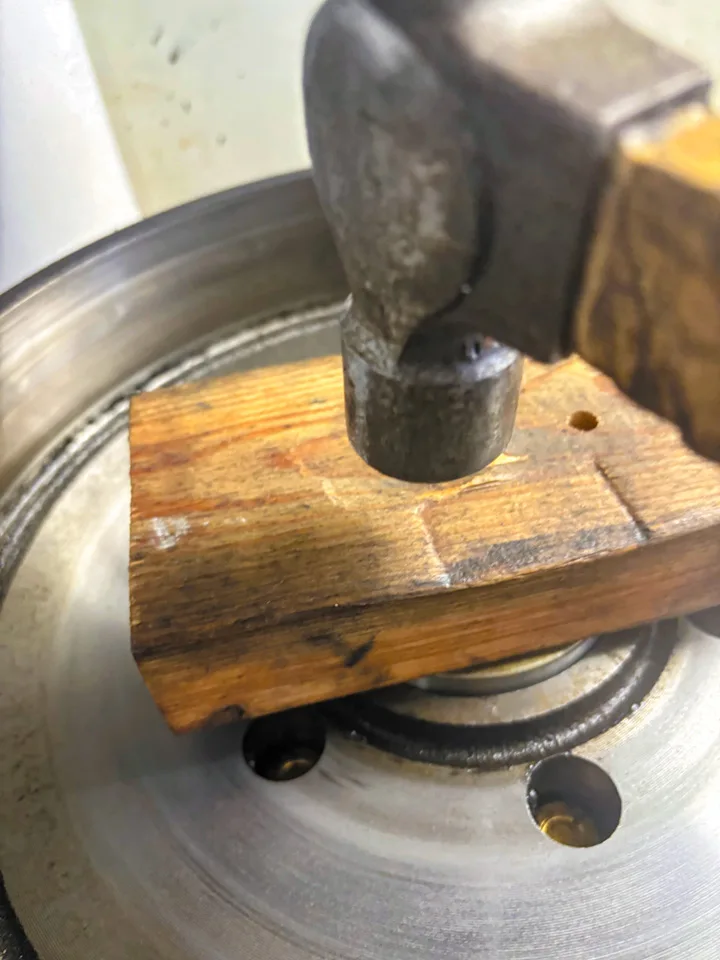
Place the inner bearing with the taper down (smaller diameter surface facing down) against the inner bearing race in the inside spindle hole of the brake drum. Place a new bearing seal on top and use a piece of wood and a mallet to seat the seal until it is completely flush all around with the drum (or use a seal setter if you have one). Be sure to tap directly in the middle or uniformly around the edges so the seal goes on straight. If it starts going on crooked, stop; pull it off; and start again. If you were to continue tapping it on out of line, the bearing may not go all the way down and may become damaged.
If you previously identified an issue with the magnets, brake shoes, or brake hardware, I suggest simply replacing the entire backing plate. Replacing shoes tends to be a frustrating affair, and backing plates are not expensive. In this case, simply cut the brake wires and remove the nuts securing the backing plate to the spindle. Replace the backing plate with a new one (be sure to replace both sides of the axle — never put new brakes on only one side). Install and tighten the new nuts and reconnect the brake wires.
Once the inner bearings are mounted, reinstall the drums on the spindles. Be sure the drums slide easily all the way onto the spindles, so the back of the drum is almost contacting the backing plate. If the drum will not seat all the way back, it is possible the outer bearing was installed in the inner position or an incorrect wheel seal may have been used.
Install the outer bearing, followed by the washer (if originally present) and the nut. The axle nut should be tightened all the way with pliers, just to be sure the drum is fully seated, then backed off and retightened BY HAND ONLY. The spindle nut should never be wrench-tight, as this will result in too much force and friction against the bearings.
Reinstall the spring clip or a new cotter pin. The nut may need to be slightly rotated so the cotter pin or spring clip can be inserted into the hole. With the nut fully hand-tight from the previous step, rotate it counterclockwise to loosen it just enough to get the pin or clip on.
If using a spring clip, be sure it is fully engaged; for a cotter pin, don’t forget to bend the ends completely around the nut. Although these steps may seem simple, it is extremely important to follow them to avoid having your wheel fly off.
At this time, you can reinstall the hub dust caps. With the drums reinstalled, it is time to check and adjust the brakes.
Assuming you have good battery voltage on the trailer, pull the emergency breakaway pin. Spin each drum to make sure it completely locks up within a quarter rotation. If not, you will need to troubleshoot the issue. If all the wheels are affected, it’s likely you have a dead battery or faulty breakaway switch. If only some of the wheels are affected, the problem could be a bad magnet or faulty wiring. This troubleshooting is out of scope for this article.
Reinsert the breakaway pin and make sure the wheels spin freely again. Safely crawl under the unit so you can access the rear of the backing plates. At the bottom of the plate, there will be one or two dust covers covering oval slots. In some instances, the covers may be missing. Shine a flashlight into the hole(s) to identify where the star wheel is located. The star wheel is a small gear that’s used to adjust the braking. Spin the drum in the forward travel direction while using your brake adjusting spoon to move the star wheel up (lever the brake spoon downward). Lever the star wheel until the brake drum just barely rotates without locking up. If you have auto-adjusting brakes (as evidenced by the presence of a cable running across the backing plate), you can use a screwdriver to hold the auto-adjusting plate out of the way while you adjust the star wheel.
Once you have adjusted all the brakes and checked for proper brake operation at all positions, reinstall the wheels and loosely torque the lug nuts. Drop the trailer, remove the jack stands, and torque the lug nuts to 100-120 foot-pounds.
Once your tow vehicle is connected, you may have to readjust the brake controller for proper handling.
I hope this series of articles will provide members of Family RV Association who tow trailers valuable information about maintaining the bearings and brakes on your RV.