
KEEPING ON THE SUNNY SIDE: PART 2
Get the most out of your battery power while off the grid.
By Steve Froese, F276276
September/October 2026
In the previous issue of Family RVing magazine, I began this series to describe an RV upgrade that was requested by a customer at the company I work for to support significant off-grid living (July/August 2026, page 12). In that article, I discussed the addition of an inverter/charger. This time I am going to talk about the lithiumion (Li-ion) battery upgrade.
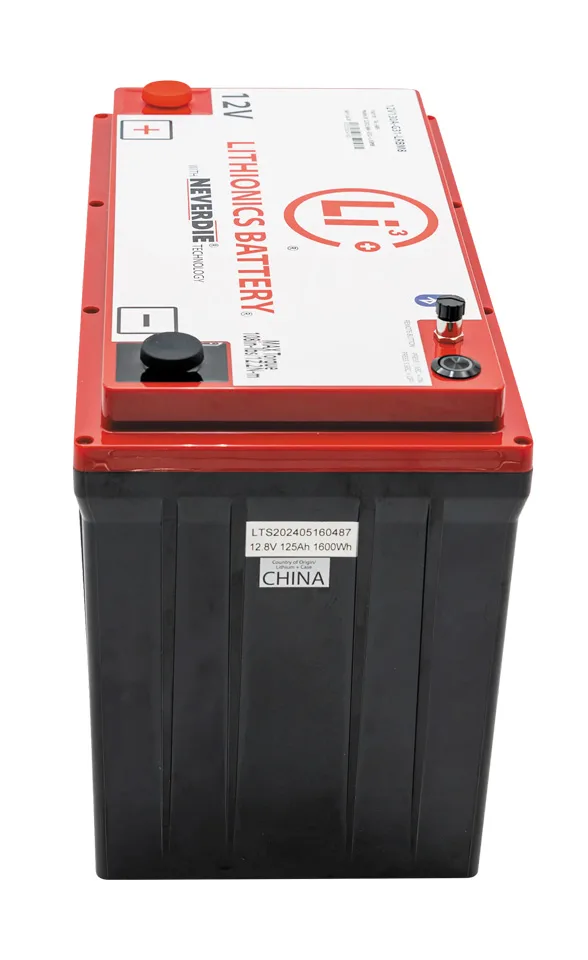
The customer requested 400 amp-hours (Ah) of battery capacity. When the upgrade was first presented to me, I assumed this would include a single 400 Ah battery, or perhaps twin 200 Ah batteries. However, the work order indicated a configuration consisting of four 100 Ah batteries, which I thought was odd, until I surveyed the battery location.
The RV being upgraded was a Class C motorhome. The original house batteries resided under the entry step — the same location the service adviser suggested installing the Li-ion batteries. One advantage of Li-ion batteries is they can be placed anywhere. Unlike sealed lead-acid (SLA) batteries, they do not release gas when being charged, so they don’t need to be vented or even isolated from the RV living area. If you read my last article, you might remember that I installed the inverter/charger in a large storage compartment. There would have been room for twin 200 Ah batteries, or a single 400 Ah one. This was likely discussed, and I suspect the customer did not want to forfeit additional storage space. Therefore, they opted for four 100 Ah batteries, as they would fit in the same location as the existing batteries.
The process of upgrading from SLA to Li-ion batteries is usually straightforward. However, in this case, given the number of interconnections and accessories directly connected to the batteries, it required a high level of organization and moderate knowledge of electricity, specifically parallel and series circuits.
The first step was to remove the existing batteries. Whenever you replace your batteries, regardless of the RV type, be sure to mark each wire as you remove it from the terminals, including which battery it came from. This RV originally contained two 6-volt batteries supplying the house system, generator, charge line, and a solar panel. So, there were several wires to remove, including the jumper wire connecting the batteries. I labeled each wire as I removed it and then tucked it out of the way to make space for the batteries to be lifted out of the box. Bear in mind, regarding the battery interconnections, this job involved converting from a series to a parallel circuit, adding some complexity. Again, knowledge of parallel versus series versus series/parallel is fundamentally important.
Lithium-ion batteries come in a variety of sizes and shapes. While these batteries are smaller than their SLA and absorbent glass mat (AGM) counterparts when based on amp-hour ratings, it is important to know the size of the Li-ion batteries you want to use to ensure they fit in the required space.
Another benefit of Li-ion batteries is that they are light, about half the weight of comparable SLA batteries. And Li-ion batteries can be repeatedly cycled down to between 0 percent to 10 percent state of charge (SOC) with no performance degradation, depending on the manufacturer. Sealed lead acid batteries can only be safely discharged to 50 percent SOC without significant degradation of performance. This means that compared to SLA batteries, Li-ion batteries provide double the amp-hour capacity. In other words, a 100 Ah Li-ion battery provides the same power capacity as a 200 Ah SLA battery.
This is one reason RV owners often replace 225 Ah, 6-volt battery pairs (as an example) with a 100 Ah Li-ion battery, resulting in basically the same usable amp-hour rating. It also means that per amp-hour, a Li-ion battery can be up to one quarter the mass of an SLA battery.
The previous example assumes equivalent amp-hour comparison. Many people use the size comparison between SLA and Li-ion batteries to increase their total amp-hour capacity. This is the case here. The original battery configuration in this RV was two 6-volt batteries, for a total of 225 Ah. In addition, the Li-ion batteries were much lighter, at about half the physical weight of the original batteries. The original batteries offered a total usable capacity of about 110 Ah, whereas the Li-ion batteries provide a full 400 Ah, almost four times more capacity.
The challenge, and disadvantage, of using multiple batteries rather than a single one (four 100 Ah batteries compared to a single 400 Ah battery) is that they must be interconnected. I won’t get into the details, but the batteries had to be connected in parallel to create the 400 Ah capacity. This required two battery cables be connected to each battery, one on the positive terminal and one on the negative. The battery manufacturer also provided a communication interface between the batteries to equalize charging and discharging, among other functions, adding four more communication wires between the batteries. This resulted in a fair number of cables being strung throughout the battery compartment before the wiring into the RV even began.
Lithium-ion batteries, like any other automotive batteries, need to be secured to the battery compartment, which I did prior to attaching any cables. This proved to be a challenge, since the batteries at the back of the compartment were difficult to access. In your application, the installation location and batteries themselves will dictate how you secure them.
Once the batteries were installed and connected, I was able to complete the interconnections. Referring to the labeling I had previously done, I connected each wire as per the label. It is recommended that each wire pair be connected to the positive and negative terminals of the first and last battery in the bank. Basically, you should connect the negative battery cable from the inverter to the negative terminal of the first battery in the bank, and the positive battery cable leading to the inverter to the positive terminal of the last battery in the bank. This ensures even current flow between all batteries.
In this example, there were many battery connections to make other than the interconnections. I had to consider the inverter, two solar controllers, the generator, and the alternator charge line. I could not connect each component to the
first and last batteries in the bank, as this would have resulted in too many wires sharing single terminals. In this case, I connected each wire pair across more than one battery so there were no loads connected across a single battery.
The most important part of this installation was to label each wire. While many wires are color coded, some are not. For instance, many chassis battery wires are black, and you might be fortunate to have red tape or shrink tubing at the battery lug end of the cable for positive connections, but not always. I can’t emphasize enough the importance of labeling every wire that is connected to the batteries. This is the main way to make a future battery replacement or upgrade more manageable. It is important to note that a single mistake in battery connections could be damaging at best and dangerous at worst. Connecting a negative wire to a positive battery terminal, or vice versa, could lead to equipment damage or a battery explosion.
It is also important to be aware of the difference between series, parallel, and series-parallel battery connections when making the battery jumper interconnects. The two main outcomes that occur when this is done incorrectly are connecting 6-volt batteries in parallel (resulting in 6 volts of total output) or connecting 12-volt batteries in series (resulting in a 24-volts of total output). So, make sure to connect each battery cable correctly, including the interconnects. As with this install, your new battery interconnect may be different than the original. This would be the case when changing from 6-volt batteries to 12-volt batteries, or if you are installing more than one bank of 6-volt batteries, which would require a series-parallel connection.
In summary, let me underline some of the major advantages of Li-ion batteries versus SLA batteries.
Orientation: Li-ion batteries do not contain liquid, so they can be installed in any orientation — horizontally, vertically, or even upside down.
Location: Li-ion batteries can be installed anywhere, even in RV living areas, without fear of emitting toxic gases.
Weight: Li-ion batteries are generally about half the weight of SLA batteries, and about one-quarter the weight when amp-hour comparison is considered.
Discharge capacity: Li-ion batteries can be discharged to between 0 percent and 10 percent state of charge consistently without damage or degradation. This is compared to a safe discharge rate of 50 percent for SLA batteries.
Cost and long-term value: Many consumers balk at Li-ion batteries because of the upfront costs. However, one must consider their long-term cost, which is significantly lower compared to SLA batteries. On average, SLA batteries last between 300 and 500 cycles, which is 2 to 4 years under normal use (admittedly a generalization). Li-ion batteries can last significantly longer, providing more than 2,000 cycles and a life up to 20 years. Li-ion batteries often outlast the RV in which they are originally installed.
When considering Li-ion batteries, don’t be put off by the initial cost. They are a great investment, especially if you plan to spend significant time camping off the grid.
If you plan to install Li-ion batteries, it is highly recommended to upgrade your alternator charge line and converter as well, and to set the parameters on any inverter/chargers and solar controllers. Doing so will protect your vehicle alternator and optimize battery charging. This is often overlooked by parts and service staff when advising about Li-ion battery upgrades, because of their lack of understanding. I will discuss this further in the next article when I detail the DC/DC charger upgrade.
RECALLS
Looking for the latest RV-related recall information? Visit FamilyRVingmag.com for a list of the most recent recalls issued by RV and component manufacturers. Or, to search for recalls, investigations, and complaints by vehicle year, make, model, and VIN, visit nhtsa.gov/recalls. NHTSA’s Vehicle Safety Hotline is (888) 327-4236.
SEND YOUR TROUBLESHOOTING QUESTIONS to Steve Froese at techtalk@frva.com. The volume of correspondence may preclude personal replies. Not all responses will apply in every instance. Some situations may require a visual inspection and hands-on testing. If you choose to follow any procedures outlined in this column, first satisfy yourself that neither personal nor product safety will be jeopardized. If you feel uncomfortable about a procedure, stop and make an appointment with an RV service facility.